2011-04-25

Setting up a Home DSL Network / Router

Howto: Configure a Linksys Router

Note: This article describes how to setup a typical home network using a DSL Modem and a now obsolete  Linksys Router WRT110.

See these articles for newer Linksys Routers:
Linksys EA2700 - First Time Router Setup for Home Networks
Router Setup Steps - 5Ghz

Original Article:

These same instructions can be used to "re-program"/re-configure a Linksys router that is malfunctioning or if the password was lost and the router needs to be re-set. You will notice I do not use the vendor's Installation CD.

In this type of network, a phone-line runs from the wall to the DSL Modem and a Cat-5 network cable connects the DSL Modem to the internal (Linksys) router. All wired and wireless workstations connect to the Linksys.

Related Articles:
If you have intermittent network failures, consider this article:
Windows 7 and Vista Network Problems (IPV6)
Router Testing Steps


Basic Wiring:
Skip this section if the wiring is already in place.

A. On all phones, caller-id boxes, fax machines, answering machines, satellite receivers, etc., install a DSL noise filter that came with the Modem. Do *not* install a filter on the line that runs to the DSL modem.
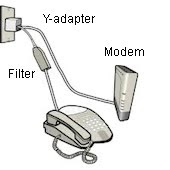
If a phone and the DSL-line need to share the same wall jack, either plug the phone into the RJ11-phone jack on the back of the DSL Modem (and a filter is not required) or purchase a standard RJ11 Y-Adapter and wire as illustrated on the left.

B. Run a standard phone-line cable from the wall-plate to the DSL Modem, plugging into the "DSL-Line-In", illustrated with the grey cable, above.

C. From the DSL modem, run a standard Cat-5 network cable (usually comes with the Modem) from the Ethernet (network) port to the router. This is illustrated above, in yellow. From the backside, the wiring looks like this:
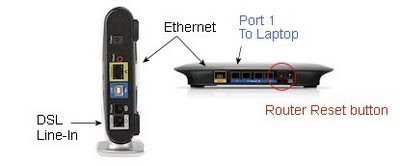
C. Finally, run a standard Cat-5 network cable from the Router's Port #1 to your desktop or laptop's Ethernet port. Even if you intend to use a wireless laptop, temporarily use a wired connection during the configuration steps because it is easier. Ideally, you would have two network cables -- one for the Modem-to-Router and a second for the Router-to-your-PC. But if you have only one, 'borrow' the Modem-to-Router cable for the configuration steps.


Configure the Linksys Router

Follow these steps to configure the linksys router. You will be changing from the factory-settings to slightly different settings for security and configuration reasons. Warning: If you have a functioning network, these instructions will re-set the network and you may need to re-visit existing workstations to get them re-connected.

1. Reset the router.

With the router powered on, use a pencil and press-and-hold the reset button (illustrated in Red, above. This is a recessed micro-switch button; feel the "click" when pressed). Hold the button for 5+ seconds, then release.

This sets the router to factory defaults and makes the the (Linksys) router's internal IP address:
192.168.1.1

(Other brand routers may use different default addresses)

2. Reboot your workstation.

Details: With your computer plugged into Port#1 with a Cat-5 cable (illustrated above as the blue cable), reboot your workstation. This will cause it to grab a new "DHCP" IP Address from the router. Technical note: An 'IPConfig / Release /Renew' will not work.

3. Launch a browser window and type this address in the URL line:

192.168.1.1 (This is the router's default address when re-set)

You will be prompted with a login screen. For the first-time (reset) login, use:

user-name: (blank on older models, use 'admin' on newer)
password: "admin"

Note: Subsequent logins will use different credentials and other brands of routers have other login steps -- see the documentation that came with the router for details.
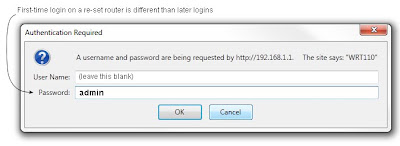
or use "admin / admin" on newer models
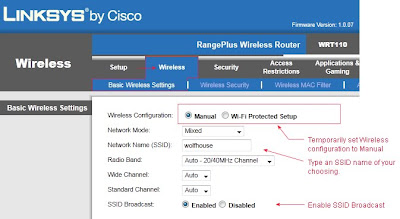
4. On the Linksys menu, click the Wireless tab (illustrated below)

a. Choose "Manual" for the Wireless Configuration.

b. Invent an SSID (Broadcast) name for your soon-to-be-built wireless network.

For example, I use "wolfhouse". I noticed another networks in my neighborhood used broadcast names such as "Shut your Damn Dog up" (I do not have a dog).

If the router has an IPV6 section, make identical settings, including the SSID name.

Since this article was written, newer routers have additional settings.
See this Keyliner link:  Router Setup - 5Ghz
Summary:  Name the 5G network as "wolfhouse5G" and the 2.4 side as "wolfhouse24G"
There are other important differences, detailed in that article.

c. Confirm "SSID Broadcast" is enabled.

Note: Why Broadcast SSID?  Some new Windows 7 / 8 features will not work without a broadcast SSID -- and hiding the SSID won't help keep the bad guys off your network.  This can be sniffed in a heartbeat.  If they are good enough to break the encryption, they have the SSID and your Mac addresses already.  Quit wasting your time.

d. Click Save and wait approximately 30 seconds for the screen to return.

e. Return to this same screen and set Wireless Configuration back to "Wi-fi Protected Setup" (this is important).

f. Click Save again (and wait).
Discussion:
Set the configuration to Manual so you can code an SSID name that is meaningful to you -- this way you do not get a system-generated name. Additionally, allow SSID to broadcast because Windows Vista and 7 require this to work properly. In the past, many people blocked the SSID broadcast in order to hide their network. With today's sniffers, there is little security benefits in doing this and I no longer recommend hiding the SSID. But you must set Wi-Fi back to protected mode for encryption. Don't forget to Save before moving to the next screen.

5. Click the top-tab "Wireless - Wireless Security"

Set Security Mode: "WPA2 Personal"
Set Encryption: "TKIP or AES"  (Newer models do not prompt for this field)
Type a pass-phrase (password)
Click SAVE and wait until the screen returns
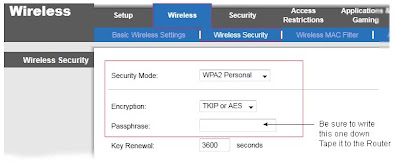
Discussion:
You really, really want encryption on your network.
The passphrase is the keyword other computers will use to gain access to your wireless network. Write the passphrase down so you don't forget it.

Note: The passphrase is not the same as the router's administration password.

6. Click the Administration tab.
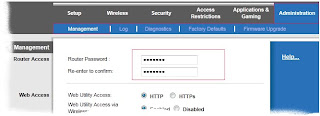

a. Change the Router's administrative password, typing a password of your choosing. This can be the same as the passphrase or different. (Do not leave it at the default "admin")

b. Click SAVE

c. You will be prompted to login again.

This time, the login is different: Use a user-ID of "admin":
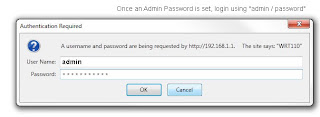
Tape the password to the bottom of the router or document it in another location you won't loose. You must have this password in order to logon to the router and make configuration changes. Without this information, you will have to re-set the router and re-configure all of your wireless devices.

7. Basic IP Address Setup

In the Setup, Basic Setup tab, make these changes:

a. Internet Connection Type: Automatic Configuration - DHCP
b. Host Name: Any name of your choosing; I use the SSID name

c. Set the IP Address: 192.168.200.1
d. Subnet mask: 255.255.255.0

e. DHCP Server: Enabled
f. Start Address: 192.168.200.100
g. Maximum number of users: 50
h. Client Lease time; change from zero to 1440 minutes
i. Set your time-zone

j. Click Save! (Scroll down to see button)

k. Important: When the screen returns, close the browser window and *reboot* the computer.
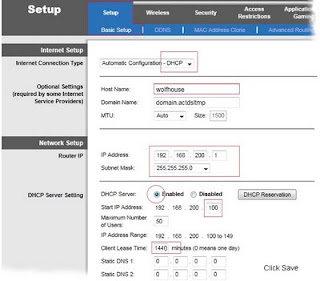

Discussion:
I like giving the router a different default address than a typical factory setting (e.g. 192.168.200.1). In the end, the network will look like this, where the workstations pickup variable DHCP network addresses, starting at 200.100:
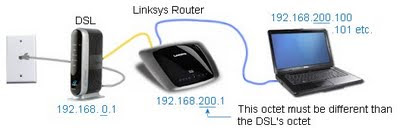
Note: The DSL Modem's address (192.168.0.1) has not been configured or discussed in this article.

This completes the Linksys Router's setup.

Consider backing up the router's configuration by clicking the Linksys Menu: Administration, Management, "Backup Configuration" (near the bottom of the screen). Save the config.bin file to your local C: drive.

When powering on the network, it is best to boot (power on) the DSL modem first. Wait a minute, then boot (power on) the Router. This gives the DSL modem time to establish its IP address so it can send it down the line.

Workstation Setup

Connect all wired connections per normal and reboot the workstation. When windows prompts for the network connection, choose "Home" and let it connect. Details on this step are not documented here.

Once connected, browse the Internet. If all is well, you are done. Otherwise, see the testing steps, below.

TESTING:
If the network is still failing, see this article for recommended testing steps.
Router Testing Steps


Related articles:
Linksys EA2700 - First Time Router Setup for Home Networks 
Router Setup Steps - 5Ghz
Router Testing Steps
How to upgrade Linksys BIOS
Windows 7 and Vista Network Problems (IPV6)

Router Testing Steps

Howto: Router Testing Steps.

This is a sister article to "Setting up a Home Network DSL/Router" and it discusses basic network trouble-shooting and diagnostic techniques.

This article can help you determine which component on has failed and it assumes a network wired in this fashion, with these example IP Addresses.  Your addresses may be different:

If your home network intermittently "crashes" (especially when a laptop is booted and first logs in), see this very interesting article: Windows 7 and Vista Network Problems (IPV6)
Ideally, you would have recorded your previous network configuration by simply making a drawing like the illustration above -- but most people do not bother and this makes diagnostics more difficult.


Assuming you have previously configured your DSL Modem and Router, but you are still having connection problems. Consider these tests. You will need to test both the Linksys Router and the DSL modem.  Similar steps work for Cable and non-Linksys routers.


Confirm the Workstation

1. From any workstation, open a DOS Prompt by clicking Start, All Programs, Accessories, "Command Prompt"

or optionally, Start, Run, "cmd" (enter) See this article: Exposing the Run command.


2. Confirm the current workstation has an IP Address with this DOS command:

ipconfig

Look for an IPV4 address similar to: 192.168.200.100 (or 101, etc.).
This is an address from the Linksys router's DHCP pool.


3.  If IPConfig reports no IP Address (0.0.0.0 -- Address not found):

Confirm the network cable is plugged in or if a wireless, confirm the wireless card is active.  If you have a laptop, it is easiest to test the network with a wired Cat-5 network cable.  Plug it into the laptop and then into the router; reboot and test the ipconfig again. 

If other workstations are on the network, do the same IPConfig test to see if they respond with a valid IP Address.  If they have an address, the problem is with the workstation's network card, wiring or local software.

If IPConfig responds with a wrong address: 192.168.1.2 address when another address, such as 200.100, 101 was expected, then then the router has lost its configuration. Follow the steps in the configuration/setup article to re-program it (or restore your backup configuration).  See this link:  Setting up a Home Network DSL/Router


4. Bypass the Router for this test:

(This test only works with a wired connection and for this reason, I keep a short Cat-5 Network cable handy.) 

If no IP Addresses can be found on your machine, or any other machine, unplug the network cable that leads from your PC to the Linksys/router and connect it directly into the DSL or Cable Modem (bypassing the Linksys).  With a direct connection to the Modem, reboot the computer and check your IP Address again; it will be different than 192.168.1.100.  If you do have an address, something is wrong with the router; it may need to be re-programmed, rebooted, etc.


If the direct-connection to the DSL or Cable Modem returns an IP Address, but the PC cannot browse the Internet, the problem is likely with the DSL/Cable Modem or with your ISP (assuming you trust the local PC's hardware and setup).  Start looking at the blinky lights on the DSL/Modem.  Consider calling your ISP and asking them to test the circuit (DSL).  Leave the network in this state while working with the ISP, this way they can't blame your internal router.

If the direct-connection to the Modem does not return an IP Address (ipconfig), log-into the DSL/Modem and confirm DHCP is enabled.  Confirm the local workstation is set to use DHCP (not detailed here.)  Both of these ideas are not likely to happen as almost all equipment is set to use DHCP.


Testing the Linksys Router


Return the router to the network (wiring from Walljack to DSL/Cable Modem, to Router, to Workstation) and continue with these tests.

Reboot all workstations on the internal network.  Assuming an IP Address is present on your workstation, consider Pinging other devices on the network.  You can "ping" other workstations, network printers or the router itself.  If any of these devices respond to the ping-test (below), your workstation and the router are configured correctly.  Here are the details for the ping tests:

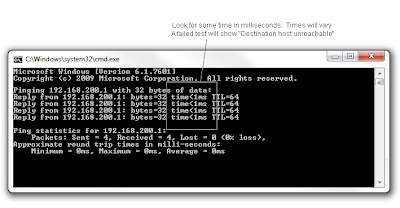
1.  Assuming your workstation has a valid IP address:  At the DOS prompt, 'ping' the router with a "dot.1" address.  This address can vary, depending on how your network was built, but for most, use this address -- taking your workstation's returned IP Address and change the last octet to "1".  Thus, if your workstation was given an IP Address of 192.168.200.1, ping 192.168.200.1:

ping 192.168.200.1

Decision:
If this test succeeds "time<1ms", then the Router is probably working correctly.
Continue with the DSL Modem test.

If this test fails "Destination host unreachable", check these possibilities:

a. Reboot the router by unplugging the power cable; wait 10 seconds, then plug back in.
After a minute, reboot your workstation and re-test with an IPConfig and Ping test.

b. If the Ping test still fails. Confirm the network cables are plugged in to your workstation and the router. If wireless, confirm the wireless card is active (Control Panel, Manage)

c. For wireless devices, switch to a wired connection and test again.  If the wired connection succeeds, but the wireless fails, this is probably a software issue - either in the router or your workstation. More details on this, below.


Test the DSL Modem:

2. Test the DSL/Cable Modem.

If the workstation gets a valid IP Address (192.168.200.100,  101, etc.) and the Router Ping tests succeed, but you still cannot connect to the Internet, test the DSL Modem.

This assumes these addresses; your equipment may be different:
Workstation:  192.168.200.101  (or 192.168.100.101)
Router: 192.168.200.1 (or 192.168.100.1)
DSL/Modem: 192.168.0.1


ping 192.168.0.1 (Pinging the DSL/Cable Modem)

If the ping answers, suspect a problem with your workstation's firewall or virus protection software.

3. If 'ping 192.168.0.1' fails, do this test, if you did not already test this from above:

a. Plug your workstation (wired only) directly into the Ethernet port of the DSL Modem and reboot to get a new IPAddress range. (Temporarily unplugging the illustrated yellow connection between the Modem and the router.)

b. Do an "IPConfig"; expect an address similar to 192.168.0.2

c. Ping www.google.com (most web addresses will not respond to a ping, but google does). If google responds in 60 to 400ms, then the DSL modem is functioning properly and the problem is within your local network - it could be harware or software.


If you can ping google (while connected directly to the DSL) but cannot browse, suspect a software problem with the browser, firewall, virus software.

If you re-connect back to the Router (reboot to get a new IP Address) and you still can't browse, suspect a problem with the router. Perhaps the router has physically failed?

4.  Can't PING Google while directly connected

If you can't Ping google, suspect a problem with the ISP/phone company. Call your DSL provider and ask them to check the line.  It could be a problem with the hardware itself.  If this device fails, it can be difficult to debug. The DSL/Cable modem may have "reset" itself to a new, default IP address.  Your workstation's IPConfig test should give you a hint on where to test (ping .1)

Consider resetting the DSL/Cable Modem to factory defaults.  Follow the DSL/Cable Modem's instructions or see my previous article for steps.


Related articles:
Setting up a Home Network DSL/Router
How to upgrade Linksys BIOS
Windows 7 and Vista Network Problems (IPV6)
2011-04-18

Adding MP3 Folder to WMP12

How to: Add a folder containing MP3 files to Windows Media Player 12 (Windows 7)

Contents:
  • Adding a pre-existing MP3 Folder to WMP
  • Finding the WMP music library
  • Changing the default directory for My Music files

WMP 12 (Windows 7, Vista), is lame in how it imports a directory of MP3 files. Contrast this with importing a CD: Insert the CD and click "Rip" -- the CD is added to your library. But if you happen to have a folder of pre-ripped files, adding them to the library involves trickery. Windows XP (WMP 11) has a slightly different procedure to follow.

These instructions are for Windows Media Player 12 (Windows 7):

Update: 2012.02:  WMP version 12.0.7601.17514 appears to have fixed a problem when a new folder (a music album) is pasted into your main music library (e.g. C:\data\Music); it now appears to read and catalog the album properly, without resorting to this article.  If a pasted folder does not catalog, use these steps.

1. Expose the Windows Media Play "File Menu"

Use this to determine where your music files are normally stored.

a. Launch WMP
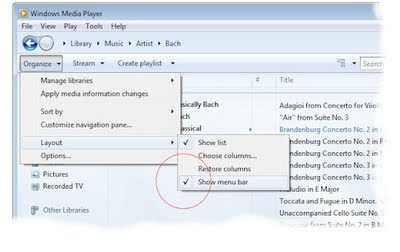
b. Type Ctrl-M to expose the File Menu (or click Organize, Layout, Show Menu Bar)

2. Determine where the Music Library is stored

For most, the library is stored here:
C:\Users\[Your login name]\Music

However, it could (and should be) moved to a different location. To confirm the exact location:

a. Select top-menu: Tools, Options, [Rip Music] tab
b. Note the "Rip music to this location"

On my system, I store all music in C:\Data\Music (see below for reasons).


3. Using Windows Explorer, Copy the MP3 files to a dedicated folder, one per Album

Get ready to copy the MP3 files to a sub-directory within the Music Library. While this is not strictly required, it makes for a good structure and makes the music easier to backup.

Using Windows explorer, build the folder within your existing music library.
For example,
C:\Users\(your name)\My Music\(new folder-album name)\*.MP3

4. "Import" the new files:

Follow this step for WMP12. See step 4b if using WMP11 (XP)

In WMP, select top-menu: File, Manage Libraries, "Music"

In the Music Library Locations window, click "Add"
Browse to the newly created folder.
"Add" each folder/album as a separate item.

(If you have many folders/albums, you can create a top-level folder to hold the sub-folders and only add the top-level; the program will automatically navigate the sub-folders, however, I recommend dedicating a folder to each album. You'll appreciate this later, when you try to locate an album. Admittedly, it is odd to add a subfolder to an existing directory, but this is the trick to making this work - it is convoluted.)

4b. Windows XP, using WMP11, have an easier procedure. Copy the album to a subfolder, as described above. then click "File, Add To Library". Note the default music folder (C:\Users\...\My music or C:\data\music). Click OK. WMP11 searches the entire folder for new content and the new album(s) are added and you can skip the remainder of this article.

5. Click OK when done.

WMP will 'detect' the new files and adds them to the WMP library. The album will be added under "Unknown."


6. Cleanup the Music Library location list

Once the MP3's are imported, return to the WMP top-Menu: File, "Manage Libraries, Music" menu and *delete* the newly-added locations. This way, WMP does not have to constantly monitor those directories for new music. Deleting the Library location does not affect the underlying files or the import.

One would hope future versions of WMP would have a simple "Import Folder" menu.


7. Edit/Tag the newly-added album

Return to the main WMP screen
On the left side, click "Music, Artists".
Scroll to the end of the list, locating the "unknown" albums.
Double-click the Album cover.

"other-mouse-click" the album's details, manually editing the title, artist, and genre. Optionally, edit the track-list. Be sure to double-click the album before attempting to edit.


Optional Discussion
Where to Save the WMP music library

By default, Microsoft saves the music (and other data) in a relatively fragile location, called your user-profile: For Windows 7,
C:\Users\(your user name)

If your profile ever becomes corrupted, you may have troubles retrieving the data -- this is especially true in a corporate environment with 'roaming profiles.'

You may have noticed if you log into the workstation using a second User-ID, the entire Music library is invisible. This is part of the security and profiles. If you don't care about this, especially on a home computer, store the music in a less-fragile location.

Consider these recommended steps:

A.
It is wise to backup your music files periodically. They are expensive to build and painful to loose.

B. Using Windows Explorer, create these directories:

  • C:\Data
  • C:\Data\Music

C. Using Windows Explorer, Move all files from 'C:\Users\(your name)\My Music'
to 'C:\Data\Music'

D. Launch WMP.

In WMP's top-menu, Tools, "Options"
Select the [Rip Music] tab
Change the 'Rip Music to this location' to the new directory "C:\data\music"
Click OK.

E. In the
File, Manage Libraries, "Music",

add this directory: 'C:\data\Music'
Remove all other folders from the list

Related Articles:
WMP 12 Burned CD's Do Not work in Car Stereo

Your comments on this are welcome.