These instructions work with all versions of WordPerfect for Windows and was written using WP X5 and still work in the same in version 2021. For best results, follow these steps, in this order.
Contents:
- Fixing White-Space Behaviors
- Setting a Default Font
- Setting default Tab Settings on Ruler Bar
- Margin Releases
- Paragraph Widows and Orphans
- Reveal Codes
- Draft View
- Fancy Page Numbering
- Headers
- Cover Page
- Suppressing Page Numbers / Footers
- Reset Page Number to 1
- First Page / Duplexed First Page (Odd)
2025.09 Update: If you need to write Term Papers or a thesis, this article has been expanded into a whole new book. Search Amazon for: "Term Papers with WordPerfect".
"Term Papers with WordPerfect" does not have the chapter or style-complexities described in a sister publication: "Adventures with WordPerfect -- Writing books with WP".
The original article continues here:
Make these one-time recommended changes to WordPerfect's preferences. This makes editing all future documents easier. If you have already made these changes, skip to the Starting a New Paper section.
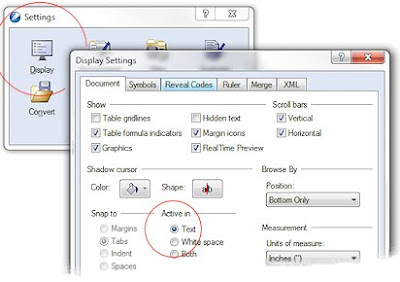
A. Set the Cursor "Active in text"
This keeps mouse-clicks from inserting tabs in the middle of the document. I have no earthly idea why WP would default the setting the way they did. By turning this off, the word processor will behave more naturally.
- In Tools, Settings, Display
- Select the first tab, [Documents]
- Mark "Active in Text"
- Click OK and close the preference screens

B. Set a Default Font:
- From a blank document, select Format, Font.
- Choose Times New Roman (a True Type font)
- Size 11 or 12 (11 looks more professional)
- On the same Font menu, click the bottom "Settings" button.
- Choose "Set face and point size as a default for all documents"
- Click OK
Following the standards set by nearly all printed magazines and newspapers, printed material should be a serif-font (Times New Roman) while online material is typically a sans-serif font (Arial).
C. Set optional default tabs:
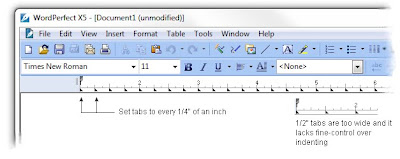
Set a default tab (ruler-bar) for this and all new documents. By default, tab stops are every 1/2 inch -- which is too wide. Set the tab-settings every 1/4" inch. This also sets a Margin Release. Even if you like tab-settings at 1/2", you should still set the negative -.50 margin release.

Setting Tabs:
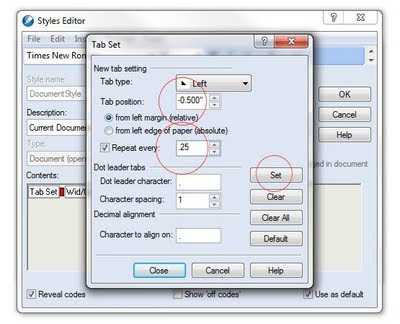
- Format, Styles: Choose "DocumentStyles"
- Click Edit to open the "Style Editor"
- Important: Confirm "[x] Use as default" is checked in the lower-right corner
- Click the mouse in the "Contents" section
- Click Format, Line, TabSet
- Confirm Tab Type = Left
- Change Tab Position to -0.5 (negative point 5)
- Click box [x] Repeat every .25 (point 25)
- Click "Set"
- Click Close, returning to the Styles Editor. Ok.

Margin Release Example:
Notice how tab stops are set 1/2" to the left of the Left margin (-.5) -- this is called a "Margin Release." Often, in a paper, a Hanging Header is needed. With this setting, you can quickly type a bolded title that "sticks out past the margin" without having to fiddle with the ruler-bar or with margins.
To use a Margin Release:
- At the beginning of a paragraph, press Shift-Tab to hang the heading. Press Shift-Tab a second time to jump one more stop to the left.
D. Set Widow and Orphans
(This keeps the first and last line of a paragraph from 'orphaning" at the bottom of a page-break -- it always forces at least two lines before a page-break. No more chasing text that happens to live at the bottom of a page.)
Still in the Styles Editor, select Format, "Keep Text Together"
[x] Prevent first and last lines of paragraphs from being separated across pages" (check)
Click Ok
E. Optionally, set a default Font in the "Default DocumentStyle"
Set the font using the instructions from above. You will note it appears in the default Document Style. From this screen, you can insert any codes (settings) you need in all future (default) documents.
Confirm the settings.
From the main Styles Editor screen, confirm the Tab Set and Wid/Orph are set in the Reveal-codes 'Contents' window (the order does not matter).

- Click "OK" to save
- Click "Yes" when prompted "Apply this style to new documents as they are created."
This completes the default WP preferences.
Starting a new Paper
With the settings above, all new papers begin with a preferred default font, tab settings and Margin-releases. Widows and Orphans are also set. The remaining settings, below, could also be set in the Default/Preferences, but I prefer setting them manually at the document level because papers have different needs. These changes will be "Document" changes (rather than defaults).
When making any Document change, remember WordPerfect makes its changes at the cursor's position, down. In other words, where ever the blinking cursor is, the change takes effect from that point until the end of the document. This is noticeably different (and better) than Microsoft Word -- which makes all of its changes at the "current paragraph".
1. Begin by Exposing Reveal Codes
If you have not already done so, expose WordPerfect's famous Reveal Codes. This makes editing a complicated document easier because you can see all codes, including bolds, underlines, font-changes, footnotes, etc.
Click and drag-up the reveal-codes pane (lower-right corner), as illustrated, exposing a half-inch or so:

2. Set Draft View (recommended)
Although WordPerfect can edit documents in a full "What-You-See is What you Get" mode, it is easier to edit in Draft mode. This way, you don't have to scroll past white-space and Headers, Footers and Footnotes don't get in the way.
- From the top menu, select View, "Draft"
The rest of this document assumes "Draft view"
 3. Set Page Numbering for all Pages
The easy way to set page numbering is with menu - Format, Page, "Numbering". Be sure the cursor is at the top of the document when making this change. This type of page-numbering shows at the bottom center of each page.
If a more complicated page indicator is needed, use a Page Footer.
For example, this footer shows a horizontal line, your name, a page number and the Course title:

When building the footer, the same line of text will have left-justified, centered and right-justified text (try doing this in MS Word...).
To build the footer, create "Footer A":
In summary:

Detailed Footer Steps:
a. Place the cursor at the top of the document. Alternately, place the cursor on the first page where you want the header-and-footers to begin, usually after the cover page. Changes to Headers and Footers take effect on the current page and flow down, through the remainder of the document. However, as you will see below, you can control when the header/footer "activates." I prefer to set all document-level codes at the top of the first page, where they are easier to find.
b. Select menu Insert, Header/Footer.
c. Choose "Footer A", then "Create"
(Because of Draft View, a new document window opens, which obscures the original document. Do not panic -- your document/paper is in the background.)
d. Press Enter (Return) one time. (I like a blank line, separating the footer from the text above)
e. Optionally, insert a Horizontal Line by choosing menu: Insert, Line, "Horizontal Line". Note Reveal Codes shows a [Graph Line].
f. Press Enter (Return) after the graphic-line.
g. Type Your name (e.g. J.Smith); this aligns along the left margin.
h. Insert the current Page Number:
- Press "Shift-F7" (Center)
- Select Menu: Format, Page, "Insert Page Number"
- Choose "Page"
- Click "Insert"
Notice how you can center the page-number-text on the same line, even though other text was already typed. Your name stays along the left margin while the new text centers. Once again, this shows how WordPerfect is different than MSWord. Most text controls (Centering) take effect at the cursor position -- they do not apply to the entire line or paragraph. This allows you to make complicated footers using only a few keystrokes.
Alternately, after centering, you could type the word "Page " (space), then "Insert the Page Number," giving a "Page #".
i. Next, type the Class-name with these formatting steps:
Immediately after the [Pg Num Disp] reveal-code (at your current cursor position), press Alt-F7 (Flush Right) and type "Biology 202".
The screen, with Reveal Codes, will look like this:
j. Click the Document's "X" (near the upper-right, illustrated above); this returns you to the original document.
Because you are in Draft Mode, the footers are not visible while typing in the main paper. They can be seen in Print Preview or by switching to Full View mode (not recommended).
Headers with the Paper's Name
Similarly, define a Header at the the top of each page in the paper. For example, here is the paper's name, justified to the right:

a. Confirm the cursor is near the top of the document (the exact position in Reveal Codes is not particularly important. If you have made no other editing changes, the Header will appear next to the previously-built Footer, as seen in Reveal Codes; this is acceptable.)
b. Select top menu:
- Insert, Header/Footer
- Choose Header A
- Create
(Opening a new editing window, obscuring the original document).
- Press Alt-F7 (Flush, Right)
- Type your Paper's name; e.g. The Secret Lives of Turtles
- Press Enter one time (I like a blank line below the header)
Click the document's "X" to close this window, returning you to the (blank) document (note: this does not close WordPerfect). Because you are in Draft View, the Header is hidden while you type in the main document.
Cover Page

Up to this point, you have a document defined with a default font, margins, tab-settings, and page-number footers (which will be disabled for the first page in a moment). Follow these steps to write the Paper's Cover Page.
a. Disable the Headers and Footer for this page only.
- Select menu: Format, Page, "Suppress"
- Check "Header A"
- Check "Footer A"
- Click OK
Note: I prefer to define the document's Headers and Footers on the first page of the document and then disable them where not needed. This way, their location is easily remembered and easily found. Alternatively, you could create the Headers and Footers on the first "real" page of the paper and let them "flow down" through the remainder of the document.
b. Press 8 or 9 Returns (Enter), to move the cursor down the page.
c. Press Shift-F7 (Center) and type the document's title "The Secret Lives of Turtles".
d. Highlight the text and change the font by pressing F9.
- Choose "Extra Large"
- Click OK

e. Click the white area after the large text
(note how the editing cursor appears after the closing [ExtLarge] Reveal Code).
Continue building the remaining text of the cover page, pressing Shift-F7 to center each line and press Return to move to a new line. Results will look similar to this:
The Secret Lives of Turtles
Your Name
Biology 202
July, 2011
Your Name
Biology 202
July, 2011
f. Press Ctrl-Enter to insert a Hard Page Break,
moving you to the first "real" page in the paper.
First Page Duplexed
Decision: If the paper is being printed duplex (front-and-back), the first "real" page should begin on an odd-numbered page; not on the back of the cover-page (page-2).
The cheap and sleazy way to accomplish this is to insert a second Hard-Page (ctrl-Enter), moving you to "page-3". Do this now.
- Press Ctrl-Enter (insert a second Hard Page Break)
Alternately: on the first page-break, Menu: Format, Page, "Force Page: Odd"
First Page of Paper
Because of the cover page(s), the first "real" page in the paper starts on physical page-2 /or 3 -- but it should be numbered as page "1".
Resetting the Page Number:
a. With the editing cursor on the last page, select menu: Format, Page, Numbering.
b. Click "Set Value", type "1"

Change the Page-Number layout on Page 1:
Traditionally, page 1 nomenclature should be at the bottom, center of the page, with no other accouterments -- in other words, no fancy footer. Once again, go into the Suppress menu and make this minor change:
a. Menu: Format, Page, Suppress
b. Click only on "Footer B"
c. Check [x] Print Page Number at Bottom Center

Begin Typing your Paper!
This completes the Paper's setup. You can now begin typing the paper. You will find all page numbers behave appropriately, and automatically with professional-looking formatting. After typing a few pages, switch to View, "Page" to see the results -- but I recommend switching back to "Draft" to keep editing.
Links:
keyliner book: Term Papers with WordPerfect
https://www.amazon.com/dp/B0FSYTWSW5
keyliner book: Adventures with WordPerfect - writing books with WordPerfect
https://www.amazon.com/Adventures-WordPerfect-Writing-Books/dp/B0CRZD2QPR
keyliner book: Real World Excel
https://www.amazon.com/Real-World-Excel-Tim-Wolf/dp/B0FRSJP1JV
Related Articles:
Hanging Indents (out-dents)
"Block-Protecting" text - automatically forcing a page-break if an illustration and related text crosses a page-boundary.
WordPerfect X5 - A Quick Review
Your comments are welcome.


This comment has been removed by a blog administrator.
ReplyDelete