DeviceID is a computer-tagging program that shows the machine's current IP Address, device name, user, and network status. In the background, an inventory is written to a local report and optionally to a server, which the helpdesk will appreciate. The program sits unobtrusively in the upper-right corner and periodically checks network conditions.
Network status checks both internal and external IP addresses, confirming the machine can see the Internet. Settings are adjustable and every object on this small panel is double-clickable, giving different reports, different features.
Behind the scenes, DeviceID tracks an inventory of the hardware, free-disk space, OS
settings, recent logins, and other interesting goodies. If the report is allowed to live on a central
server/share, the helpdesk can view
activity, even if the user's machine is offline. Inventory is tracked
through simple ASCII files; no database required.
Free to download and use for all personal, commercial, and governmental use.
* No registration
* No nagware
* No spying
* DeviceID does not call back to the mothership
Features:
Although
this is a long article, and it seems complicated, it really only takes a
minute to set up. The advanced features can be ignored. Although designed for small to medium-sized businesses, the program is
useful on standalone machines. I run this program on my home
network, mainly for IP and network status.
Downloading and Installing:
Here are the fast installation instructions where the program can be run directly from the Downloads directory. It needs a minor installation step.
To install, download the .exe and place in any temp folder on
your hard disk. Double-click the .exe and you are done.
A. Download Link:
From Keyliner's public GDrive, click this link and download to a local temp or download directory. Do not download directly into ProgramFiles.
Download Link: Version 1.30 (New, 2023.10)
File Link: DeviceID.exe - contains standalone .exe.
a5-d6-6b-f7-37-97-30-68-a4-1f-34-17-f6-25-24-c3
SHA-256:
d93b32d976492870ab99559b2378c3e11fc21c3f6295b3e1409eac68d7bd1d50
When downloading, different browsers behave differently.
You will be prompted the file cannot be scanned. Click "Download anyway"
Microsoft Edge:
Prompts "DeviceID.exe" was blocked because it could harm your device (it is an .exe from the Internet).
"Click See More" and allow the download.
With Microsoft Edge, the downloaded file appears in your Downloads directory with a random name, such as "Unconfirmed 780359.crdownloaded" (name varies). Use File Explorer to rename the file to "DeviceID.exe".
B. Mark the program as safe-to-run:
(This step may not be needed if downloaded by Edge and you clicked "More / Download Anyway")
Using File Explorer, right-mouse-click the downloaded (and re-named) .exe
Select "Properties"
Check [x] Unblock. This removes the "mark of the web."
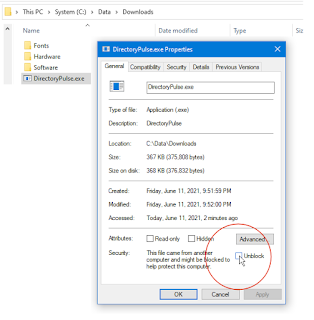 |
Click for larger view
|
* Only do this if you trust
keyliner *and* only if downloaded from keyliner's public GDrive.
If
"Unblock" is not visible, it has already been unlocked (by Microsoft
Edge).
Once [x] Unblocked is clicked, this security menu disappears.
C. For a first-time run, launch with a setup switch
Click "Start" and immediately type the word "Run" (enter). A Windows "Run" dialog opens.
From the Run box, use File Explorer to click and drag the downloaded "deviceID.exe" program into the run box (illustrated below). Append a "/setup" switch and allow the program to run:
DeviceID.exe /setup
Since keyliner cannot afford a signing certificate,
you will be prompted that the file is not safe (being downloaded from
the internet). Click "more information" and allow the program to run.
Choose "[x] Server simulation" -- to just play with default setup values
Click "ok"
This writes two INI control files to the same directory. For the initial test, they can be ignored. Details below.
D. From the same directory, re-launch DeviceID.exe a second time (without the /setup switch)The program should be running and uses a simulation for the workstation inventory files.
See panel in the upper-right corner of the primary monitor.
Details:
/setup builds two .ini files, both stored in the local directory.
The
default settings will run as-is, which is good enough for initial
testing:
C:\downloads\DeviceIDLocal.ini (where the .exe was stored)
C:\downloads\DeviceIDServer.ini
Using Notepad, edit the ini files to see what they are up-to.
The local ini points to the server file and to an optional user-specific 'reminders' file (a calendar). The
Server ini describes shared network resources, messages, etc, and is intended to live on a shared, centralized server. The server file contains global settings, a place to put messages, and other settings.
For a more professional installation:
To install the program 'more properly,' follow these slightly more advanced steps.
Setup1. Server Share Setup
If you are not using a server, select option [x] ServerSimulation and skip the remainder of these steps -- no setup is required. In this mode, the program can only track one workstation's inventory.
Server steps:
a. On a central drive share (typical for a business, but not for a home user), make a
dedicated server folder to hold inventory and other minor configuration files.
For example:
P:\Software\Util\DeviceID\wsConfig //A server share
(use any path - system .ini files live here)
P:\Software\Util\DeviceID\wsInventory
(workstation inventory reports live here)
(It helps to pre-build these directories, but DeviceID will attempt to create them, provided your account has rights.)
b. Set end-user rights:
For P:\Software\Util\DeviceID\wsConfig, give all users to "Read-only" rights to this folder, with rights cascading down.
For P:\Software\Util\DeviceID\wsInventory, grant all users "Modify" rights. Remove rights to build directories. Remove rights to delete.
2. Complete the initial download, described above.
Place the .exe in a temporary working folder (the download folder is fine)
3. From the download directory, temporarily, launch the program using the /setup switch
a. Click Start, type the word "Run". Launch the Windows "Run" app.
b. In the small Run box, use File Explorer and drag "DeviceID.exe" into the box. (Or browse)
c. In the RUN dialog, after the .exe, type {space} /setup
d. Click OK and allow it to run
4. Build Default Settings and Folders
From the Setup panel (which opens after typing /setup):
Browse to a server folder (P:\software\util\DeviceID) where the Inventory and ServerConfig files can roost - this is typically a server share.
Click button "Build ini Files"
From the setup screen:
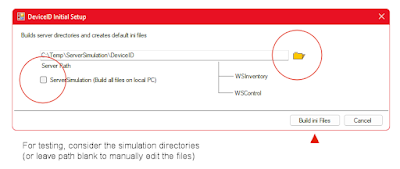 |
Click for larger size
|
Ideally, this folder should be pre-built. If not, DeviceID attempts to create the directories, provided your account has rights. If you don't have rights, it will still record that path in the ini-control files, assuming you will fix the missing path later.
If testing on a stand-alone workstation, or if testing without using a server, check
[ ] SeverSimulation (recommended if you just want to play with the program and not make a commitment -- see C:\Temp\ServerSimulation\DeviceID).
5. Results
New Directories:
a. C:\Users\(you)\prefs\DeviceID for workstation and user-specific data
b. C:\temp\ServerSimulation\DeviceID
c. C:\Temp\ServerSimulation\DeviceID\WSConfig (all users have READ only rights)
d. C:\Temp\ServerSimulation\DeviceID\WSInventory (all users need Create/overwrite rights)
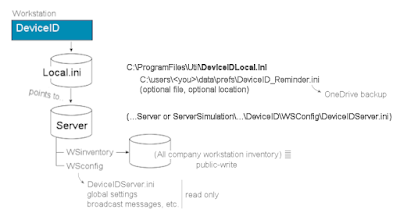
New INI files are built:
File and folder schematic:
 |
Click for larger view
|
DeviceIDLocal.ini
The .INI contains a pointer to the server's config file.
In step5, this file, plus the .exe, will be distributed to the workstation.
Typically place these files in C:\program files\Util -- or location of your choosing.
DeviceIDServer.INI
(This second INI file is a server file. For testing, it can also be in the TEMP\ServerSimulation folder)
The first INI file (DeviceIDLocal) tells the workstation where to find the server's INI file. The server INI file contains all the settings you want the workstations to share. Plus other server-administration settings, such as global messages, etc.
Both INI files are editable with notepad and you are invited to explore.
5. Create a Program folder to hold the program:
Once the ini files are built, position the program and its local .ini file, in on a safe local directory. For example, C:\Program Files\Util.
(End-users are not expected to have rights to edit the INI file and this is why ProgramFiles is a good choice.)
Detailed steps:
a. With File Explorer, open folder C:\Program Files,
b. Create a subfolder C:\Program Files\Util (for example)
c. Copy the program file and the local.ini file:
Copy "DeviceID.exe" to C:\Program Files\util
Copy "DeviceIDLocal.ini" to C:\Program Files\util
Do the copy as a two-step,
copying from the download folder into Program Files. Windows security
will not let you download directly from the Internet into Program Files (technically, you
will not be able to remove the "mark of the web" if downloaded directly
into Program Files).
DeviceIDLocal.INI is purposely in C:\Program Files. Reason: Most end-users (should not) have administrative rights and won't be able to edit the file. This is by design. This forces their connection to the server-share.
6. Position the Server Control file
If using a server (not the server simulation)
a. Copy DeviceIDServer.ini to P:\software\util\DeviceID\wsConfig
(if using [x] Server simulation, everything points to the C:\Temp directory. )
7. Optional: Create a Start Menu Tile:
Using File Explorer, in C:\Program Files\util
Right-mouse-click the executable and "Pin to Start"
Launch the program now to test. See upper-right on the primary monitor
Auto-launch steps below.
8. Auto Launching:
DeviceID should be set to auto-launch at boot. Do this in one of two ways (do one or the other). 1. Place a shortcut in the workstation's "Startup" folder. 2. Optionally, put the program in a login script (not recommended because the laptops may travel off-network. The program is still useful, even if the server is not available.).
Startup Folder steps:
a. Using File Explorer, tunnel to
C:\Users\<you>\AppData\Roaming\Microsoft\Windows\StartMenu\Programs\Startup
b. In the Startup folder, right mouse click a blank area on the detail side, "create shortcut".
Set the path to C:\program files\util\DeviceID.exe. No other switches or steps are required. This assumes the local.ini file is also installed.
Testing
With setup complete, and assuming the ServerSimulation (or server directory),
- Confirm DeviceIDLocal.ini is in the same directory as the .exe.
- Use File Explorer to double-click the .exe, which launches the program.
Expected results:
a. Program loads in upper-right corner, Network Status = (green)
b. Folder C:\Users\<you>\Prefs\DeviceID has an inventory report. On my computer this is called "Oscar.txt", where Oscar is my workstation's Name.
c. Using FileExplorer, see folder C:\temp\ServerSimulation\DeviceID\WSInventory for the server version of this same inventory report. Useful for helpdesk research.
d. On the running program, double-click the workstation's name for small report.
e. On the running program, double-click the word "DeviceID" for full workstation report
f. Optionally: On the running program, double-click your user-id. Allow it to build a reminder file, such as "Bob's birthday on 08/22".
g. Hover the mouse over IP Address to see the external-facing IP address.
Off Network Workstations
If the workstation is off network (and it can't detect the Server.ini), the program disables all server-related activity but still runs and can still test network status and display reminders.
When off-network, the External Test Site temporarily defaults to www.google.com, in case your default pingable server was different (these preferences are on DeviceIDServer.ini). Colored status indicators continue to work. The Internal Test Site will ping the workstation's x.x.x.1 IP Address.
The local inventory is still written to C:\Users\<user>\prefs. This can still be opened, emailed, etc.
When off-network, the server inventory is skipped and the workstation will not be able to post a current inventory. No harm.
For Documentation: Generated INI files:
Example Local.ini
(at each workstation)
;DeviceID Local INI Control File
;Directs DeviceID to the ServerControlFile; must be in current DeviceID.exe directory
;Position-dependent file; do not change structure or line counts
ServerControlFile = C:\temp\ServerSimulation\DeviceID\WSconfig
\DeviceIDServer.INI
LocalReminderFile = C:\users\<username>\prefs\DeviceID
\DeviceID_Reminder.ini
WorkstationOffsiteFlag = N
LocalDisableRebootNagSW = N
LocalDisableRunEventsSW = N
LocalHorizontalOffsetPixels = 0
LocalVerticalOffsetPixels = 0
Example Server.ini
(At the server's WSConfig folder)
;DeviceID
;ServerControlFile DeviceIDServer.INI; Do not delete
;Note: Workstations have a local file that points to this file
;Example location: \\Server\Share\Util\DeviceID\Config\DeviceIDServer.INI
[General]
ServerInventoryDirectory = C:\Data\proj\util\DeviceID\serverSimulation\DeviceID\WSInventory
DefaultLocalReminderINI = C:\Users\<username>\prefs\DeviceID\DeviceID_Reminder.ini
ActiveDirectoryLDAPPath = cn=prod,dc=mycompany,dc=com
DefaultHomeDataDirectory = H:\Data
PhysicalLocation = Main Campus
InternalTestSite =
ExternalTestSite = www.google.com
ExternalIPAddressTestSite = https://api.ipify.org ;Shows external-facing IP address
RebootNagWarningDaysYellow = 5
RebootNagPromptDaysRed = 7
[Launch Run Events]
;This event can be set to run on program launch. This is a one-time event per launch.
RunAtLaunch = N
RunAtLaunchCommand =
RunAtLaunchParameter =
RunAtLaunchMarkerFileName =
[Emergency Run Events]
;Run these events in an Emergency with an optional user prompt
;Caution: RunLine is and can be called multiple times; manage duplicate runs with Run Once Marker Filename
;When used, Usually RunAtLaunch=Y, RunAtHourlyCycle=Y, with marker filename, for fastest results
EmergencyRunAtLaunch = N
EmergencyRunAtHourlyCycle = N
EmergencyPromptMessageHeader = Important Message:
EmergencyPromptMessageLine1 = This is an example emergency message
EmergencyRunCommand = notepad.exe
EmergencyRunParameter =
EmergencyRunMarkerFileName =
Broadcast Messages
DeviceID can broadcast emergency messages to workstations. This is only useful for those workstations on-network.
Set an example emergency message:
The program can optionally connect to a server to show simulated company-wide messages or to run company-wide .exe / installation program.
With your copy of DeviceID still running,
Edit the Server.INI file
If running the [x] ServerSimulation, see: C:\Temp\ServerSimulation\DeviceID\WSConfig\DeviceIDServer.ini
If running on the network, find where the workstation's Server.ini by double-click the word "DeviceID" on the running program. This opens the workstation's local inventory file. Note the "ServerInventoryFileName". With notepad, open *.* all files. Locate "DeviceIDServer.ini"
- Set "EmergencyRunAtLaunch = N (no need for this test)
- Set "EmergencyRunAtHourlyCycle = Y
- Set "EmergencyPromptMessageLine1 = "Database maintenance tonight"
Leave all other Emergency fields blank.
Save the file.
Results: After roughly an hour -- and every hour after that -- all users running DeviceID will see the database maintenance message.
Put a limit on how many times the Emergency Message can run
Edit the file again.
Set "EmergencyRunMarkerFileName" to something like:
2024.1101-DatabaseMaint.txt (any made-up, but unique, never used before name).
Save the server configuration file.
Results: After another hour, all users are bugged once, then never again
Marker files are stored per workstation. See C:\Users\<you>\prefs\DeviceID.
Delete the marker file and they will be nagged again if that same marker is still active.
Recommend using unique marker file names with any Emergency Run.
Only one Emergency can be allowed at-a-time.
The hour delay is randomized and is designed to keep the server from being overwhelmed if everyone logs in at 8:00am.
* The Server configuration file must be religiously guarded against edits and malicious actors. Rights to edit this file should be limited to special service accounts, that can only login from selected workstations.
Testing CommentsBecause
of the [x] ServerSimulation, the WSInventory directory will only have inventoried a single workstation -- yours. In real life, all workstation writes to this directory. Fifty
workstations = fifty files.
I would appreciate hearing about your experiences with this program.
Version History:
1.10 Initial Release
1.11 Generates inventory report on demand, not just at launch. Double-click label. Ping testing less aggressive if all "green".
1.20 Added External-facing IP Address reporting. Click once, then hover on displayed IP Address.
1.30 Added OneDrive backup for Reminder.INI file; Reminders now move across machines via OneDrive. If OneDrive not available, feature disables.
Related Keyliner Programs
Midy5 Checksum finder
Directory Pulse Disk Management
The program is a free keyliner-developed application, with no
registration, no sign-in, no ads, and does not call the mothership. Write this program yourself! This started out as a Student project in my book War and Peace Programming Volume 6 (Visual Studio C#) - Project 5.


