Windows 11 Tuning - polishing some rough spots. Recommended settings for Windows 11.
Windows 11 spiffs and Tune
I follow these steps on every Windows install. These ideas make the computer easier to use, removes bloat and advertisements, and adds new features -- all are Microsoft-safe changes. Nothing here is extraordinary.
This is a long article, with many steps. Pick and choose what interests you. I do all of the steps on my Windows 10 and 11 computers. All are documented here for my reference. Most of these steps work on any version of Windows.
If this is a new computer:
Consider removing the pre-installed crapware by logging into the new computer for the first time (registering the operating system's install with Microsoft), then download the Windows 11 "Media Creation Tool". Build the bootable USB disk, and then reboot. Use this to re-install the entire operating system from scratch. Details on how to do this in a future article.
On any new or existing computer, I follow these steps. Yes, this takes time, but it is glorious. Get rid of Microsoft built-in advertisements, restore things they hid behind fancy-new-menus, and adds features you did not know were missing. This fixes a variety of annoyances and enshitifications.
Contents:1. Move the Windows Settings Icon (Gear icon)
2. File Explorer Icon Spacing
3. Show File Extensions
4. Launch File Explorer, defaulting to favorite folder
5. Speedup ComboBoxes and other Visuals
6. Optimize the Swap File
7. Enable Hardware Administrator Account
8. Cleanup Windows Downgrade Files
Enshittification items:
9. Enable Classic Context Menus (Cut, Copy, Paste)
10. Turn off Start Menu Advertisements
11. Turn off Search Highlights
12. Turn off Copilot (and other Taskbar changes)
13. Taskbar Alignment Left and other settings
14. Unpin Microsoft Store, Edge
15. Turn off various System Notifications
16. Turn off Lock Screen Advertisements
17. Remove Start Menu's "Recommended" section; remove all (apps)
18. Remove "Learn about this Picture"
19. Add "Run" to the Start Menu
20. Send-To Notepad
21. Windows File Explorer Status Slow - Green bar
22. Remove / disable Bing from Windows Search (Disable Search Box Suggestions)
23. Add Music Bit Rate to Explorer View
24. Active Title Bar Color
25. Windows Titlebar colors
26. MSConfig Startup Programs
27. Speedup USB Drives
28. Turn off HardDrive Write Cache Buffering
29. Disable NetBIOS over TCP/IP
30. Turn off Windows File Sharing Update
31. Windows PowerSave (Wake from sleep)
Battery drains unexpectedly
32. Setup a "loser" account; non-admin
33. Disable AI in Firefox
-----------------------------
1. Move the Windows Settings Icon (the Gear icon)
Windows 11: Rather than having the Windows Gear icon occupy valuable space in the Tile menu, move the icon to an unobtrusive, but handy place in the Start Menu:
Steps:
Click Start, search/type "Settings"
On left-nav, choose "Personalization"
Select Start>
Select Folders (These folders appear on the Start, near power button)
Turn on "Settings"
Close window.
Click Start Button. Note new, unobtrusive icon near power button
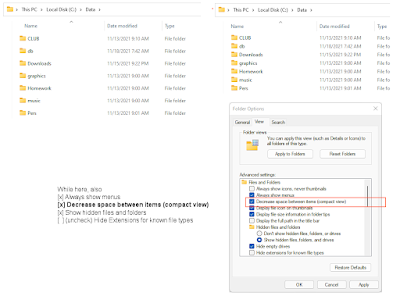
2. File Explorer Icons Spacing
Windows 11: For touch screens, Microsoft gave more white-space around objects.
Illustrated left, the default Windows 11 spacing.
Illustrated on right, the recommended change; tighter, more items on screen:
 |
Click for larger view
|
If on a desktop, consider tightening the icon spacing.
a. Launch File Explorer
b. Click the ribbon's top-right ellipsis . . ., "Options"
c. Select the [View] tab
[x] Decrease space between items (compact view)
Also recommended, in the same [View] tab -- especially for the next step:
[ ] Uncheck "Hide extensions for known file types"
[x] Show Hidden Files, Folders, or Drives
[ ] Show Sync Provider Notifications (stops some advertisements)
3. Show File Extensions
Curse
the Microsoft Marketing rep who thought this was a good idea to hide
file extensions. They have been doing this wrong since Windows XP.
Doing this makes everything safer; you will know what you are
double-clicking, whether it be an .exe or an .xlsx sheet.
Recommended steps.
Using
File Explorer, on the ribbon bar, click the ellipsis,
OptionsIn Options, click the [View] tab.
Check "[x] Show hidden files, folders, and drives"
Uncheck "[ ] Hide extensions for known file types"
Uncheck "[ ] Hide protected operating system files"
Ignore warnings.
Click OK.
4. Launch File Explorer, defaulting to favorite folder
Have File Explorer automatically open to a C:\Data or MyDocuments folder.
This works in all versions of Windows.
These are busy, but easy steps.
a. From the step above, set these File Explorer options:
[ ] Uncheck "Hide extensions for known file types"
[x] Show Hidden Files, Folders, or Drives
(Click Apply/OK)
b. Delete or unpin any Microsoft-built File Explorer icons
From the Start Menu, *and* from the TaskBar,
Delete/"unpin" all File Explorer icons (shortcuts, tiles) - this does not delete or uninstall the program; this just deletes the shortcuts.
Right-mouse-click each and "Remove" each "File Explorer" icon (aka Delete)
They will be rebuilt in a moment.
c. Temporarily, launch File Explorer manually
Click Start: Immediately type the words "File Explorer" (searching)
Double-click "Launch the program.
Tunnel to folder (This PC, "local Disk")
Open folder: C:\Windows
In C:\Windows, scroll down and locate "explorer.exe" (note the .exe extension. "Explorer.exe", not "File Explorer"! It is a long way down...)
d. Right-mouse-click "explorer.exe",
Choose "Pin to Start"
e. Open the Start Menu (the Tile menu),
Right-mouse-click the new File Explorer tile
(This is not the file-explorer icon in the Windows folder; choose the file-explorer tile in the Start Menu; the one next to all the other application icons.)
In the popup menu, right-click the yellow-folder'd "File Explorer" icon (again)
In Properties: Click "Open File Location"
It opens to another file list where the "explorer" icon is a "shortcut" icon
f. Right-mouse-click the "Explorer" shortcut, select "Properties"
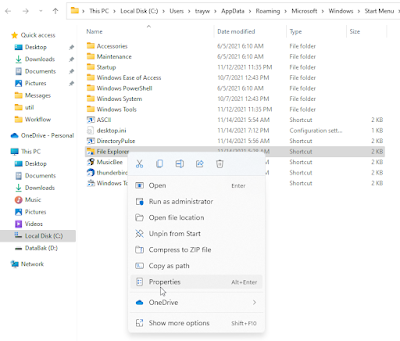 |
Click for larger view
|
g. In the 'Target' field, append a space-slash-e, comma, and a quoted path name
/e, "C:\data" or
/e, "%USERPROFILE%\DOCUMENTS"
In the [General] tab, change the name from "explorer" to "File Explorer"
OK
Right-click the "File Explorer" shortcut icon,
Click "Show more options"
"Pin to task bar"
Close all Explorer windows
Test by launching the new Start Menu or taskbar icon. It should open in the new default folder.
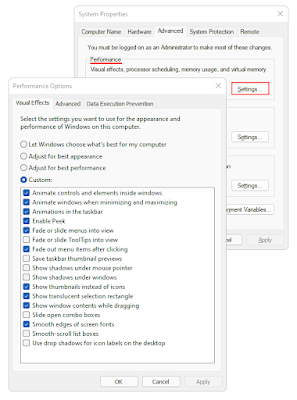
5. Speedup ComboBoxes and other visuals:
These
are a matter of preference, but programs like Excel, WordPerfect, and
others, seem faster when you don't have to wait a half-second each time
you click on a menu or comboBox.
This can only be set if you are an administrative user on your PC (most people are, but should not be. See below if not an administrative user)
a) Launch File Explorer
b) On tree-side, click/highlight "This PC"
c) Right-mouse-click Properties
d) In center-right of panel, click blue (sometimes red) link, "Advanced System Settings"
e) Click top-tab [Advanced], then in Performance, click "Settings"
 |
Click for larger view
|
I prefer to uncheck the following:
[ ] Fade or slide menus into view - I want to see them now
[ ] Fade or slide tooltips into view - I want to see them now
[ ] Show Shadows under Windows - much cleaner without the overhead
[ ] Slide Open ComboBoxes - Programs like Excel "feel faster"
[ ] Smooth Scroll list boxes - moves line-at-a-time instead of pixels
Important
note: "Advanced System Settings" are not available to standard users
(non-administrative users). Running File Explorer as (admin) will not
work; it will set the wrong user to these preferences. Clicking
Advanced and promoting to an Administrative user will not work either.
If your user account is a "loser account"
(see step 22, recommended), use the administrator's account to promote this user to
an administrative user. Login as the newly-more-powerful user, make
these changes, and logout. Then revert this account to a "loser account."
Once set, these setting will 'stick.' It is a poor design to tie these user preferences to only administrative users.
6. Optimize the Swap File (Geek Out)
Optimize
Windows 11 swap file by following these steps, which results in a
slightly faster computer with less disk fragmentation. This is an
admittedly technical.
What is a Swap File?
The "Swap file", also known as a "Paging File" or "Virtual Memory" is
used by Windows to extend the PC's memory by simulating (virtualizing)
memory on the hard disk. It works like this: When more programs are
loaded than can fit in the available RAM, Windows takes the least-used
program and "pages-it" to the hard disk. The paged-out program doesn't
know it was moved into Virtual memory, and while there, it is in
suspended animation.
When you switch back to the application, Windows pulls it from the hard
disk's paging file and crams it back into memory, while shoving
something else to disk. Paging only happens when you run out of memory
and there are too many programs are running at the same time. Although
paging is a wonderful idea, it is slow. PCs that use paging files really
need more RAM.
By Default, Paging Files Fragment
When Windows is first installed, a paging file is automatically defined,
with a minimum and maximum size. With each reboot, Windows re-allocates
(re-creates) the file, starting with the minimum size. This is a large
file, often 1.5 times physical RAM. In other words, if your PC has 8G of
RAM, then the paging file is likely about 10 to 15G. With each reboot,
the old paging file is destroyed and a new one is constructed.
As Windows allocates the new file, it starts writing on the first
available disk cluster, but because the file is so large, it invariably
runs out of space and the file is fragmented into multiple locations,
chaining across the disk, often hundreds of times. The file can grow as
more RAM is needed, up to its maximum size. This causes other files to
fragment.
Optimizing the Paging File:
With
the steps outlined here, force a permanent, fixed-location swap file.
This keeps it from allocating and de-allocating, and keeps it and other
files from fragmenting around it.
Windows 11 Instructions:
a) Launch File Explorer
b) Right-mouse-click "This PC
Select "Properties"
c) In Device Specifications (center section),
Click "Advanced System Settings".
If prompted for administrative credentials, type them now (this can be run from a loser-account with a promotion).
d) In the new System Properties screen, click the top [Advanced] tab
Click Performance's "[Settings]" button
f) Click the second [Advanced] tab
Change "Virtual Memory"
Uncheck [ ] Automatic manage paging file size
Set "No paging file" (Set)
Click OK, OK. Ignore warnings.
g). You must reboot to de-allocate the file.
h) (Optional step): After reboot, manually defragment the hard disk:
- Open File Explorer
- Highlight drive C:, other-mouse-click, "Properties"
- In the Tools Tab, click Optimize and defragment drive. Defragging is
less of a concern with solid-state drives and on newer versions of
Windows 11, Defragging is not even given as an option.
- Allow the "optimization" / defragment to complete - with few indications it finished. Look for last-checked 0-days
i) Return to the Virtual Paging screens (see steps above)
j) Manually set a Virtual Paging Size. Turn off [ ] Automatically
manage paging file size. Set a custom size, where the minimum and
maximum sizes are the same.
The numbers are not important ,
but for most machines I pick 1500-1500, or 1800-1800, where both the
min/initial and max sizes are the same. Click "Set" to commit. Ignore warnings.
For example:
8GB RAM, set to 1500,1500
16GB RAM, set 1800, 1800 - choosing this even if you have more RAM
32GB RAM, set perhaps 2000, 2000. I use 1800.
The key to setting the size is to set both the minimum and maximum to the same value --This keeps the file from growing and shrinking (and thus fragmenting).
The actual number chosen is not that important and it does not need to be in the increments above. Do not bother setting the swap file much larger than 1.5 to 2G. Larger
swap files take even longer to parse and the performance-loss may not be
worth the trouble. It slows down backups.
k) Reboot one last time, ignoring any warnings.
Optimize Swap File for older versions of Windows
7. Enable Hardware Administrator account (Optional)
Optional:
This enables a computer-based Administrator account, which is useful in
rare instances. This is a different account than the "admini"
recommended at the end of this article. This is here for my documentation. I build and use
this account in rare instances.
a) Start, type/search "CMD", Run as Administrator
b) Type this command: NET USER administrator /enable:yes
There
will be a new user account, "Administrator" on the computer's initial
login screen. Be aware it does not have a password enabled. Login once
to set the account.
Use /enable:no to turn the account off.
You can ignore this account; see Step 28 for the real admini account.
8. Cleanup Windows Downgrade files
There
are a variety of temporary and downgrade files that can be cleaned up.
If you are making a backup, or an image backup, I always run this step
because it can save gigabytes of disk space.
These are hard to cleanup by hand and instead you should use a built-in Microsoft Utility.
The steps are convoluted, and some checkboxes have to be checked twice. The steps here are a bit weird.
I run these steps frequently.
Windows 11 (later editions)
a. Using File Explorer, locate and highlight "Local Disk C:"
b. Right-mouse-click "Local Disk C:", select "Properties"
Of curiosity, note the free-space available.
c. Click "Details"
(This brings up a semi-complicated menu, where you have to choose each sub-item separately)
1. In Temporary Files: Check various options, then button "Remove Files". I recommend these options:
Delivery Optimization Files
[x] Temporary Files
[x] Previous versions of Windows, Windows.old, etc., if seen
[x] Windows Update Cleanup
[x] Temporary Internet Files
[x] Recycle bin
Select top button "Remove files"
d. Cleanup old Restore points
(This step was easier in older versions of Windows)
1. In the Start Menu's Search bar, type "Restore Point", "Launch Create Restore Point"
2. Click button [Configure]
3. On bottom of panel, click "Delete all Restore Points for this drive"
While in this panel, look at the "disk-space usage" -- adjust the value down to about 8 or 10GB; make the adjustment by pressing the left-arrow-key, which gives you granular control.
In Properties, never click "Compress this drive to save space" - a desperate idea.
Even
with these steps, use File Explorer to manually delete two or three
cluttered $Windows temp files, listed below. These are safe to delete.
If locked, reboot, and they should be available. This step requires Step 4 from this article: "Expose File Extensions and Hidden files".
In the root of the C: drive, manually delete folders that look like these:
Do not delete "$Recycle.Bin" (although no harm)
Other notes:
In Properties, never click "Compress this drive to save space" - a desperate idea.
Even
with these steps, use File Explorer to manually delete two or three
cluttered $Windows temp files, listed below. These are safe to delete.
If locked, reboot, and they should be available. This step requires Step 4 from this article: "Expose File Extensions and Hidden files".
In the root of the C: drive, manually delete folders that look like these:
Do not delete "$Recycle.Bin" (although no harm)
9. Enable Classic Context Menus (Cut, Copy, Paste)
Put Cut, Copy, Delete, and Rename back where God intended and get rid of the confusing ribbon-bar icons:
 | |
Context Menus: Click for larger view
|
This involves editing in the Windows Registry. If you have never been there, it is scary. Panic not.
a. Copy this key name into the clipboard, including the {braces}.
Do not include leading or trailing spaces. where 86ca-"one"-aa-zero...
{86ca1aa0-34aa-4e8b-a509-50c905bae2a2}b. Click Start, type "RegEdit".
Because this is the Current User registry key, do not "Run as Administrator"
c. On the left-nav's tree diagram, open HKEY_CURRENT_USER
Tunnel to \Software\Classes\CLSID
(Once in the Classes key, and immediately type "CLSID" to search for that key. It is right below "Calculator" and is no where near the dot-c items at the top of the list)
d. On the detail side, right-click in a blank area,
Select New, Key (or Right-click CLSID and select NewKey)
Paste: {86ca1aa0-34aa-4e8b-a509-50c905bae2a2} (including braces. ENTER)
This builds a new yellow folder under CLSID
e. On the tree-side, click once on the new key (tree-side) to select
(highlighting {86ca1aa0....} )
Right-click the highlighted key
Select "New, Key"
Name the new sub-key: "InprocServer32" (no quotes, ENTER)
f. On the detail side (right side), double-click the "(Default)" value
Click OK, making no changes.
This changes the (Default) from "value not set" to (blank)
g. Close the registry editor
h. (Reboot for changes to take effect)
To test, launch File Explorer; right-mouse-click a file for its Context Menu. Note Cut, Copy, Paste as menu choices.
To undo the change, delete the "{86ca1..." key, and reboot.
If technically-inclined, here is the .REG merge file:
Windows Registry Editor Version 5.00
[HKEY_CURRENT_USER\Software\Classes\CLSID\{86ca1aa0-34aa-4e8b-a509-50c905bae2a2}]
[HKEY_CURRENT_USER\Software\Classes\CLSID\{86ca1aa0-34aa-4e8b-a509-50c905bae2a2}\InprocServer32]
@=" "
10. Turn off Start Menu Advertisements
(This option is now gone in later versions of Windows 11)
Settings (Gear icon), Personalization
"Start"
[ ] "Show Suggestions occasionally in Start" -- Turn off
[ ] "Show recommendations for tips, shortcuts, news app and more..." -- Turn off
Windows Settings (Gear), Personalization
Start (Start Menu - see center of screen)
Set the top section:
Click Radio-button: "Layout" to "More Pins" (vs More Recommendations)
11. Turn off Search Highlights (Recommended)
Another
annoying feature with newer versions of Windows 11 are "colorful icons
and helpful tips" that appear on the Windows Search bar. Although this
looks a bit like a virus, it is a "new feature." Read the scathing user
comments on Microsoft's support site - Link. It took me an hour to find this setting.
To remove:
For Windows 11:
Launch Settings (gear icon)
Privacy & Security (see left Nav),
locate "Search Permissions"
Near the bottom of the list, under "More Settings"
[ ] Show Search Highlights (off)
For Windows 10:
Right-mouse-click the Start Menu Search box,
Select "Search"
[ ] Uncheck Show Search Highlights
If the options is greyed-out (unable to turn off), use RegeEdit:
HK_Current_User\Software\Policies\Microsoft\Windows\Explorer
On the detail side, look for or create this key:
DisableSearchBoxSuggestions (Reg DWord32);
change from 1 to zero to re-enable the field
(then, after a reboot, you can toggle the switch)
12. Turn off Copilot (and other TaskBar changes)
In Windows Settings (Gear Icon), Personalization
Turn off Copilot - This option appears to be gone from later versions of Windows.
In Personalization, Taskbar
Optionally, turn off Task View (recommended)
-Task View (Off) (optionally)
-Turn off Widgets
In "Other System Tray Icons"
- Microsoft 365 Copilot App (Off -- unless you are paying extra for this feature)
- Windows Update Status (Off -- Don't worry, it will nag you anyway)
13. TaskBar Alignment Left and other settings:
In Windows, Settings (Gear Icon),
"Personalization", "Taskbar behaviors"
Task Bar Alignment, Left (the traditional location)
Consider: "Combine Taskbar buttons and hide labels" (to Never) -- takes more space on task bar, but easier to read
14. Unpin
Unpin Microsoft Store from taskbar (it is easy enough to find when needed)
Unpin Edge from the taskbar (saving space); easy enough to find in Start Menu
15. Turn off various System Notifications
Click the Settings icon (gear)
"System",
"Notifications",
Scroll down the page,
[ ] "Notifications from apps and other senders"
Turn off various bloatware, such as (Dell Assist), (Lenovo this or that)*
In "Additional Settings" at the bottom, expand and turn off
[ ] Offer Suggestions
[ ] Get Tips
Under Settings, "Privacy & Security"
"General"
[ ] Turn off -- all
*(Better yet, uninstall bloatware through Add-Remove Programs)
16. Turn off Lock Screen Advertisements
The
Windows "Spotlight" lock screen has advertisements for xbox, O365,
etc., also called "fun facts, tips and tricks". Use the Registry editor
to partially-disable; these changes remove some of the popup-text, but
not all. The two other lock screen/Screen-saver options have a
preference to disable these "features" but the "Spotlight" lock screen
does not.
This seems to be a never-ending battle.
Despite
high hopes, these changes have not worked in the long run. Leaving
them here while I continue to research. No harm in these steps but
expect failures. (Changing from the Spotlight wallpaper to a standard
wallpaper also works, but I like the changing wallpapers.)
Start, Run, "Regedit" (as current user, not as administrator)
On the tree-side, tunnel to
HKEY_CURRENT_USER\Software\Microsoft\Windows\CurrentVersion
Locate key "ContentDeliveryManager"
Most of the keys in this area are set to Hex "1" and most are safe to change to "0".
Caution: "ContentDeliveryAllowed" should remain at "1"
Set these keys to hex zero:
FeatureManagementEnabled = 0 (all)
OemPreInstalledAppsEnabled
PreInstalledAppsEnabled
PreInstalledAppsEverEnabled
RotatingLockScreenEnabled
RotatingLockScreenOverlayEnabled
SilentIntalledAppsEnabled
SoftLandingEnabled
SubscribedContent-xxxxxxEnabled (various)
SystemPaneSuggestionsEnabled
(but leave SlideShowEnabled, and RotatingLockScreenEnabled (if exists) as "1")
Next, add a new value in the same area:
On the detail side, right-mouse-click
any white space, select "new DWord 32-bit value".
Name the new key exactly as: "SubscribedContent-338387Enabled" (no
quotes). Set its DWord value to hex zero (0).
A reboot is needed before it takes effect and the reboot can wait.
17. Remove Start Menu's "Recommended" Section
Currently no good solution.
(Policy Editor works in the Student Edition, but no other Windows Versions)
I have had mixed results with this step:
Regedit (run as administrator)
HKLM\Software\Policies\Microsoft\Windows
+Add left-nav (tree side) key, "Explorer" (adding a new yellow folder on the tree-side)
In detail section, add new DWord32 value: "HideRecommendedSection"
Set to Hex 1
In RegEdit:
Computer\HKEY_CURRENT_USER\Software\Microsoft\Windows\CurrentVersion\Start
On detail side, right-click a blank area and add a new DWord32 entry:
"ShowRecentList" set to hex zero (0)
18. Remove "Learn about this picture"
A
new desktop icon in the upper-right corner of the main monitor shows
"Learn about this picture" (Windows 11 Build 22635.3785 (pushed on
2024.11). This is part of the Windows Spotlight -- the same feature
that put advertisements on the Start Menu's Search bar. The icon only
appears if your wallpaper rotates and Windows Spotlight is enabled. Remove the icon with this step:
Start, Run, Regedit (as current user, not Administrator)
Tunnel to:
HKey_CurrentUser\Software\Microsoft\Windows\CurrentVersion
(note this is not HKLM CurrentVersion from the previous step; different key)
Tunnel into
... Explorer\HideDesktopIcons\NewStartPanel
Add a new key:
On the detail side (right-side, white area)
right-mouse-click, "New, Dword 32-bit"
Paste this as the key name, including the braces:
{2cc5ca98-6485-489a-920e-b3e88a6ccce3}
Double-click the newly-added key
Set to value: (hexadecimal) 1 (one)
Delete a key:
On the tree side, tunnel up to
...\Explorer\Desktop\Namespace
Delete this entire yellow folder, it it exists:
{2cc5ca98-6485-489a-920e-b3e88a6ccce3}
Close regedit.
A reboot is needed to take effect and this can wait until convenient.
Optionally, use this .Reg file to automate these steps
Windows Registry Editor Version 5.00

[-HKEY_CURRENT_USER\Software\Microsoft\Windows\CurrentVersion\Explorer\Desktop\NameSpace\{2cc5ca98-6485-489a-920e-b3e88a6ccce3}]
@="Windows Spotlight"

[HKEY_CURRENT_USER\Software\Microsoft\Windows\CurrentVersion\Explorer\HideDesktopIcons\NewStartPanel]
"{2cc5ca98-6485-489a-920e-b3e88a6ccce3}"=dword:00000000
19. Add "Run" to the Start Menu
The
"Run" menu is handy for launching programs when you need to pass a
parameter into them. For example, Start, Run, "Notepad.exe
myfile.txt". This behaves differently than searching for the program at
Start.
"RUN" can be run two different ways. I like using the Start Tile Icon.
Method 1: Recommended Pin the icon on the Start Tile Menu:
a) Click Start, type/Search the word "Run"
b) Right-mouse-click, "Pin to Start"
Method 2: Press Keyboard "Windows-key-R" (R for Run)
Of
interest, you can drag a file or executable from File Explorer into the
Run Menu, and Windows will pre-type the full path and filename, then
will wait for you to type parameters and switches.
20. Send-To Notepad
I
often want to send html, .txt, and other ascii files into Notepad. Use
File-Explorer to "other-mouse-click" and send them into notepad without
bothering to use the RUN menu or to manually launch Notepad. I love
this change. It requires a previous change: "Show hidden files and folders".
Add a new sub-menu to the right-mouse-click Context menus:
a) Using File Explorer, tunnel to this path:
C:\Users\(your userid)\AppData\Roaming\Microsoft\Windows\SendTo
b) Right-mouse-click in a blank area on the detail side,
Select "Create a new shortcut"
c) In Location, type "Notepad.exe" (or browse to the executable's path)
Click OK
Name: Notepad
Try it out:
Microsoft dumbed-down this idea in Windows 11 where it now takes more keystrokes than in earlier versions of Windows.
.
Using File Explorer, find any ASCII text file.
Right-Mouse-Click,
Choose "show more options", Send-To, Notepad
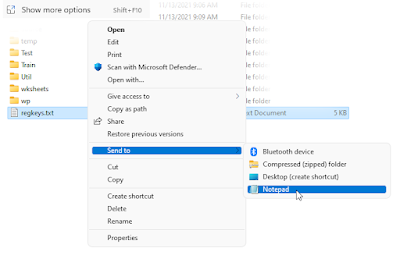 |
Click for larger view
|
You can add other programs here, such as a photo-editor.
21. Windows File Explorer Status Slow - Green BarFile
Explorer can be slow when opening folders, especially on external
drives, on remote-computers, or SAN drives. Since you probably have
more than 1 CPU core, put one of them to work on its own thread.
Dramatic improvement in speeds.
Make this change even if you have not yet noticed the problem.See this keyliner article: File Explorer Green Status Bar Slow
https://keyliner.blogspot.com/2021/12/windows-file-explorer-green-status-bar.html
22. Remove / disable Bing from Windows Search
Bing is hard to remove from Windows and there are numerous places that require attention.
Disable Search Web Results
A.
Whenever you use Windows Start Menu Search, results also include Bing
web results, 'web results'. Disable with a registry change. Windows 11
and Windows 10.
Start, Run, "Regedit" (as Administrator -- even though you are updating HKCU)
On the tree-side, tunnel to:
HKEY_CURRENT_USER\Software\Policies\Microsoft\Windows
While highlighted on the tree-side "Windows" key,
right-click, choose "New, Key"
Name the new key "Explorer" (case-sensitive)
(New folder "Explorer" will appear as a yellow folder, directly underneath "Windows". This key may already exist from a previous step.)
In the new Explorer key's detail section,
right-click, choose "New", "DWORD (32-bit) Value"
Name the new key, "DisableSearchBoxSuggestions" (case-sensitive)
Double-click the new "DisableSearchBoxSuggestions"
Set to value 1 (Hexadecimal)
Close Registry Editor
This
takes effect after the next reboot (technically after restarting
Explorer) and is only active for this current user. If you have a
secondary admin (administrator) account, consider making this same
change for that user.
B. In Windows Settings (Gear icon)
Left-nav, Privacy and Security
Click "Search Permissions"
[ ] Microsoft Account (turn off)
[ ] Work or School Account
Scroll down the page
[ ] Show Search Highlights (turn off, previously discussed in this article)
Scroll down the page
Click link: Windows Privacy Options
Turn off all options on this page
C. Launch Microsoft Edge
Click ellipsis in upper-right corner, "Settings"
In Left-Nav, "Privacy, Search, and Services",
Click "Search and Connected Experience"
Click "Address Bar and Search"
Change "Search Engine used in address bar" to "Google"
In "Manage Search Filters" (the search list)
- remove as many as you can (clicking their ellipsis), leaving Google.
(note: Bing can't be removed)
D. In Privacy, Search, and Services, "Search and Connected Experiences"
Turn these options off, as you see fit:
[ ] Suggest Similar Sites
[ ] Save Time and Money with Shopping
[ ] Save Content using Collections
[ ] Get Notifications on related things
[ ] Let Microsoft Edge help keep tabs organized (possibly useful)
[ ] Save Screenshots of sites for history (possibly useful)
E. Click the taskbar's START button.
Immediately begin typing "REGEDIT" (no quotes)
"Run as administrator"
Tunnel to "HK-LocalMachine" (not the previous HK-CurrentUser)
Software, Policies, "Microsoft"
With the Microsoft key still highlighted (tree-side)
right-click the Microsoft key, select "New Key"
Name the new key "Edge"
In the new key's detail side (the white pane to the right)
Right-mouse-click anywhere in the detail pain
New "DWord 32-bit value"
Create a new value: "HubsSidebarEnabled" (no quotes; note double-s, case-sensitive)
Double-click and set hex value to zero (0)
Close Regedit
In Edge's URL bar, type this address:
edge://policy
Click "Reload Policies" (no screen activity shown)
Close Edge.
23. Add Music Bit Rate to Explorer View
For locally-stored (C: drive) music files (MP3) it is often nice to see the bitrate the music was recorded.
See this keyliner article: Add Bit Rate to Explorer View
24. Active Title Bar Color
Windows 11 TitleBar and window borders are white, making it hard to distinguish which window is active. The active title bar is the same color as an inactive window. Also, the border style is a light grey. Make the active window "pop," while still maintaining a link with the color scheme.
a. Click the Start Menu, Gear icon
b. In left-nav, select "Personalization"
c. Select [Colors]
d. Scroll down in same menu,
Enable (turn on) "Show Accent Color on Title bars and Windows Borders"
This is not enough to activate all windows with the new title bar color. Continue with these geeky steps.
e. Click "Start", type "Regedit" (does not need to be run as Administrator ). Open the Registry editor.
f. On left-navigational tree, tunnel to this yellow-folder/key:
Computer HKEY_CURRENT_USER\Control Panel\Colors
g. Locate the detail value called "Active Title"
Double-click and set the value to "255 0 0" (space delimited, where this equal RED).
255 is red,
0 = no green,
0 = no blue.
Search the Internet for "RGB Charts" to find your favorite three-octet character code.
h. Close the Registry Editor
(note: The original, light theme, the default value was: 153 180 209 Red, Green, Blue, space-delimited)
Some programs won't respect this setting until after a reboot. Some programs, such as Windows Setup do not use this value at all - thanks Microsoft! However, many programs do, and the color will make it easy to find the active window.
25. Windows TitleBar Colors (Active and Inactive Title bar colors)
In Windows Settings (gear Icon), Personalization,
Colors,
[ ] Uncheck "Start, taskbar, and Action Center" (option missing on newer Windows)
[x] Check "Show accent color on Titlebars and Windows Borders"
Sadly,
this sets all titlebars to the same color, which is kinda dumb and
makes it hard to see the active title bar from the inactive ones. Older
versions of Windows gave granular control to this.
To resolve: Start, run, Regedit
HKey_Current_User\Software\Microsoft\Windows\DWM
In the details section, create a new 32-bit DWORD value: "AccentColorInactive"
Set a hex value of: beb7a3 (light grey, or other value).
Close RegEdit.
Change
takes effect immediately. Some Microsoft programs (remarkably, the
Windows Settings screen (Control Panel)) ignore this setting. Again, thanks, Microsoft!
26. MSCONFIG - Startup Programs
Cleanup
unneeded startup programs, save memory, faster computer, etc..
Auto-start programs live in multiple places, where "MSConfig" gives
access to both "Services" and the "Startup" group. If you have never
been here, this is somewhat interesting.
Click Start. Immediately type/search "MSCONFIG" (in Windows 11 it shows as "System Configuration")
Run as Administrator.
Open the [Services] tab
In
the [Services] tab, ignore most entries, but I do give consideration to
application auto-updater programs, especially for software that I know
will never be updated, or I want to control when they update. For
example, I unchecked these:
[ ] Asus Update Checker (a motherboard maintenance program)
[ ] LGHub Updater Service (Logitech Keyboard updater; I want to control)
[ ] Corel License Validation (My software is three versions behind, why keep checking?)
[ ] Foxit Updater (Foxit PDF Reader: if allowed to auto-update, they install unwanted other programs)
[ ] Xbox services, various (I am playing with turning these off)
Basically, look for application-services - for applications you may have installed.
Click "Apply"
Next, click the [Startup] tab and follow the re-direction to Task Manager (Startup moved in Windows 11):
In Task Manager, open the [Startup] tab,
Click the left-side Hamburger menu.
Choose the left-nav Speedometer/speed icon
Disable things you don't need, but might want to use later. For example:
[ ] Intel Graphics Command Center Startup Task
[ ] Inbox Monitor (if you are not using the Outlook Email client or do not need nagging)
[ ] Status Monitor Application (for Brother Printer)
[ ] ControlCenter Launcher (again, for Brother Printer)
[ ] Cortana (now permanently gone)
[ ] Microsoft 365 Copilot (unless you are actively paying for the subscription)
[ ] Microsoft Teams (? if not being used)
These changes take effect on next reboot.
27. Speed up USB drives
Windows
uses a cache when writing to USB disks in order to keep a copied file
from being corrupted if you should unplug the USB drive in the middle of
a write operation. If you are a better user than that, and you would
never unplug a drive while writing, you can significantly speed up the
drive by disabling that cache.
This article, although written for
an older version of Windows, it is still applicable. I make this
change on my larger USB backup drives. I don't bother with USB sticks
or cameras:
USB Backup Speeds Slow
Need a backup program. keyliner wrote one you can use for free.
https://keyliner.blogspot.com/2021/05/directorypulse-keyliner-backup-software.html
28. Turn off HardDrive Write Cache Buffering
Similar to the step "Speed up USB Drives," the local Hard Disk
has a similar setting, which I also enable on my own computers.
*only do this on
battery-powered laptops or desktops with UPS battery protection.
Note: Control panel cannot be run as "administrator" but the icons within can be.
a. Click Start, immediately begin typing "Control Panel".
Launch the Control Panel
(Note: In the future, some of these areas will move into the Settings/Gear icon... someday)
b. Click top-right "View by Small icons"
c. Right-mouse-click Device Manager ("run as Administrator"),
Expand "Disk Drives"
d. Locate the hard disk (by name (may be labeled as "ATA Device"))
Most laptops only have one drive.
e. Select Properties, then the [Policies] tab,
[x] Enable Write Caching on the Device
[x] Turn off Windows Write-cache buffer flushing on this device*
29. Disable NetBIOS over TCP/IP
Windows
still supports an obsolete protocol, and while enabled, it generates
2505 Errors in the Windows Event Log (Event ID 2505 - Server could not
bind to transport). This protocol is safe to disable.
See this keyliner article:
Windows Event ID 2505 Server Could not bind to Transport
https://keyliner.blogspot.com/2022/01/windows-event-id-2505-server-could-not.html
Do this for no other reason than to remove a re-occurring error from the Event Logs.
30. Turn off Windows File Sharing Update
By default, Windows 11 can use your computer to help distribute Microsoft updates to other computers in your local network. This happens unattended. Consider disabling this feature to help control unexpected slowness.
Settings (Gear icon),
Windows Update (upper-center of screen; they've been moving this around)
Advanced Options (Center, scroll menu)
Delivery Optimization
[ ] Allow download from other PC's (Off)
31. Windows PowerSave
Fix unexpected wake-from-sleep issues, where the PC wakes from sleep in the middle of the night. These steps do not address "Does not wake from sleep".
32. Setup a Loser Account
Windows
users can log in as standard users (with minimal rights to install and
change things), or as god-like admin users. Malware folks like it when
you run in administrative mode. Do what I do - I always run as a
non-administrative user (which I call a loser account). Use this
account for day-to-day work.
To
make this work, build a second Administrative account, not tied to
Microsoft. Use this account only when installing software or making
system changes. Otherwise, run as an account with no rights to install
software. This is not as bad as you think. Practically-speaking, once
the machine is built, how often do you install software?
Steps here, too detailed to include in this article, but recommended:
https://keyliner.blogspot.com/2020/02/windows-10-administrative-accounts.html
Summary:
Build
two accounts on every workstation: One is a 'loser' account (for
day-to-day work" and a second "admini" account for software installs.
At least one administrator account must be installed on the PC.
*If your current account is already an administrative account
(Windows
11/10 -- assumes you are logged in with an administrative, 'non-loser '
account for the account-build)
Build the new account:
1) Start, type "Users", and open "Other Users"
2) "Add other User" (add another account)
3) Select "I don't have this person's sign-in information"
4) "Add user without a Microsoft Account"
Complete the rest of the account setup, including the three lost password questions.
5) Once the user is built, select the new user from the already-displayed control-panel's User-list.
Change the new Admin's account type:
-For the admin account, make it an administrator.
Log out as yourself.
Then
login as the administrator and demote your regular account to a
Standard User. Make the admini password the same as your account, so
there is one less thing to remember. Only use the admini account when
UAC prompts for "installation rights".
33. Disable AI in Firefox
If you use FileFox, disable AI with these steps:
1) Type URL: "about:config" (no quotes)
Accept risk and continue.
2) Search for:
browser.ml.chat.enabled = false
browser.ml.enable = false
extensions.ml.enabled = false
sidebar.revamp=false
browser.ml.linkPreview.enabled=false
browser.tabs.groups.smart.enable=false
browser.tabs.groups.smart.userEnabled=false
Other links of interest:
Do you need a backup program? Backup to your SAN drive, OneDrive, GDrive, USB. No nag ware, no installation, no spying. Free.
https://keyliner.blogspot.com/2021/05/directorypulse-keyliner-backup-software.html
Raspberry Pi-Hole - A DNS SinkHole for security - a fun, but geeky project
Windows 11 System Event Log errors of interest:
Windows Event ID 2505 - Could not bind to transport
Windows Event ID 2 - Windows.Remediation
Windows Event ID 10010 - Did not register with DCOM
Windows Event ID 10016 - permission settings do not grant, could not bind


