2012-12-11

font Musings

Font and Typography Musings

Normally, I like to write my own content, but some subjects are clearly better served by other experts.  Take the case of font and typography.  One would think the battle was won by Ariel (Helvetica) and Times New Roman.  These people think otherwise and they will show how fonts can speak. 


Main Site:
An enjoyable site with history, reasons, design and commentary.
http://www.smashingmagazine.com


Selected Articles that occupied my time:

What Font should I use, by Dan Mayer
http://www.smashingmagazine.com/2010/12/14/what-font-should-i-use-five-principles-for-choosing-and-using-typefaces/

Typographic Etiquitte
http://www.smashingmagazine.com/2011/08/15/mind-your-en-and-em-dashes-typographic-etiquette/


Throughout the site, they have a variety of free fonts, such as:
http://www.smashingmagazine.com/2011/08/02/new-high-quality-free-fonts/

Geeky Font Stuff:
http://ilovetypography.com/2009/01/14/inconspicuous-vertical-metrics/


For Fun:
Each of these san-serif fonts were printed at the same size, default kerning and tracking (variable leading).  Fonts pulled from a Windows 8 computer.  Can you spot differences?


Can you see the Differences?  Click for larger view

Anatomy of a Font / Character - Click for Larger View


I like serif fonts and two spaces after my periods.  However, to my dismay, this blogging tool enforces its own preferences.

Other Resources: Open Source / Free Fonts
keyliner: Google Fonts

Vaguely related articles:
keyliner: Word Perfect - Review - A word processor that won't frustrate you
keyliner: Word Perfect - Setting up School Papers
keyliner: WP Hanging Intents, Paragraph Headers

2012-11-27

USB Drive Backup Speed Slow

Howto: Speed-up all USB drives in  Windows 11, Windows 10, and Windows 7. USB speeds for all Thumb drives, cameras, and other external USB disks will be oodles faster with a minor tweak.  This change is recommended.

Acronis full system USB backup speeds were horrible -- 8 hours to backup 100G. The backup should only take about 20 minutes.  This was not an Acronis problem.

At first I thought it was a problem with the 64-bit drivers, then I suspected a problem with the backup program, but the real issue turned out to be how Windows handles USB drives. This turned out to be interesting and is applicable to all kinds of devices.


Follow these steps - which must be done for each plugged-in USB Device where you want improved speed.  The drawback to this change is you can't unplug the drive at will; you must use a menu to eject the drive, described below.


Solution:

In Device Manager, change the drive's USB Policy to "Better Performance".

1. Plug-in the USB drive and allow it to mount normally.

2. Start, Control Panel,
   Locate "Device Manager"; Right-Mouse-click, "Run as administrator"

3. Open the "Disk Drive" section, locate the USB drive section (illustrated in red box).

In the details, locate the plugged-in USB drive.
For example, my drive is an external Seagate 5G disk, labeled "Seagate BUP"

Make these changes:

a. Other-mouse-click (right mouse) the drive, Properties
b. Click the [Policies] tab
c. Choose "[x] Better Performance"
    Leave "[x] Enable Write caching on the device" checked (not illustrated)
d. Click OK and close the control panel


4. In the System Tray (Windows 7 illustrated), click the arrow to expand hidden icons;
Choose the USB icon ("Safely Remove Hardware and Eject Media);
Eject the disk
Unplug the USB cable.

Re-plug-in the disk for the changes to take effect.


Note:
If you purchase a new USB drive, you will need to make this same setting. 
Set one time per device, regardless of which USB port it is plugged into.

This holds true with thumb drives, cameras and all other external writable drives. I have not researched, but there is probably a global policy which can set this for all devices.


Results:

USB Disk operations will be a zillion times faster. The new backup took exactly 23 minutes, which was a slight improvement over the original 8 hours. Everything, including standard file-copies to this drive, was improved.


Microsoft made a conservative default setting, which allows you to pull drives without fiddling around with software. But if you make these changes, you will have to exercise restraint when pulling a drive; you will have to use the System Tray menu to eject the disk.


Drawbacks:

If you like to jerk the USB drive when you are done, you may be in trouble.  With this change, you must click the system-tray icon and eject the disk in a controlled manner. Out of habit, you should be doing this anyway -- just to be safe.

Cameras seem to corrupt their memory cards more-often-than-not and it is probably best to leave the USB settings for this device unchanged, mostly because people tend to unplug cameras and run away; everyone is always in a rush.. 


Hard Disk Cache

The local Hard Disk has a similar setting, which I also enable on my own computers.

A.  In Control Panel, Device Manager (run as Administrator), "Disk Drives"
      Locate the hard disk (may be labeled as "ATA Device")

B.  Select Properties, [Policies] tab,
[x] Enable Write Caching on the Device
[x] Turn off Windows Write-cache buffer flushing on this device*

*only recommend doing this on battery-powered laptops or on desktops with UPS protection.


Related Articles:
Disk Imaging Cleanup Steps - Make your backups faster - All versions of Windows
Windows 11 Tuning
Windows Deleting unused apps


Windows 7 Explorer Changes
Streamline Windows 7 Start Menus

2012-11-24

Run a Windows 8 DOS CheckDisk


If your disk-image backup program hangs or crashes, or you have other reasons to believe a disk is corrupt (power failures, etc.), run a DOS check disk (chkdsk).  This command will more thoroughly repair the disk than the default Windows-based error-check routines.

Steps:

A check disk will take approximately 1.5hrs, depending on the size of the disk.  It will spend a huge amount of time at 28%, be patient.

1.  Launch an Administrator DOS Prompt

     Windows 8
     a.  From the Start Page, swipe from bottom or "other-mouse-click" background
     b.  Click "All Apps"
     c.  Locate "Command Prompt"
     d.  Other-mouse-click Command Prompt icon; choose "Run as Administrator"

     Windows 7
     a.  In the Start Menu, locate "Command Prompt"
     b.  Other-mouse-click menu item, choose "Run as Administrator"

2.  Type this command:

     chkdsk C: /f /r    (enter)

     With the C: drive, DOS will complain the disk is in-use ("volume in use")
     Acknowledge the prompt with "Y".
     Nothing else will happen.


3.  Close the DOS window by typing this command:  exit

4.  Gracefully reboot / restart the computer. 

     The CheckDisk will start when the machine boots.
     Go out and have a nice dinner.
     When done, it will automatically load Windows.


Review the Results:

Windows 7 and Windows 8 may not show the results of the scan, especially if no errors were found.  Optionally confirm what Chkdsk found by looking in the Application Event Log.

5.  In Control Panel, Administrative Tools, "Event Viewer"
     Open Windows Logs, Applications
     Click "Filter"
     In Event Sources, type "chkdsk"; Click OK

     Review the events.
     Within each found event, note the two tabbed items below. 
     Scroll down to read the reports.


     What you want to see is a report similar to this:

   Windows has scanned the file system and found no problems.
   No further action is required.
    :
   0 KB in bad sectors.
    :
 

      Anything else may be cause for concern; see below.

 6.  With File Explorer, examine the root directory of the scanned disk (C:)

     Look for chkdsk log files with names similar to this:
    Chkdsk20120703093010.log

     If found, these are recovered damaged files but are likely not useful.
     Examining (with Notepad) and you will probably find they are useless and can be
     deleted. 


What if Bad Sectors / Bad Clusters are Found?


A few (hundred) bad sectors is not the end of the world, but does indicate some kind of hard disk trauma or power problem.  As Chkdsk runs, it marks bad clusters and takes them out of rotation.  Rarely, viruses will damage clusters but most do not do this anymore - a killed host can't propagate the virus. 

If you find a larger number of chkdsk log files and the Event Viewer shows a large number of errors, Reboot and run these steps again. If errors continue, your disk is failing.  Manually copy important files to separate media and replace the drive, or if you are like most people, buy a new computer. 

Times like this are a good time to take an image of the disk, but the image may fail if clusters are misbehaving.  This can be a scary time.  See this keyliner article: Acronis Step-by-Step.

Related Articles
Acronis Step-by-Step
Disk Image Cleanup Steps
USB Backup Drive Slow
Frankenputer comics

2012-11-10

Windows 8 Border Thickness

How to: Change Windows 8 default border thickness

The default Windows 8 border thickness is too thick for desktop and laptop users.  You can make the border thinner, matching the Windows 7 style. 

Windows 11 Notes:
Border cannot be adjusted in Windows 11.  But note this important thought:  Although the borders display with a thin, 1 pixel thickness, they actually active around 10 pixels.  This setting is no longer needed in Windows 11.


Recommendations:
  • Make this change only on desktop and laptop computers.
  • For some people this change may not be recommended on touch-screens - the border may be too thin for accurate finger placement.  This is easily tested.

Steps:

This change requires editing in the Windows Registry.

1.  From the Start Page, "other-mouse-click" the background (or swipe from bottom).
Click "All Apps"


2.  From the Charm menu, search for and run "Regedit"


3.  In the Registry Editor, locate this key on the tree-side:

HKEY_CURRENT_USER\
Control Panel
Desktop
WindowMetrics

HKCU\Control Panel\Desktop\WindowMetrics

4.  On the detail side, change these two values:

BorderWidth from -15 to 0 (zero)
PaddedBorderWidth from -60 to 0 (zero)

Click for larger view
5.  Close Regedit

6.  Reboot.  You must reboot to see the change.

Testing

Launch any standard desktop application, such as Notepad; Confirm border width / thickness.
To undo this change, return the two values to their previous value (documented above) and reboot.

Additional Notes:

Unfortunately, this registry change can only be made in the Current User Registry key and cannot be made in the HKLM key.  Because of this, it must be made for each new user in the system. 

This key can be changed in the Default User's key but this will only help new users added to the system (Keyliner, untested).
HKEY_USERS\.Default\Control Panel\Desktop\WindowMetrics

Changed Keys:
HKCU\Control Panel\Desktop\WindowMetrics\BorderWidth
HKCU\Control Panel\Desktop\WindowMetrics\PaddedBorderWidth 


2012-10-23

Excel Sort and Filter functions grey, unavailable

Problem: The Excel Sort and Filter tools are gray, unavailable, unselectable.  Sort is disabled.

Likely issue:
Two or more spreadsheet tabs are grouped together. 
Looking at the bottom of the workbook, at "sheet1, sheet2", look to see if two or more tabs are highlighted (usually bright white, depending on tab colors).  In the illustration below, "sheet3" is not part of the group.

Solution:
Hover the mouse over a tab name (e.g. "sheet1").
Other-mouse-click, choose "Ungroup Sheets"


Other possible issues:

Although not greyed out, Sorting will not work on merged cells (cells that span multiple columns or rows) -- "This operation requires the merged cells to be identically sized".  Illustrated below, cell B3 is merged with cell C3.  Highlighting either cell also highlights to other. 


Related articles:
Excel Parse First and Last Names
Excel VB : Return First and Last word / Supertrim
Excel VBLookup Tutorial

2012-09-15

Installing Netgear DM111PSP ADSL2 Modem

How to: Manually install a Netgear DSL modem, model ADSL2 DM111PSP

Manually setting up this router is relatively straight forward and simple and you will not need the router's CD. I recommend not installing the modem's setup program, saving you from a lot of junky software.  

Setup takes less than 10 minutes and these are my recommended steps.  Almost all DSL and Cable Modems follow similar steps.  Use these instructions for new or re-configured routers.

Related article:
Keyliner: Linksys EA2700 Wireless Router - First Time Setup

Note:  This modem is an ADSL modem and is likely obsolete.  If your ISP supports "VDSL" modems, you should switch to a new modem.  Contact your ISP to find out.

Note:  Although these instructions will work with any DSL or Cable Modem, these instructions should only be used if the DSL Modem has only 1 (yellow) network port.  If you have 1-4 yellow network ports, see this article instead:  http://keyliner.blogspot.com/2017/09/zyxel-c1100z-dsl-modem-setup.html


Basic Setup

1.  Obtain DSL Login credentials

You will need your DSL login account credentials from when the DSL line was first installed.  This is not your computer's login or any other login that you would normally type and you may need to tunnel into your filing cabinets to find it.  This will contain your DSL accounts user-id and password for the circuit.  If misplaced, contact your ISP.

ATT 877.722.3755
Century Link / Qwest: 877.348.9005 or 888.777.9569
Verizon 800.567.6789

For other ISP's, please leave a comment so I can update this list.

2.  Discover DSL Type

DSL comes in two incompatible flavors.  A slightly older, but still commonly used in America, "ADSL," which is what this article describes, and a newer version is called "VDSL."

In general, ADSL is probably a safe assumption, and this article assumes you bought a Netgear ADSL modem.  However, with this said, if your ISP supports VDSL, you should abandon this modem and get a more modern device.  I know my circuit is ADSL, but a friend's house, 20 miles from mine turned out to be a VDSL and this modem would not work at that location; the two technologies are incompatible.  This took several days to figure this out and was frustrating.  See diagnostics at the end of this article.

3.  Connect the DSL, as illustrated


Wiring:
  • Connect a standard "silver satin" flat phone cable (RJ-11) from the wall-jack directly to the modem into the grey-port.  Do not use a DSL filter on this line.  On newer packaging, this is the "green" cable.
     
  • If you also need a voice telephone on the same connection, use the RJ-11 Y-adapter that came with the router.  If you are using a different brand router, you may need to buy a separate Y-adapter.  With a voice-phone, place a DSL filter on the telephone-side.  If your brand of modem has a second telephone jack built-in, a DSL filter is not needed.
     
  • Temporarily connect an RJ-45 network cable directly to a PC or laptop hard-wired network connection using the cable provided with the modem (yellow port, often a yellow cable).  You cannot use a wireless connection for this setup; it must be hard-wired.
     
  • Install DSL Line filters on all other devices connected to the phone line.  This includes all handsets, caller-ID boxes, answering machines, TIVO or recorders that are connected to the phone line.  DSL filters were provided with the modem and you must do this prior to the next steps.  If you used a Y-adapter on the modem's RJ-11 port, the phone on that half of the connection will need a filter.
Comment: Technically, the modem can be configured without being connected to the DSL circuit -- needing only the network connection.  Once setup, you can move the modem to it's final resting place. 


4.  Power-up the modem
 

a.  Plug in the power-adapter
b.  Press the black button (round, black button, back-side of router, illustrated above)

5.  Boot the attached computer. 
The computer will get a new IP Address.

6.  Confirm LED status

Power (top icon) = Green
Ethernet (second icon) =Solid or blinking green
DSL (third icon) = Green

7.  Start a browser session

From the PC, launch a browser and connect to this IP Address:

Connect to URL:  192.168.0.1
UserName:  admin
Password:  "password"   no quotes
(* this is default, factory value, which will be changed in a moment)

7a.  On launch, cancel the modem's firmware update check  - because it won't work yet.  It will be manually restarted later. 


8.  Configure Software settings:

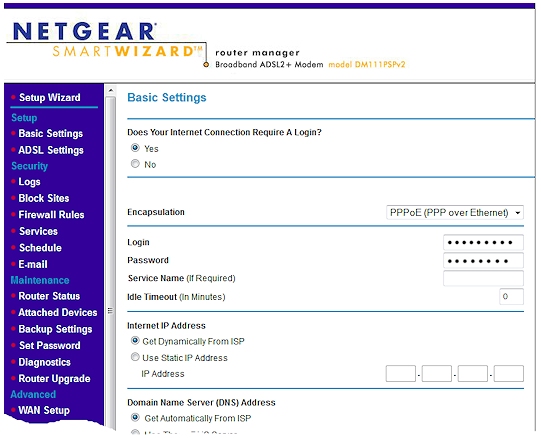
In "Basic Settings," on the left-nav, make these changes:


a.  set Encapsulation to its default setting.  Likely PPPoE, per your DSL vendor's recommendation.  This will be in the letter your ISP sent you when the account was first purchased.

b.  Select (*) Yes on "Does your Internet Connection require a Login"
c.  Type the DSL credentials recorded in step 1.  The password is case-sensitive.

d.  Check (*) Get IP Address Dynamically from ISP  (typical)
e.  Check (*) Enable NAT
f.  Click Apply and Test.

In "ADSL Settings," accept the defaults, which are documented here:
Multiplexing Method = LLC-Based, VPI=0, VCI=32, DSL Mode=Auto(Multimode)

9.  Change the router's default password
  • Click left-nav "Set Password" and change the password from "password" to one of your choosing.  I like to use "bratwurst sausage9"
  • Write password and tape to side of the router or use checklist, below
  • You may be prompted to re-authenticate

10. Allow an update to the BIOS.

Now that the DSL credentials are in place, allow the router to look for a Bios/Firmware update.  As of 2012.09, this Netgear modem did not have an update, but it does not hurt to look.  Follow these steps:

a.  Close the browser session
b.  Re-launch browser, re-connect to 192.168.0.1.  Authenticate with your new credentials.
c.  Allow Firmware check / update to run

If new firmware/bios is found, it will download to your local PC. 
On left-nav "Router Upgrade," browse to this file and follow on-screen prompts to upgrade.
Periodically, once every 6 months to a year, check for firmware updates.  You can update on a Wireless or wired network.


11.  Record Keeping

It is embarrassing and painful to lose your router's configuration.
Write this information in a safe place because if the Internet is down, you can't exactly jump on the net to find your contact information.  Don't wait to do this because you will forget.

ISP Name: ______________________________________________

ISP Technical Support Number: _____________________________

DSL Login Credentials: _____________ / Password _____________

DSL/ISP Account Number: _________________________________
(Often your home phone number.  If no home phone, they will provide a separate account number)

Modem Model Number: ____________________________________

Modem IP Address:  192.168.0.1 ____________________________

Admin Login and Password:  admin / _________________________

Downstream Wireless Router IP Address:  _____________________
(Optional, if you have a separate Wireless router; see below)

This completes the initial setup.  Confirm by browsing to any internet site.

Factory Reset:  If the modem was previously working, but now is not, especially after a power failure, you may need to reset the modem to factory defaults.  Using a paper-clip, press and hold the reset button (back side, pin-hole near the yellow RJ-45 jack.  Hold for 10 seconds with the power on.  Once reset, repeat the steps in this article.


Additional Devices


Except in the simplest case, you would not leave your PC connected directly to the DSL's Ethernet port.  Instead, you would install a second (wireless) router into the DSL's ethernet and would then connect all other devices to the second router.  

For related instructions on configuring a wireless router, see this Keyliner article: 
Linksys EA2700 Router - First time setup.


Note: Your ISP does not care if you have one or twenty devices on your internal network. 


12.  Optional: Connect Wireless Router Summary:

a. Disconnect your PC from the router's RJ-45 network jack.
b. Connect a network cable between the Netgear DSL router to eithernet port on the wireless router (typically, a yellow-plug to a yellow plug). 
c.  Connect your PC to any port (1-4) on the (Linksys) wireless router.

d.  Reboot the wireless router to get a new IP Address.

From a previous article, a typical network would look like this, where the Linksys Router (or other brand) is your wireless router.  Illustrated, a different branded DSL router:


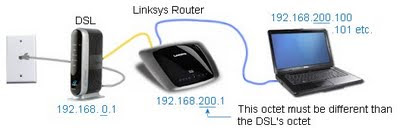
Consider putting your DSL and Wireless router on a small UPS.  It will protect this equipment from being fried or losing their configuration during a power-failure.  After having several devices fry, I expect this will save money and time.

Your DSL router setup is complete.


LED Status Details and Debugging:

The vendor's online documentation (which may not be helpful when you can't get on the internet) has a good debugging and diagnostics section at the back of the manual.  See this link:  NetGear Product Documentation.  Below is a summary, showing normal and abnormal indicators.

Power LED 
Solid Red -Modem is initializing
Solid Green - Power on  (normal state)
If Red at other times, turn off the power, wait 1 minute, then power back on to see if the modem recovers.  If this continues to fail, reset the modem to factory default (reset pin-hole button, see instructions above) and re-do the steps in this article.

Ethernet LED:
Solid Green - Devices connected (normal state)
Blinking Green - Devices active (normal state)

If Ethernet light is off, this indicates a problem with the yellow-cable connection.  Confirm the downstream PC or wireless router is connected.  Check the cable connections.

DSL LED  [Icon looks like this:  )00(   ]
Off - No DSL signal
Solid Green - DSL signal (normal state)
Blinking Green - Initializing on power up.

If the DSL LED continues to blink, confirm the data-line to the DSL modem does not have a filter installed.  If this still fails, disconnect all land-line phone devices in the house, including other phones, caller-ID boxes, answering machines, TIVO or Satellite boxes, home security systems.  Reboot the router and test again.  If the LED goes solid green, you are probably missing a DSL line filter on one of those devices.

If the DSL LED is off, confirm DSL line filters (see step immediately above).  If you have multiple phone lines, confirm you connected to the correct circuit.  It may be necessary to swap DSL signals on pins 1 and 4 on the RJ-11 jack.  Contact your ISP for instructions.  Be aware this DSL modem uses pins 2 and 3 for its signal.

If the DSL LED continues to be problematic, consider whether your curcuit is an ADSL (older, but common) or a newer VDSL.  The two types are incompatible and an ADSL modem will not work on a VDSL circuit.  You will have to contact your ISP to find out which you have.

Source: Wikipedia article 2012

If this does not resolve the problem, contact your ISP and ask them to test the line.  This may also indicate a poor-quality or damaged line in your house.


Internet LED [Icon looks like ?i]
Off - No internet connection - likely an ISP problem or bad ISP password
Solid Green - Internet detected (normal state)
Blinking Green - Internet activity (normal state)

If the Internet LED is red, the device can see the DSL signal but cannot connect to the Internet.  Verify your DSL Login credentials; the password is case-sensitive and usually contains upper-cased letters.  Check with your ISP to see if the advanced settings "VPI and VCI" are set correctly, per their recommendations.  This may indicate the ISP is having technical problems.


Finding your Router's IP Address

If you installed the router and later wanted to connect to its IP address (to update the BIOS, etc.), but you forgot to write down the address, it can be discovered with this test.  This assumes you changed the default address from 192.168.0.1 to a different address:

a.  Open a DOS Command Prompt.
b.  Type this command, no quotes:  "tracert www.google.com"

The first or second response will be your DSL router, depending if you are passing through a home wireless router or not.


DSLReports.com speed test:

Of interest, I am running on a 7mbs aDSL circuit (upgradeable to 12).  DSLreports.com's line test shows these results in a late-night test from Boise, ID to LA,CA.  

Speed Test #102812136 by dslreports.com
Run: 2012-09-27 23:56:18 EST
Download: 5830 (Kbps)
Upload: 698 (Kbps)
In kilobytes per second: 711.7 down 85.3 up
Tested by server: 55 java
User: 2 @ dslreports.com
User's DNS: qwest.net


Compared to the average of 78 tests from qwest.net:
* download is 36% better, upload is 32% worse


Subsequent tests on 2016-09-07 - with the same DSL Modem this article was written with, on the same 7mbs circuit, here are the latest from dslreports:

Download: 6050 (kbps)  6.05 (mbs)
Upload: 7552 (kbps)
Overall Speed Rating "C"
Quality: "D"


Qwest / Century Link has their own DSL speed test, found here:  Qwest DSL Speed Test
with these results:

File size transferred : 1.04 MB (1090681 bytes)
Total time taken      : 1.74 seconds (1739 milliseconds)
Throughput            : 627.0 KB/sec [Kilobyte-per-second]
                      = 0.63 MB/sec [Megabyte-per-second]
                      = 5016.0 Kbps [Kilobit-per-second]
                      = 5.02 Mbps [Megabit-per-second]


Neither are scientific tests and are subject to latency and other variable delays.  No circuit will reach its rated throughput -- in other words, I would never expect 7mbs, getting 5.8 is close enough.

Author's note:  Since this article was written, the author upgraded to a VDSL modem, and bumped up to a 20mb circuit.  Speedtests now show about 15mb/s  See the Zycell article, below.


Related articles:
Zycel C1100z DSL Modem Setup

Linksys EA2700 Wireless Router review
Linksys EA2700 Wireless Router - First time setup / setting up a home network
Windows 7 Unidentified Network problem
Installing an upgraded laptop wireless card
Wireless printer fails after router upgrade

2012-09-14

DSL Status Light Blinking

Problem: The DSL's Modem light is blinking, does not turn steady-green, does not connect properly.

This is an excerpt from a longer Keyliner article: 
Installing Netgear DM111PSP ADSL2 Modem

Netgear DSL modems look like this; other brand modems will behave similarly.

Power (top icon) = Green
Ethernet (second icon) =Solid or blinking green
DSL Light (third icon) = Green


If the DSL's DSL LED is blinking and does not authenticate, consider the following


Likely solution:

The DSL Light 
If Off - No DSL signal
If Solid Green - DSL signal detected, all is well (normal state)

If Blinking Green - (blinks on power-on initialization); afterwards, indicates unable to authenticate.  If it continues blinking consider these points:


  • Confirm the DSL login credentials, typed in the DSL's configuration screen, are correct.  You will find this in your first-time setup papers for the DSL circuit.  This is not a user-id/password that you type very often.  If you do not have this, call your ISP.
     
  • Confirm the data-line to the DSL modem does not have a filter installed.  If the filters check out okay, disconnect all land-line phone devices in the house, including other phones, caller-ID boxes, answering machines, TIVO or Satellite boxes, home security systems.  Confirm there was not a DSL filter installed at the phone company's demarcation point into the house.  Reboot the router and test again.  If the LED goes solid green, you are probably missing a DSL line filter on one of those devices.
     
  • If you have multiple phone lines, confirm you connected to the correct circuit.  Although rare, it may be necessary to swap DSL signals on pins 1 and 4 on the RJ-11 jack.  Contact your ISP for instructions.  Be aware this DSL modem uses pins 2 and 3 for its signal.
     
  •  Confirm with your ISP that you have an ADSL circuit (this netgear modem is an ADSL2 modem).  Some jurisdictions are running a newer type of DSL line called VDSL.  Contact your ISP to determine.  If you have a VDSL circuit, this modem will not work and it will not be able to authenticate.

If this does not resolve the problem, contact your ISP and ask them to test the line.  This may also indicate a poor-quality or damaged line in your house.


Related article:
Installing Netgear DM111PSP ADSL2 Modem

2012-09-09

Aggressive McAfee Security Scan Plus

What is it McAfee Security Scan Plus?

McAfee Security scan (now called Intel Security, now spun off again) is a legitimate vendor's product, but it is really just advertising.  It should be un-installed.  The program will do you no favors.  This article describes what the program does, and how you got it installed.  It may explain system instabilities on your computer.

Before describing what this program does, it is easier to explain what it does not.

Amazingly, it does not scan for viruses, or protect the system.  Instead, it monitors already running processes and will inform you if a virus was found.  It does nothing to preempt the virus.  It does nothing to protect the computer.  It will not tell you what files were infected, nor will it clean your system.

From McAfee's website, "(McAfee Security Scan Plus) Alerts direct customer to McAfee offerings if antivirus software, firewall protection or web security is out-of-date or not found.  Offers also appear for users who are protected but may want to consider other security software products."

In other words, advertising. 
 
This is pure, unadulterated junk.  It also causes browser problems.


McAfee is aggressively advertising this program and if you
allow it to install, it will encourage you to buy 
their full-fledged product. 

While this program is not a virus, it acts like one.


How did you get it?

The web is awash with people commenting they did not know where the software came from. Sadly, it is being installed by venerated companies, such as Adobe, Sun Java, and others.  The software comes as a payload, attached to those popular programs, and it installs almost surreptitiously.


Adobe Flash Player Install:  Shame

Not that anyone installs Flash anymore, but Adobe Flash Player (and its updates) installed McAfee's sin on to unsuspecting computers using a sneaky "Yes" on the default installation screen.  Note the subtle checkbox, a few steps into the installation process:


Similarly, Oracle/Sun Java threatens to install McAfee's product with this prompt, right at the moment you are tempted to click "next":


In other words, if you unexpectedly have this software, it is because you allowed it to install!  Money and other kickbacks are involved because why else would these companies do this?

My daughter caught her copy on her school's website, again with a default opt-in "Yes" being checked.  She clicked yes to install other, unrelated software, and got more than was hoped. In other words, her college (Idaho State University) sold their students to the highest bidder.


A Default YES is a Sin!

Vendors hocking this software with a default opt-in (yes-install-me-when-you-don't-expect-it) is a disservice to their customers and is a disservice to hard-working, already-protected computers everywhere.  This is reprehensible and shameful. 


Does it cause problems?  Yes.

While McAfee claims the program can run along-side other virus scanners, my experience shows otherwise.

Consider my daughter's laptop: Both IE and Firefox were crashing several times per hour.  The most recent change:  McAfee Security Scan Plus.  Having two virus scanners (McAfee and Microsoft Security Essentials MSE) running on the same computer is never a good idea.  We uninstalled McAfee.  This immediately cured the laptop's problems.

Past experience with McAfee's commercial and retail products has been poor.  Especially in the retail market, I found McAfee's products bloated, causing more problems than solved -- and this despite the awards bestowed by trade magazines.  McAfee mercilessly pesters for paid renewals, with many set to auto-deduct from checking accounts, and no recourse to stop the charges.  Behaviors like these, along with default installs, have not endeared me to their products. Symantec has not been much better.

More often-than-not, un-installing McAfees and Symantec's Virus scanners dramatically improved a machine's performance.  To un-install, open the control panel's "Programs and Features". 

But virus scanners are a necessary evil.  When you are done removing McAfee's software, install Microsoft's free (Security Essentials, now Windows Defender).


Reviews and Accolades:

I found a variety of other website reviewing Mcafee Security Scan Plus.  Of the 30 reviews, only one rated it as high as two stars -- and this review was cursory, where they clearly did not research.  Most reviews were emphatic with more than one exclamation points!!! 
  • "Bloatware, junkware, whatever. It should be a crime to auto-install this junk. It does nothing for you, and takes up resources."
     
  • "Latest Java update installs this bloatware!"
     
  • "Crapware - Any company that does piggyback installs shows a true lack of concern for the user - For a "security" company to use these tactics should be criminal"
     
  • "How do I give this no stars?! First it's McAfee which is bad. Second it's bloatware. And third it detects even less than a full install of McAfee."
     
  • "Doesn't do a whole lot except consume system resources."
     

This article was originally published earlier in 2012, but was re-written to be more forceful, and lightly-touched in 2019.  I really hate this program and would not consider McAfee's software for anyone.  Frankenstein graphics added to give a little color to such a dreary subject.


Related Links:
Keyliner Review: Microsoft Security Essentials

2012-08-12

UPS Making a Clicking Sound

How to: UPS appears to be malfunctioning - constantly turning on and off; clicking.

Two years ago, in this Keyliner article, UPS Battery Replacement, I replaced the lead-acid battery in my APC cs350 battery backup, fixing a problem where the laser printer fired-up, causing my workstation to reboot.

This week, a new problem arose when I could hear the UPS clicking on and off, every minute or so.  The UPS thought there was a brown-out, and was busy back-filling power.

Blame the Battery First*:

Naturally, my first inclination is to blame the UPS -- knowing a 2-year-old battery had likely failed.  Annoyed at the prospect, I promptly spent $40 on a replacement.   

The new battery was installed, and to my surprise, and later, chagrin, the problem remained.  Then, out of the corner of my eye, I saw the laser printer had a red-flashing error. 

Rebooting the printer fixed both the printer's problem and the UPS. 

For what-ever reason, the printer was in a bad mood and while quietly sitting in the corner, it was busy heating its fuser roller for a few days, drawing a ton of power.

*I wasted money on the new battery.


Lesson learned:
When a UPS is unexpectedly tripping, the problem is almost always upstream.  It could be a power-company brownout, but this is unlikely, especially if you see the problem for several days.

When UPS's misbehave, turn off other devices on the same (household) circuit before jumping to conclusions.  Turn on each device to confirm.

Consider the furnace or air conditioner, but if there is a laser printer lurking in the house, it should be the first suspect.  Laser printers are hogs.  Even though not plugged into the UPS, it draws enough power to affect the entire circuit.

Keywords:
Trip Tripping, cycling power-on, power-off

Related article:
UPS Battery Replacement

2012-07-29

Copying Large Files to Android Tablet

Discussion: Copying Large files to Android Tablets.  Problems copying files larger than 1G. "Windows has stopped working".
After digitizing a movie, I wanted to copy a large 4G file to an Android tablet and was surprised at how challenging this was.  Symptoms: Windows starts the file copy but does not get past the estimated time calculation and the copy fails. 

Normally it is a simple matter to connect the tablet to the computer with a USB cable and copy the files with Windows Explorer.  However, there is a known Microsoft Windows limitation where Explorer runs out of cache and the file copy may fail.  I have seen inconsistent results where some large files succeed while others fail; reasons undetermined. 

Wish you could Map a drive on an Android

In a perfect world, you could "map" a drive letter to the Android through the USB cable -- actually, this would be interesting with any USB device, but this is not possible.   *If* a drive letter/UNC could be assigned to the tablet's folders, there are several tools which can always copy large files:
  • Use DOS XCOPY with a /J switch -- Starting in Windows 7  2008R2, "/J" tells XCopy to use an unbuffered (non-cached) copy and was especially designed for large files.
  • Use RoboCopy (a Microsoft utility designed for automated batch copies), which also works well with large files.
  • Consider using teracopy http://codesector.com/teracopy, which I have not yet tried, but seems popular on the net.

Why not copy to an SD-Card?
SD Cards are almost always formatted as FAT32 (a file system format) and they cannot handle files larger than 4G.

Using FTP to copy Large Files

Because I could not get my copy to run, I used FTP (File Transfer Protocol).  This was a much slower than a local copy and even though the tablet was connected via USB, I had to make the copy over wireless.  A 4G copy took about an hour.  Here are the steps I used and these steps work inside of your local (home) network.

1.  From the Android control panel / Settings Screen, find your tablet's IP Address.  You will need this during the file-transfer step.

With my Asus Transformer tablet, this was found in the System, scroll down and tap the "About Tablet" menu.  Click "Status". Note the IP address.  For example, my device was 192.168.200.124

2.  From the Android Play Store (App Store), download and install the free "My FTP Server" to the Android.  This simple app turns you Android into an FTP Server.

"My FTP Server", by Boby Ertanto
As of 2012.07, version 1.4

3.  Once installed and launched, click the "Tools" gear-icon (upper-right corner).

For security, change the user-ID to an ID of your choosing, I used "user"
Change the password
[x] Check "Keep phone awake"
Save
Click "Start Server"

When the ftp server starts, ignore the displayed ftp url, you really want to use the IP Address.

4.  On your local PC use any Windows-based FTP Client and connect to the Android's new FTP service.

Note: Windows does not come with an FTP client (The built-in DOS FTP will not work because the Android software will use Passive-mode FTP).  The easy work-around is to use a more sophisticated client. I like to use the free and easy-to-use FileZilla FTP Client.  http://filezilla-project.org/.  Screenshot below; click for a larger view.


Connecting with FileZilla

Host:  192.168.200.124 (your address will be different)
Username:  user  (or as set above)
Password: (as set)
Port: 9090
Click button "QuickConnect"

5.  Upload the file (copy) to the Android. 

From the Source window (left-side), click and drag the source file from the left-side to the right.  The file transfer will run.

6.  When done, on the Android, stop the FTP Server (tap "Stop Server") and close FileZilla.

2012-06-28

MSE - Microsoft Security Essentials

If you practice safe surfing habits and have a good backup strategy, consider installing Microsoft's Security Essentials (MSE). It is fast, unobtrusive and free. Article originally published 2010.05.  Updated 2012.06.    


This article has been retired.  See this up-to-date Keyliner article:
Keyliner - Virus Cleanup Steps


I am asked to fix friend and family computers and I get asked to fix friends-of-friends computers. The number-one complaint is invariably the same: "the computer is too slow," along with "it used to be faster -- should I buy a new computer?"

As I've worked on these machines, the most common reasons for slowness are, in order:
  • McAfee Virus Scanner
  • Norton Symantec Virus Scanner
  • AVG Virus Scanner
  • Too many (legitimate) programs running in the background (system tray)
  • Actual viruses and spyware problems
  • Insufficient RAM; dial-up Internet; really-old computers
Notice that viruses are not at the top of the list.  In other words, the machines are generally virus-free.  The best solution has been to uninstall the virus scanners and install Microsoft's MSE.

Current Affairs

The expense and complexity of the commercial versions have driven me away.  To gain market share and revenue, they add features and raise prices. In the end, the McAfee and Symantec/Norton suites are too complicated and the software does so many things that system resources are fully-consumed. Admittedly, these products do more than just scan for viruses.

But if you practice safe surfing habits, then these other products may be overkill.  Safe habits include:
  • Avoid free music bit-torrent sites and porn.
  • Surf with Firefox (not IE), keeping ActiveX from running.
  • Up-to-date with Adobe Acrobat and Flash patches.
  • Full-system disk image backups on a regular basis.
  • Keep teenagers off your computer and give them their own machine.
Improvements:

In the past two years, both Norton and McAfee have improved their software and they now have smaller footprints.  If I had at-risk computers, where virus infections were a re-occurring problem, I would consider more robust software and would probably choose Norton.  But in general, I still do not trust most commercial virus scanners.  Case-in-point, McAfee is aggressively installing on unsuspecting users.  See this Keyliner article: McAfee Security Scan Plus.

PC Magazine's most recent Virus Scanner Reviews 2012, seem a little vague and almost non-committal and it doesn't mention Microsoft's product.  In a separate review, PC magazine rates MSE 2012 as mediocre, but most other reviewers generally like Microsoft's product.  The biggest failing is when a machine is already infected. I agree.  On an already-infected machine, you need to use several tools, including Microsoft's bootable "Windows Defender Offline," along with other's, such as Malaware Bytes (see Keyliner article:Removing Win32/Cryptor). But if you practice generally safe browsing, then MSE will work well-enough.


What I am Doing Now

I now exclusively use Microsoft's Security Essentials.  

Although Microsoft claims they are not competing with commercial software, they are doing relatively well and by most accounts, MSE is a decent program. Almost all reviewers report the software is capable and does not sap system resources.

Benefits:
  • It is tightly-integrated into Windows and runs well in Windows 8, 7 and XP.
  • Performance is invisible.
  • Unobtrusive - no nagging.
  • Quiet, automatic updates; several times per day.
  • A simple, straight-forward user-interface.
  • It is free; no registration; fully-functional; no upgrades to paid packages.
MSE not only uses virus signatures to detect malware, it can also flag suspicious activity, such as an unexpected network connection, modifications to system files, or if software attempts to download in the background. When MSE sees activity like this, it automatically sends the suspected malware to Microsoft's servers for analysis. With 100 million PC's, this gives Microsoft a good pool for correcting problems.

Drawbacks:

Because it can't be configured or controlled from a central server, it is not suited or licensed for business use.

Rootkit detection is weak and you should not rely on this tool to repair an already infected machine. With a raging infection, you will probably have to rely on other tools before MSE can be effective.  I recommend starting with Microsoft Standalone Windows Defender and then see these popular Keyliner articles: Removing Win32/Cryptor and Removing Personal Security ).


Downloading and Installing

Download directly from Microsoft by using this address:
http://www.microsoft.com/security_essentials

Installation is easy and even your grandmother can do this. 
Un-install old virus scanners before installing MSE.
If you have Microsoft's older Windows Defender, it is automatically disabled during the install.

Once installed, let it kick-off a full scan. From then-on, you can basically ignore the software.


When it does have something to say, it is obvious and UAC nag-screens appears, assuring you are not looking at a virus-look-alike.


Conclusions:

I am pleased and now use MSE on all my personal equipment. Microsoft Security Essentials may not be as powerful as other packages, but I have a low risk of infection and am comfortable with my backup strategies.  For at-risk computers, a more robust solution is needed and I would tentatively recommend Norton Antivirus 2012.  Some day, I may give Norton/Symantec and McAfee another try.


Related Keyliner articles:

Use this when your machine is already infected.
Microsoft Standalone Windows Defender.
Removing Win32/Cryptor
Removing Personal Security

HowTo: Fixing Slow Computers
HowTo: Cleaning Windows 7 Startup Programs

HowTo: CPU Utilization and Diagnostics

Reviews:
PC Magazine Virus Scanner Reviews 2012
PC magazine rates MSE 2012
PC Magazine Norton Antivirus 2012 Review

2012-06-24

Captain UnderPants Name Maker Program

For fun:  Captain Under Pants Name Maker.

A decade ago, when my children were little, they were reading the adventures of Captain Underpants, by Dave Pilkey.  In one of the stories, the book asked the kids to take a letter from their first and last name.  They were then instructed to look in a chart to generate a new name. Their new names were well-suited for people that age.

This looked fun and I wrote a program around the idea for my kids.  We played with this off-and-on for a few years until I out-grew it.  Today I stumbled across it again and thought it would be fun to post.

This is a screenshot of the program:

To use, type your name, press enter, and it generates a new name.  President George W. Bush is "Fluffy Toiletshorts" while President Obama gets "Cheeseball Hamsterbiscuits."  My name is nothing to brag about either, I get the ignominious "Tootie Picklelicker."

Download and Installation:

The program is a simple EXE that installs with a file-copy.  There are no registry changes or installation routines and it was written in VB6. 

From Keyliner's public GDrive, click this link and download to a local temp or download directory.  Do not download directly into ProgramFiles

Click this Keyliner Public GDrive link:
NameMaker Download

When downloading, different browsers behave differently.
You will be prompted the file cannot be scanned.  Click "Download anyway"

Microsoft Edge:

Prompts "NameMaker.exe" was blocked because it could harm your device. 

"Click See More" and allow the download.  With Edge, the file will appear in your Downloads directory with a random name, "Unconfirmed 780359.crdownloaded" (name varies). 

Rename the file to "NameMaker.exe".


C.  Mark the program as safe-to-run:

(This step may not be needed if downloaded by Edge and you clicked "More / Download Anyway")

Using File Explorer, right-mouse-click the downloaded (and re-named) .exe
Select "Properties"
Check [x] Unblock.  This removes the "mark of the web." 

                 Click for larger view

* Only do this if you trust keyliner *and* only if downloaded from keyliner's public GDrive. 

If "Unblock" is not visible, it has already been unlocked (by Microsoft Edge).
Once [x] Unblocked is clicked, this security menu disappears.
You may be prompted for security UAC/Windows credentials.


The name-selection algorithm is slightly more complex than the author's original design and that makes it more fun. Scattered throughout the screen are numerous Easter eggs with jokes that will make you groan.  It will take a lot of clicking to get through them all.


At the risk of cease-and-desist, and with apologies to Mr. Pilkey, you are welcome to download and have fun.