Important: If your DSL Modem has 4 or more (yellow) network ports, *and* if you have a secondary wireless router, do not use this article. Instead, see Zyxel C1100Z DSL Modem setup for those instructions.
Related articles:
Installing a DSL Modem
Resetting a Wireless Password or Admin Password
Router 5ghz Wireless Setup Steps
Basic Wiring
A. Wire the routers in this fashion.
Avoid using a Wireless connection when configuring or building your network. If using a laptop or desktop to configure the network, temporarily connect the laptop via a Cat-5 cable directly to the new router (illustrated below with the blue cable); do this instead of using a wireless connection because it is risky and frustrating to configure a Wireless router using the wireless.
Ideally, you would have two network cables -- one for the Modem-to-Router and a second for the Router-to-your-PC. But if you have only one, 'borrow' the (yellow) Modem-to-Router cable for the following configuration steps.
When connecting your machine, attach to the blue Port on the back of the wireless router (port #1). This is temporary, just to configure the router.
Illustrations show a Linksys WRT110 router (shown as "Port 1") connected to a DSL or Cable modem. All routers, including the EA2700, work similarly.

Note: The DSL Modem (or Cable Modem) has only 1 (yellow) network port. If yours has four ports, and you want to continue to use them, see this article: Zyxel C1100Z DSL Modem setup
B. Install DSL Line Filters
If you have a DSL connection, instead of Cable, install DSL line filters on all non-modem devices, such as phones, answering machines, DVRs, home security alarms, etc. If you have a cable modem, ignore this step.
DSL filters are supplied with the DSL modem or they can be bought separately.
*Do not* install a filter on the line that runs to the DSL modem (illustrated in grey).
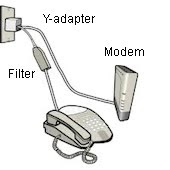 If
a phone and the DSL-line need to share the same wall jack, do one of the following: Purchase a standard RJ11 Y-Adapter and wire as illustrated on the left. Or, use the extra phone jack on the back of the DSL modem, plugging your phone directly into the router.
If
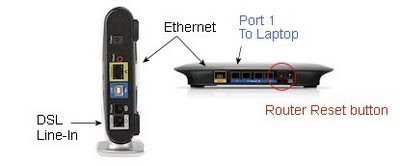
a phone and the DSL-line need to share the same wall jack, do one of the following: Purchase a standard RJ11 Y-Adapter and wire as illustrated on the left. Or, use the extra phone jack on the back of the DSL modem, plugging your phone directly into the router.C. From the DSL or cable modem, run a standard Cat-5 network cable from the Ethernet (network) port to the router, illustrated above, in yellow. On many modems and routers, the two ports are yellow. A cable is usually provided with the modem when purchased:
 D.
Finally, run a second Cat-5 network cable from the Router's Port #1
to your desktop or laptop's Ethernet port, illustrated above with a blue cable. (If you have only one cable, you can temporarily borrow the yellow cable.)
D.
Finally, run a second Cat-5 network cable from the Router's Port #1
to your desktop or laptop's Ethernet port, illustrated above with a blue cable. (If you have only one cable, you can temporarily borrow the yellow cable.)E. Power on the devices in this order:
DSL/Cable Modem first; wait 1 minute.
Linksys Wireless Router; wait a moment or two.
Laptop/Desktop
Configure the Linksys Router
Follow these steps to configure the linksys router.
You will note that I do not use the Linksys setup software provided with the router. Instead, I connect directly to the router. This gives better control over the process and you will find the setup steps are nearly as easy and you get better control.
1. (Optional) Reset the Router
If this is an existing router, reset to a factory default IP Address of 192.168.1.1 : by pressing the reset button (illustrated above, in red). To reset, power-up the router, then use a pencil to press and hold the micro-switch button for 5 seconds, then release.
(Other brand routers may use different default addresses)
2. Reboot your workstation.
Details: With your computer plugged into wired Cat-5 Port#1 (illustrated above as the blue cable), reboot your workstation. This will cause it to grab a new "DHCP" IP Address from the router.
Technical note: An 'IPConfig / Release /Renew' will not work. It is not recommended that you use a wireless connection to configure a router.
3. Login to the Configuration Screens.
Launch a browser and type this address in the URL line:
192.168.1.1 This is a linksys-brand default ip-address
First-time login will be:
admin / admin
(Older routers use a blank user-name / admin)
Note:
Subsequent logins will use different credentials. Other brands of
routers have other login steps -- see the documentation that came with
the router for details.
4. Basic Setup - IP Address:
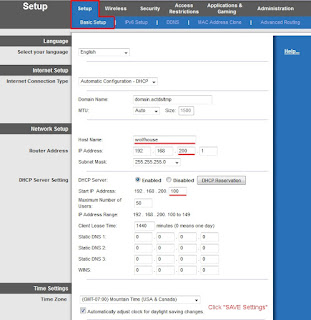
After typing 192.168.1.1, you will arrive at this screen:
2014.04 Note: Screen illustrations from Linksys BIOS Version 1.0.12. Newer versions of the router have significantly different screens.
If your initial screen looks like this, continue with this article. Otherwise, be aware the screens will look different, but the basic steps are the same.
 |
| Click for larger view |
In the Setup, Basic Setup tab, make these changes:
a. Internet Connection Type: Automatic Configuration - DHCP
b. Domain Name: (accept default or use domain.actdsltmp)
c. MTU: Auto - Size 1500
d. Host Name: Any name of your choosing;
Example: "wolfhouse"
e. Set the router's new IP Address and subnet mask. (The address's third octect (200) must be different than the DSL or Cable Modem's third octect):
192.168.200.1
255.255.255.0
f. DHCP Server: Enabled
Start Address: 192.168.200.100
Maximum number of users: 50
Client Lease time; change from zero to 1440 minutes
g. Set the time-zone
h. Click "Save Settings" (Scroll down to see button... Don't forget to Save)
Note: Always Save Settings before leaving any router-configuration screen.
i. Important: *reboot* the workstation to obtain a new IP Address.
Discussion:
The Linksys router needs to live at an IPAddress range that is different than the DSL or cable modem. I like to pick an address, such as 200.1 but many people like to choose 100.1 -- anything but something in the 000.x or .001.x octect range.
By enabling DHCP, you are allowing this router to dispense (broadcaset, distribute, assign) IP addresses to any device that arrives on the network. Out of habit, I choose the start-IP address as 200.100. Many people like to choose 200.50 -- it really does not matter the starting octect -- but it must be greater than ".1". Limit the maximum number of users to 30 or 50. Remember, this defines a range of assignable DHCP addresses (see below). I like to leave addresses 200.200 - 254 for printers and other hard-coded, non DHCP addresses.
Results: The new network will look like this:
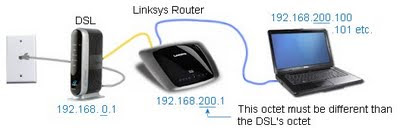 Note: The DSL or Cable Modem's address (usually 192.168.0.1) has already been configured and how to set it's address is not discussed in this article.
 The DSL / Cable modem's address is usually 192.168.0.1 or 1.1. The new Linksys router's address is set to 200.1. Workstations connect, either by wired or wireless, and will pull a new, somewhat random address from the DHCP pool, starting at 192.168.200.100, 101, 102, ... through 150.
5. Wireless Setup
Continue with the wireless setup. I recommend setting Wireless settings, even if you do not have any wireless devices.
On the top-row menu, click "Wireless", "Wireless Settings".
With newer routers, you will be setting different values for the 5Ghz and 2.4Ghz networks.
Do this:
Follow the steps documented in this Keyliner article and return here where done:
Link: Router Setup Steps - 5Ghz
Note: The article references important differences in the Network Modes, Security Modes and SSID names! Encryption is also set within this article. Don't forget to click "Save" before leaving that page.
6. Wireless Guest Access
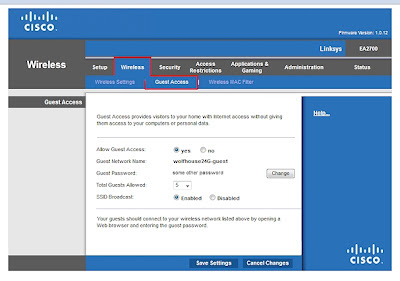
Returning to the main Linksys menus, select the Wireless menu, then sub-menu "Guest Access":
 |
| Click for larger view |
Make these changes:
- Allow Guest Access: Yes
- Guest Network Name (auto-assigned: e.g. wolfhouse24G-Guest)
- Guest Password: Assign an easy-to-remember password that is different than the admin or regular passwords. For example, "doghouse"
- SSID Broadcast: Enabled
Save Settings before leaving this screen.
Wireless MAC Filter and SSID Broadcast
Contrary to popular wisdom, hiding broadcasted SSID's and using MAC-address filtering is no longer recommended and these sections in the config screen should be skipped.
Reason: Some new Windows 7 / 8 features will not work without a broadcast SSID -- and hiding the SSID won't help keep the bad guys off your network. Mac Addresses are easily sniffed and spoofed and SSID's can be quickly found. If a hacker was good enough to break the encryption, they already have your SSID and Mac addresses. Quit wasting your time.
7. Important Administration Change:
Click the "Administration" tab, then "Management"
Reset the Admin password, changing from "admin" to any other value.
Click SAVE SETTINGS
I recommend making the Admin password the same as the SSID / Wireless access password set above. If you make them the same, do not tell your teenagers the wireless access code or they will know the router's admin. I know several teenage boys who have caused mischief in this area.

Note: You may need to re-login to the router (via browser window) if you need to make other changes. The old admin/admin login credentials will no longer work.
8. Write the Passwords Down
This password should not be lost or forgotten. I recommend recording these values and store in an envelope near the router or use a luggage tag:
Router Address: 192.168.200.1
Broadcast SSID: _______________________
Starting DHCP Address: 192.168.200.100
Admin Password: __admin /______________
24G Wireless Password: ________________
5G Wireless Password: _________________
Example:
Broadcast SSID: wolfhouse
Starting DHCP Address: 192.168.200.1
Admin Password: howling5g
24G Wireless Access Password: howling24
5G Wireless Access Password: howling5g - or other password
Guest Wireless Access Password: doghouse
*Note: If the admin password is lost, you will have to reset the router (see step 1 - Reset button) and rebuild the network from scratch. Once rebuilt, you will have to teach each wireless device the new access codes. This is annoying. Write this stuff down!
Done!
This completes the Linksys Router's setup.
See below for Workstation steps.
When powering on the network, it is best to boot (power on) the DSL modem first. Wait a few moments, then power the Router. This gives the DSL modem time to establish its IP address so it can send it down the line.
Workstation Setup
Wired Devices
Connect all wired connections per normal and reboot the workstation. Wired devices will pull a DHCP address and no other actions are required, presuming the workstations use DHCP -- which is the norm.
Older Wireless Devices (using 2.4Ghz 802.11 a/b/g)
Wireless devices using older network cards on 802.11 a/b/ or /g can only connect to the 2.4Ghz network -- even though they may see both the 5G and 2.4G broadcast SSID's. If the older devices can see and connect to the 5G network, you mis-configured the wireless per this article; see Link: Router Setup Steps - 5Ghz.
If a older device are allowed to connect to the 5G network (meaning that channel is broadcasting on both frequencies), they can connect and when they do, all 5G activity is disabled -- even if those other devices have 5G capability. The channel steps down to the lowest common denominator. More expensive routers, those with 6 antennae, work around this by dedicating a circuit for each type of connection.
Newer Wireless Devices (using 5G 802.11n)
Newer devices can connect to either side of the network. Choose the 5G SSID if you want the speed.
My recommendations:
For children's machines, give them the 24G network, regardless of what their hardware allows. This is a good reason to make the 24G and 5G passwords different -- never tell your children the 5G password.... Yes, this is mean -- but it is a matter of self-preservation and greed.
For high-volume video streaming (the TV, Netflix, wii), choose the 5G network if the hardware can see that broadcast SSID.
For your personal laptop, choose either the 5G or 24G, as you needs and hardware dictate.
Once connected, browse the Internet. If all is well, you are done. Otherwise, see the testing steps, below.
Printers:
By default, printers almost always use DHCP addresses. This is stupid. Re-configure the printer to use a hard-coded IP Address -- preferably one outside of the DHCP "50" block. Details can be found in this article: Setting Up a Brother Wireless Printer
TESTING:
If the network is still failing, see this article for recommended testing steps.
Router Testing Steps
Related articles:
Installing a DSL Modem
Router Setup Steps - 5Ghz
Router Testing Steps
Resetting a Wireless Password
How to upgrade Linksys BIOS
Windows 7 and Vista Network Problems (IPV6)
Setting Up a Brother Wireless Printer


No comments:
Post a Comment
Comments are moderated and published upon review. (As an aside, not a single spam has been allowed through; why bother?)