2019-01-29

Windows 10 Video Driver Updates (NVidia)

Manually updating video drivers in Windows 10.  Keyliner's best practices.

I was working on graphic images and noted the screen was not updating properly.  The first thing I think about is Video Driver updates.  This article discusses how I like to do the updates.

Windows 10 is supposed to update them automatically, but that only happens if you are using the generic Microsoft Video driver -- which is what 99% of people use.  If you have an slotted video card -- where the monitor's video cable plugs into a card slot, rather than the motherboard's ports, then you should update manually.

Step 1:  Determine if you have a Onboard or slotted Video card.

Look at the back of the PC and find which port the monitor's data-cable runs to.  Your ports may be DVI, old-style VGA, a the new style PC-board.  The important thing to consider is does the cable plug into the motherboard or into dedicated PCI external slots. 

* If it is the external slots, or if you have dual monitors, where one plugs in onboard and the other into the slot, then this article is for you.

* Laptops only have onboard video but may use an NVidia or ATI driver.  See the control panel (step2). 

* If Step2 shows a name-brand video, continue with these remaining steps.  The only caveat is vendors often have a "Laptop" version of the drivers, but it can still be updated manually from the vendor's site.


Step 2:  Determine the brand of the PCI video card. 

Typically NVidia (Geoforce, EVGA, Gigabyte, etc.) or AMD Radeon.  Other manufacturers make video cards, but they are almost always using the NVidia or AMD chipsets.

The best way to tell is to look at the packing list/shipping inventory for the PC.   The second-best way is to open Control-Panel, Administrative Tools, Computer Management.  Expand Device Manager.


In my case, note this is NVidia Quadro K2000.  The model is helpful.

Notice I am not going to Dell, HP, Acer or other branded support sites.  It is best to get the most current drivers from the chipset maker.  For example, on my Dell, they quit supporting my PC years ago.


Step 3:  On the Vendor's site, manually download the driver and save to a local download directory.

For NVidia  www.nvidia.com
   Select Drivers, All NVidia Drivers

For AMD:  www.amd.com
   Select Drivers & Support

Both vendors have an auto-detect program you can download and install.  I have not used these and am generally against them -- not wanting to install another program on an already cluttered machine.  

If you could not determine the video card's model number, the same video driver is probably being used for all of a vendor's video cards, regardless of model.  The only difference being 32-bit or 64-bit Windows. Most, if not all of us are now running Windows 10 64-bit.


Here was my selection:


Download the driver (typically a large file) and save to a known location.  The download is substantial - these are large files.


Step 4:  Install

For most, both brands of video cards install a half-dozen utilities, toolbars, 3D graphics and sound drivers.  These complicate my life and have been unnecessary in all of my work.  I never install the extras.  Here is your chance to take control.  Plus, a simpler install means fewer bugs!  

If you are a gamer - and you know who you are - install all the goodies, if you need them.  For the rest, follow these general recommendations.

These install screen shots show an NVidia install.

Double-click the downloaded file to begin installation. 
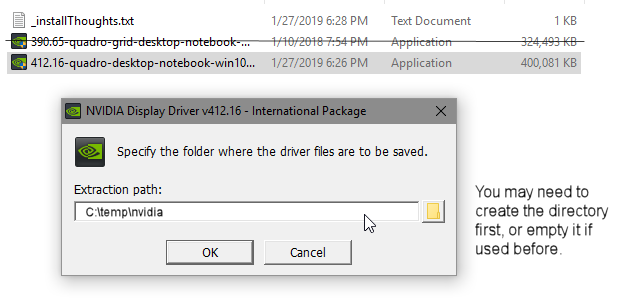
As of 2019.01, NVidia's file was
412.16-quadro-desktop-notebook-win10-64bit-international-whql.exe

(It seems they have 30 updates a year.  I check once or twice a year)

4a.  NVidia wants a temporary folder to extract the files.  I always choose this path:  C:\temp\nvidia


In this same folder, I create a notepad text document to remind me of the video-card's model number, and make (Quadro K2000).

4b.  *ALWAYS* choose "Custom Install"


4c.  In the Custom panel, uncheck all options, no matter how important-sounding they are.  Leave only the base video driver.  If you are a gamer, and you know about these other options, then I'd give a little leeway on this.


5.  The driver will install.  Expect the screen to go black once or twice.

When done,

Delete all files in c:\temp\NVidia as they are no longer needed.

Delete the original downloaded .exe

-- but I tend to leave the last one on the disk.  It makes me smile when I see my last update was 390.65 and I am now updated to 412.16

I revisit video drivers once or twice per year.  More often after major Windows version changes.


2019-01-15

Solution - Windows Update Can't check for Updates, Update hangs

Problem - Windows Can't check for Updates; Update hangs. 

This article fixes a variety of Windows 11 and 10 update ills.  

Steps are comprehensive, compiled from multiple sources and tested by the author on dozens of computers.  Although the steps are numerous and geeky, they are almost guaranteed to fix all kinds of Windows Update problems.

Updated for Windows 11
Windows 7 steps removed due to age.


Symptoms:
Windows update System Tray icon reports "Windows can't check for updates"
Windows Update hangs for hours at 0%, 44%, 90% and other percentages
Windows update "Checking for updates" status bar / progress bar does not move
The Windows Update Status indicator runs, but shows no activity or
The Windows Update Control Panel Page shows a Red-shield icon and warns you should run an update regularly, but it does not actually run the update.
Windows Cumulative Update hangs at Initializing


Reason:
Windows Update may be corrupted.  Corruption can especially happen if an older computer is brought online after a long time without updates.


You can run these steps even if you are not sure the symptoms match your problem.  There is no harm, other than taking the time.

These steps resolved the problem on my computer, but expect
to take several hours to run diagnostics -- plus more time 
to catch-up on the Windows updates. 

Windows Update can be found in "Settings" (the Gear icon).  Or click the start menu and immediately type "Update" ("check for updates").


Important Prerequisites for Windows 11 and 10:

A.  If you have not already done so, or done recently, reboot the PC.

Reason:  Sometimes Windows update needs to update itself before it can update other things and this often requires a reboot.  You may see "Windows updating..."  This is good.  This is an issue if the PC seldom reboots.

B.  After the reboot, wait 5 minutes, then check the Windows Update status again.  If pending updates, give it  (20 or 30  60 minutes) to see if the status or percent-status changes.  If it starts changing, let the update complete.  Let the machine sit for a while.

Some updates are slow updating the status and can sit at "initializing" for an hour or more before it began changing the downloading percentage.  


If the PC goes to sleep, the install may not finish.  This seems to be a particular problem with laptops, which often have tight power-management policies. For big updates, consider turning off the computer's power-saving features (turn off computer after xx minutes inactivity...)  see Windows Settings, Power Savings.

C.  If still hung, or you find you keep oscillating between downloading and initializing, continue with these steps.

D.  Although rare, confirm the PC's Date and Time are correct.  (Click the time in the lower-right System Tray).  Windows update panics if this is too-far out-of-sync.

Windows 11, Windows 10
---------------------------------

1.  Click the Gear Icon, Settings,

Choose "Trouble Shoot", "Advanced Troublehooters". 
Click "Windows Update".

Allow the troubleshooter to run.


2.  When the Troubleshooter completes:

If all is well, and problems report as 'fixed,' reboot and retry Windows Update (See Gear-icon, Windows Update). 

If updates still hang (likely, because I have never seen the trouble shooter being helpful), continue with the manual steps.  If Windows Update Troubleshooter reports errors that could not be resolved, reboot, and continue with the next Manual steps.


Manual Steps:

A.  For best results, especially on older computers and laptops, turn off Windows Power Saving features (run full power; do not turn off disk after inactivity, etc.).  For laptops, use wall power rather than the battery.  Make these temporary changes:

See Gear-icon (Settings), Power and Sleep.
Set "When plugged in, turn off: Never"
Set "When plugged in, Sleep: Never


B.  Lunch an adminstrative (elevated) DOS CMD Prompt:

Click the Windows start menu, and immediately begin typing the word  "CMD"
Single-click the found "Command Prompt" icon (do not launch or open)

Other-mouse-click the "Command Prompt" icon,
choose "Run as Administrator" (or More, Run as Administrator).  
DOS runs as an "elevated command."


C.  At the Administrative Command prompt, type these commands, one-at-at-time, pressing enter after each.  Services are being stopped to free file-locks on the software distribution folders.

net stop wuauserv   "Service not started" messages are normal, esp Windows Home
net stop cryptSvc   Keep track of which were actually stopped
net stop bits
net stop msiserver


D.  Rename these folders:

Still at the elevated command prompt, 

Rename C:\Windows\SoftwareDistribution SoftwareDistribution2.old
Rename C:\Windows\System32\catroot2 Catroot2.old

If rename folders fail, try File Explorer and delete the offending folder.  The CatRoot2 is obstinate and may not allow changes.  Consider rebooting into Windows Safe Mode and stopping the services, etc., *or* I have had success in skipping this step. 


E.  Once renamed,

net start wuauserv 
(start only if stopped above)
net start cryptSvc
net start bits     
(only if stopped above)
net start msiserver
(only if stopped above)


F.  At the same Administrator's DOS prompt, type this command, pressing Enter after typing. 
You must be running in Administrator mode!


DISM.exe /Online /Cleanup-image /Scanhealth

/ScanHealth will have hesitations while running and may take several minutes before displaying an ASCII  [0%---100%] status bar.  Expect a total run-time of 30 minutes or so.

Important:  Wait for "operation completed successfully".
Caution:  Once started, do not interrupt or cancel .

If it finds a problem, /ScanHealth step will report something along the lines, 'Repair possible'
If all is well, it will report "No component store corruption". 

In either case, continue with the next step.


G.  Next, at the same elevated Command-prompt, type this DOS command:

DISM.exe /Online /Cleanup-image /RestoreHealth


Again, expect delays, no screen activity, and an ASCII status bar. 
Another fifteen minutes or so... 
Look for "The operation completed successfully"


H.  Finally, from the same administrative DOS prompt, type this command, which does another series of cache repairs:

sfc /scannow

Again, expect about fifteen minutes to a half-hour. 

If errors ("Windows Resource Protection found corrupt files but was unable to fix some of them"):  Ignore and do not worry - these are obscure and likely not germane to this article.  The offered log file (notepad C:\windows\logs\cbs\cbs.log) is thousands of lines long - who has time to read that?


I.  When done, close the DOS Command Prompt window, "X", or type "exit"

J.  You must Reboot

On reboot, Windows, and Windows Update may apply updates.

In my experience, these steps have fixed almost all Windows Update programs.
Your comments are welcome.


Final Testing:

Open the Windows (Gear) "Settings" menu
Launch "Check for Updates".
Hopefully, all updates will apply. 

Some updates, such as Windows Cumulative Updates, are slow at telling you their progress -- sitting at "initializing" or "0%" for long times.  Give the computer time.  If it seems really hung, and after a respectable delay (say an hour), reboot and check again.  This often fixes recalcitrant updates.


Cleanup:

A.  After all updates have applied, return Power Savings settings to your preferred values:

See Gear-icon (Settings), Power and Sleep.
Set "When plugged in, turn off: (1 hr)
"Set "When plugged in, Sleep: (30 min)


B.  The two renamed folders can be deleted.

C:\Windows\SoftwareDistribution2.old
C:\Windows\System32\Catroot2.old


Comments:
I see this problem particularly when the workstation has been off the network for a long time or if Windows Update is set to manual and has not run in a long time. 

For example, with a laptop, I restored an image from 2 years ago, after pulling the machine out of moth-balls.  I found Windows Update hung multiple times and required 7 different reboots, as it applied 1.7G of patches and finally caught-up.

I have seen other articles on the Net, suggesting flushing cache, registry hacks, disk-repairs, and scan disks.  That all has been nonsense.  The key: Wait.  Leave the machine running for a few hours.  A quiet reboot after waiting has worked for me on several different machines. If those fail, try these steps.


2019-01-02

PC Reboots after Printing

Desktop PC reboots unexpectedly after laser printer prints. 

Even though my PC is protected with a UPS (battery backup), and the laser printer is not plugged into the same surge protector/UPS, print jobs were still causing my computer to reboot. This is because the laser is on the same circuit as the PC and in my house, this is unavoidable.

Laser printers are power-hungry, demanding around 450 watts.  As I have joked in the past, when I print, the house-lights dim and the power company rejoices. 


Resolutions:

Past experience shows a new battery in the UPS fixes the problem (see this keyliner article: UPS Battery Replacement, and this article:  UPS makes clicking sound when printing).  However, this time, this was not enough.  The PC continued to reboot.

The next likely solution is the PC's power supply.  Power supplies weaken with age and unexplained power problems can point this direction.  My machine is an older Dell XPS desktop tower, and it has been running 24-hours-a-day for the past 5 years.  It has, what was then, a powerful ATX 480-watt power supply.


Stopping at a local Best Buy electronics store, I picked up a 600-watt power-supply for $30.  Replacing is relatively easy, taking about 10-minutes, but you do have to be comfortable opening a PC's carcass and unplugging a lot of wires.  If you don't know how to do this, Youtube is your friend.


For a short while, this seemed to do the trick.  Replacing both the battery and the power supply now keeps the PC running even after firing-up the laser printer.  Later, after adding a new 27" 4K monitor, the problem continued.  Disheartened, I came to the only remaining conclusion:  The old UPS, even with a new battery, was not doing the job. 

New UPS

As I was explaining this problem to my friends, they laughed at my UPS's age (19 years, 3 batteries).  It was time for a new one.  Today, it was replaced with a 600W 1100va UPS from APC.  The 600-watt rating is a coincidence and has nothing to do with the new power-supply.

Compliments to BestBuy for the price -- without prodding, they price-matched from $160 down to $130 with another online vendor.  Here it is, installed under the desk.


This time, I installed the USB monitoring cable and associated software.  During an extended power-event, the UPS shuts down the computer if I am not around.  And, it has a nifty adjustment to turn off the alarm if the PC is asleep between the hours of 10:00pm and 7:00am. 


Other Changes and a Wish:

Finally, I noted the laser-printer's power is plugged into a small, inexpensive outlet-extender, that also doubles as a cheap surge protector.

It has a green light, indicating all normal, but my green-light was red.  Although this was not the cause of my problem, it was also replaced.

Although the Laser printer and the PC/UPS are plugged into different outlets, they are on the same house-hold circuit (same circuit-breaker).  This is not enough to insulate the computer from the printer.

If I were building a new house, I would make two changes to the electrical.  First, I'd run 20-amp circuits, with 12-gauge wire to all rooms.  My house has 15-amps, 14-gauge, which is not enough to run two hair-dryers at the same time, let-alone a printer.   Secondly, I'd run a separate circuit for the printer.

Related articles:
UPS Batter Replacement APC CS-350
UPS Making clicking noise