
These instructions work on Windows 7, 8 and 10.
Do not use these steps to reformat a C: drive for a Windows re-installation. Instead, see this Keyliner article: Windows 10 Partitions are not in the right order.
Issue:
After cloning a physical disk to a replacement SSD drive, I wanted to keep the old drive as a backup drive. Formatting the drive quickly erased all files on the disk, but if you looked under the hood, a number of other partitions survived, including boot sectors, recovery partitions, etc.
These partitions are not visible in File Explorer and unless you looked, you would never know they were there. The partitions waste space and confuse humans who later wonder what they are for. This article describes how to fully erase the drive.
Diagnostics:
A. Open the Windows Control Panel,
Select "Administrative Tools", "Computer Management"
B. On the tree-side, open the Storage section, select "Disk Management"
In my case, and probably yours, note the two disks, both with a busy set of partitions.
 |
| Click for larger view |
On my workstation, the new SSD drive is a 488GB disk, at Disk 0, which was cloned from the D: drive. Both disks have the same number and order of partitions. The SSD is drive C:. The larger drive, Drive D: (at 940GB) was the former C: drive and it needs to be fully erased.
From Windows Explorer, you could highlight drive D:, "other mouse-click" and "Format." It will reformat the disk, erasing all files in the large, center partition, but the other partitions and their hidden files remain, wasting disk space.
Steps to Erase all files and partitions on Drive D:
These steps are a mixture of DOS and Windows control panel steps. See below for an all DOS-method. Both produce the same results. The all-DOS method is slightly easier, with less steps, but more typing.
With some humor, confirm you know which drive you intend to delete. This article assumes Drive D:. It goes without saying, carefully follow the steps below. If you delete drive C:, you will not be happy. With this said, even novice computer users can do these steps.
1. On the Start menu, or in Windows 10 Search, locate "Command Prompt" (type "Command" in Windows 10 search).
Other-mouse-click the icon and choose "Run as Administrator" (or More... Run as administrator)

2. At the DOS prompt, type "DISKPART" (No quotes) Press Enter.
Side Note: If you are in the middle of a Windows 10 Setup (not illustrated in this article, and you are at the Disk Partition screen, press Shift-F10 to open a DOS Prompt. Type DISKPART and you will be at this same position. See this Keyliner article: Windows 10 Partitions are not in the right order.
3. Type "List Disk" (DISK is singular, no quotes).
Confirm your disk number.
In my case the old disk is Disk1. The size will give a hint.
These instructions assume disk 1. Change as needed.

4. Type "Select Disk 1"
(If you are in the middle of a Windows Setup, and used Shift-F10 to get to these screens, you are probably selecting DISK 0.)
5. Type "Clean"
The disk will be instantly erased. All partitions removed, all files gone. There is no warning, no screen activity.
6. Type "Exit", then "Exit" again to return to Windows.
7. Launch Windows Control Panel, select "Administrative tools", then "Computer Management"
8. On left-nav, tunnel to Storage, "Disk Management" (Illustrated, top). You will be prompted with "Initialize Disk"

Confirm Disk 1 (it is a little late to change your mind here; the drive is deleted)
Accept "GPT" (recommended)
OK
Results: Notice Disk 1 is un-allocated.

9. "Other mouse-click the shaded un-allocated area. Choose "New Simple Volume"
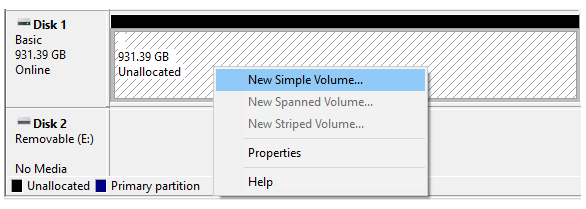
Click Next
Accept the recommended size.
Click Next
Accept the recommended drive letter (likely D:)
Click Next

At the "Format Partition" prompt, accept the defaults -
or, if you have time, uncheck [ ] Perform Quick Format (recommended).
Unchecking quick format, it gives a more thorough format, checking each cluster for damage. The long format can take several hours on a large drive.
The drive is formatted and ready to use.
Alternative Method: Using All DOS commands:
Use this method to remove all partitions and reformat a disk using DOS commands. This produces the same results as above, but all steps are from the command line. Do this method, or the other; no need to do both.
a. From the Cortana search, search for "CMD" (or Command)
b. "other-mouse-click" the Command Prompt, choosing "Run as Administrator" (or More..., Run as Administrator)
c. At the DOS Prompt, type "DiskPart" (no quotes)
d. Type "List Disk" (singular, no quotes)
Note the displayed disks.
My computer shows DISK 0 (the 500G SSD, which is my Windows C: drive) and
DISK 1 (the original spinning disk at 932GB)
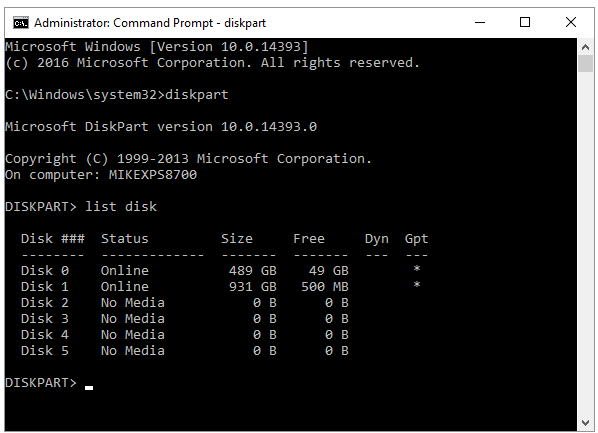
Other disks are SD card readers and can be ignored.
e. Using a DOS-like command, select the old hard disk. Do this with care, but do not fear.
Type this command:
"Select Disk 1" (No quotes. your disk may vary, but it is likely disk 1)
f. Type this command:
"Clean"
There is no warning, no prompt. The disk, and all partitions are immediately erased. Look for "DiskPart succeeded in cleaning the disk".
g. Create a partition and format the disk with these commands, typing each command and pressing enter. Do not type the quotes. Choose either the slow format (recommended) or the quick format. The slow format may take an hour or more:
"Create partition primary"
"Select partition 1"
"Format fs=ntfs label=Data" (Slow format, better quality) or
"Format fs=ntfs label=Data Quick"
when the format is complete, continue with this command:
"assign letter=D" (assuming a D: drive, do not type a colon)
"Exit" to exit DISKPart
"Exit" to close the DOS window.
The drive is formatted and ready to use.
Technical note: Although this article does not address reformatting a C: drive, but if you were, add an "Active" step right after "Select partition 1". Do not activate data D: drives.
All Done
The drive is re-partitioned cleanly, formatted, and ready-to-use. In my case, the full 931GB is available. From File Explorer, you can highlight the drive, select Properties, and rename the drive. I tend to call D: drives "DataDrive" and I tend to name the C: drive as "OS" or "System".
You can run the same "Clean Steps" when re-installing the operating system (Windows 10) from scratch. See this Keyliner article: Windows Partitions not in the right order.
Possible Problems:
* DiskPart "Format" command fails with "There is no volume selected. Please select a volume and try again."
Solution: With the proper drive Selected, type this command: "Create partition primary" and continue with the steps above.
* No D: drive:
The drive formatted but does not appear in File Explorer.
The drive formatted and the Control Panel's Disk Manager shows a disk, but no drive letter was assigned.
Solution: If the DiskPart program is still running, type "Assign Letter = D" (no colon). If you had already closed the Disk Partition program, re-launch using steps above. Select the disk, select the partition, then Assign the drive letter; no need to re-format.
The drive is formatted and ready to use.
Your non-spammy comments welcome.
Related articles:
Keyliner: Windows 10 Partitions not in the right order
Keyliner: Disk Imaging Cleanup Steps
Keyliner: Open File Explorer to a Default Folder
Keyliner: Optimizing the Windows Swap File
No comments:
Post a Comment
Comments are moderated and published upon review. (As an aside, not a single spam has been allowed through; why bother?)