
You need to do more than clone the disk when installing an SSD. There are performance enhancements and other preparations that need to happen to ensure a successful install. Once completed, the SSD will give the best speed and performance.
These instructions are for the Crucial Mx300 525GB disk but will work with any brand drive. Novice computer users should be able to complete these tasks.
Goal:
Convert a desktop computer from a spinning disk to an SSD drive
Maximize performance
Install an Over Provision Partition (giving best speed)
Assumes you are using the free copy of Acronis HD to clone the drive
Assumes Windows 10

This is a dishearteningly long, technical article and will take a long evening to complete. My apologies.
Comments:
The support forums have lots of traffic about the Acronis cloning software not working properly. A lack of preparation is the likely culprit. This article addresses this and other issues.
This assumes the old hard disk is a UEFI protected disk. These are common in most machines since Windows 8 and they are more difficult to work with -- especially if trying to boot from a CD Rom or Thumb drive. This article navigates around these issues and you need to follow them in this sequence for best and safest results.
Supplies Needed:
1. Physical keyboard, typically USB. A wireless keyboard may not work for one of the steps.
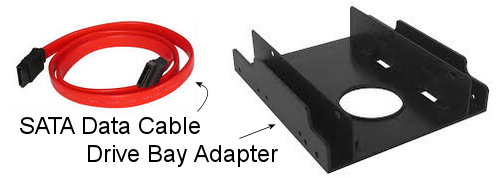
2. SATA Hard Disk data cable (purchase separately from drive. I like red ones).
3. Drive Bay Adapter (a 'sled'), purchased separately.
4. You may need a Video Cable that runs from the motherboard to your monitor.
If you are running dual monitors or a monitor with a separate video card,
you may have problems with all-important chkdsk step.
5. Recommended: An 8G or larger USB thumb drive for emergency recovery.
6. Recommended: Blank DVD, for emergency recover disk.
Hugely Important Pre-Requisites:
Cloning UEFI boot disks is risky.
As I was doing this project, I missed an important step and
trashed the computer with a nearly unrecoverable UEFI error.
A backup gives serenity to your life.
A backup gives serenity to your life.
A. Backup your current Disk -- or at least backup your data!
This is not a goody-two-shoes "backup" - I mean it. My first install had several blunders and they were scary. As I was writing and fine-tuning this article, there were several times where I nearly lost the original disk.
I recommend using Acronis Disk Imaging software to make a disk image of your existing hard drive (the full version, not the one that came with the SSD drive, or use other such software, such as Macrium Reflect's free version). Write the image to a portable external USB drive. If you have the full-featured version of Acronis, use that version to clone the disk; you do not need to install the free version that came with the drive.
Related: Keyliner link: Acronis Step By Step
B. Create a Windows 10 Recovery Drive, just in case.
From the desktop's search, type "Create a Recovery drive".
Using a dedicated 8G USB thumb drive, follow the on-screen instructions.
This takes about an hour to build.
If you blow up, booting off this disk can restore and repair UEFI disk problems.
C. Recommend spinning a copy of Microsoft's free Windows 10 installation media.
Because I did not have a recovery drive (step B), I had to use this method when my installation went south. For other reasons, this is a good disk to have hanging around.
Search Microsoft.com for "Windows 10 Media Creation Tool".
Run the program and write to a DVD.
Label the disk "Windows 10 Installation Media".
Of course, if you follow these instructions, you won't need the recovery disks....
D. Update the workstation's motherboard BIOS
-Especially if you have an older machine. Contact your vendor's support site. Almost all computers have BIOS updates. When downloading, chose the most recent version. Steps vary and are not detailed here. The older the computer, the more important this step is.
Pre-download these utilities:
E. The SSD came with a free copy of Acronis cloning software, along with an installation code. From www.crucial.com/acronis,
Download Acronis HD (www.crucial.com/acronis)
Install, accepting all defaults
Do not launch.
(Or use other cloning software. The web recommends Macrium Reflect, the free version. I have not tried this. For this article, I used the free Acronis version.)
F. Download "Crucial Storage Executive" (64-bit version).
At www.crucial.com,
Open the Support tab, click "SSD Support,"
Download "Crucial Storage Executive"
It Downloads as a ZIP file
The link is hard to find. As of 2016.12, see red-arrow in illustration:

Double-click the downloaded .ZIP file to open the archive
Note file "Setup.exe"
Other-mouse-click, select "Copy"; then paste onto your desktop
From your desktop, double-click the copied Setup.exe
(Caution: Do not run or double-click the SETUP from within the Zip)
Select "Install Crucial Storage Executive", accepting all defaults
Once installed, do not launch
The same page offers a download BIOS update. Do not bother. The Storage Exec will do the BiOS update.
Caution: Older versions of Storage Exec had a bug where Windows 10 screen positions and orientations would not save. Be sure to download the latest version.
PREP Local Disk (C: Drive)
These steps give the best chance of success and give the best performance on your new drive.
1. Clean-up the Existing Windows C: Drive prior to cloning.
For full details, see this keyliner article: Disk Image Cleanup Steps
or this summary:
a) Using File Manager, highlight Drive C. "Other mouse click", choose "Properties"
b) Click "Disk Cleanup". This takes several minutes to load
c) In "Files to Delete", select all options - except "Hibernation File Cleaner" (if present)

If present, be sure to cleanup the Windows 10 upgrade files - saving 3Gig of disk.
d) Click the "Clean up System Files" button (or in older Windows versions, the "More Options" tab). Again, this takes several minutes to load. You may have to re-select the checkboxes, depending on your version of Windows.
e) In the More Options / Cleanup System Files, click and allow it to delete all but the most recent restore point. It will complain. Ignore and allow it to delete.
2. Optional: Optimize the Windows Swap file - Recommended, but optional.
Reason: The default Windows Swap file is a variable-sized file that shrinks and grows from (0 to 2G), ebbing and flowing as needed. It is constantly allocating and de-allocating, fragmenting the disk. Force a fixed size. This way the file never collapses and never fragments. This also makes boot times slightly faster.
To set a fixed-size swap file, follow these steps.
Temporarily delete the swap / paging file:
a) Launch Windows Explorer
b) Highlight "This PC / My PC", "other-mouse-click", choosing "Properties"
c) Select Advanced System Settings
d) On top-tabs, select Advanced. Click "Performance"
e) Click the second "Advanced" tab
f) Click "Virtual Paging"
Uncheck [ ] Automatic manage paging file size
Set "No paging file" (Set)
Click OK, OK. -- Ignore the warnings.
Reboot to de-allocate the file.
g) After reboot, manually de-fragment the hard disk:
- Open File Explorer
- Highlight drive C:, other-mouse-click, "Properties"
- In the Tools Tab, click Optimize and de-fragment drive.
- Allow de-fragment to complete. This may take up to an hour.
h) Return to the Virtual Paging screens, above
i) Manually set a Virtual Paging Size. The numbers are not important, but for most machines, I pick 1500-1500 (or as much as 1800-1800), where both the min/initial and max sizes are the same. Click "Set" to commit.

Once the SSD is installed, Microsoft removes the deftragment option and you
will never be able to optimize in this manner again. Ideally, optimize before
cloning. There are performance gains in starting out with a a more organized disk.
will never be able to optimize in this manner again. Ideally, optimize before
cloning. There are performance gains in starting out with a a more organized disk.
3. Run a Chkdsk with special switches.
The check disk step fixes unseen problems that cause cloning software to fail. This is a highly recommended step, but it can be difficult to run on some machines, depending on the video, monitor and keyboards being used.
a) Run the DOS prompt program: From the Windows Search (Cortana), type the word "Command", to locate a DOS Prompt.
b) "Other-mouse-click", choose "Run as Administrator."
c) At the DOS prompt, type this command:
Chkdsk C: /f /x
Accept the offer to run at next reboot.
Reboot.
Allow the check disk to run.
This is a more thorough check disk than the standard version and the command only takes a few minutes. It looks like this at bootup:

* When done, power off the computer and continue with the drive installation steps, skipping the What if Chkdsk does not run section...
What if chkdsk does not run?

If you have dual monitors, running on a separate video card, those drivers may not load (or will not load in time). Similarly, wireless keyboards sometimes don't load and you can't "press any key to continue".
chkdsk with a /f or /f /x switch often requires "local hardware" -- this means a local video port on the motherboard's backplane and it often means a wired keyboard. Related article: Running Chkdsk on reboot.
Shut down the machine and do these steps:
a) If you were unable to "press any key to continue," you may need to plug-in a Wired (USB) keyboard.
As you try these steps, and you are unable to respond to (optional prompts), you may need to switch from a wireless to a wired keyboard. If your wireless mouse and keyboard use the same dongle, leave them plugged in, but still use the wired keyboard (both keyboards can be active at the same time). Wireless mice are ok (DOS does not need mice).
b) If you did not see the DOS screen on reboot, you may need to fiddle with the video (... the reason you are reading this section is you did not see chkdsk running).
Looking at the back of your machine, ignore all card-slots and only look at the area where the USB and network ports exist.
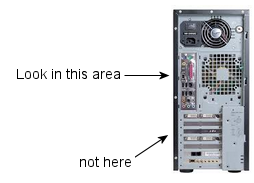 |
| Looking for a local Video Port |
c) Trace your monitor's video cable back to the machine. If it arrives at a port in the "look in this area" illustration, continue with the CHKDSK steps, below (this means the video is plugged into the motherboard). If you have dual monitors, disconnect the video-data-cable for the second monitor, leaving only the one at the motherboard.
If both monitors are plugged into a (not-here) card-slotted video card, disconnect both video cables. Then look at either of your monitors and find a video-cable connection that matches the one on the computer's motherboard. Often, this will be a PC-Display port or a VGA port. Yes, this is a pain. You likely do not have the correct video cable for this.
more details....
The type of port on your motherboard varies, depending on the age of the machine. New machines typically have a PC-Display Port (illustrated below), or an HDMI, or an older-style VGA port.
Connect a video cable (which you may or may not have) from the motherboard's backplane (see "look in this area), to the monitor. This may be a different port on the back of the monitor than used before. Monitors almost always have multiple ports and this may be in a different cable position than you normally use. If you were cursed like I was, I had to use a DisplayPort cable from the PC, then switch it with a converter to an old-style VGA connector at the monitor.

Disconnect the other video cables (if Dual monitor), disconnecting from the slotted card area, labeled above as "not here".
On my monitor, I had to use the monitor's controls, telling it to pick
the DisplayPort because the auto-detect did not work properly.
Restart Windows normally, with the one monitor connected, and retry the CHKDSK steps, above.
Personal note: This took hours to figure out, with a lot of nonsense on the web about running the chkdsk twice and editing registries. The real problem with CHKDSK not running was the video. Finding a PC Display Port cable, with a wide-end on both sides, as required by my monitor, was impossible. In the end, I borrowed the cable from a friend. Buying an adapter, DisplayPort-to-VGA would have cost $30.
A clean chkdsk ensures a good, clean disk-clone.
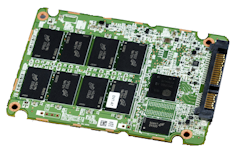 |
| Crucial MX300 - Interior View |
Install the new Drive
Keeping the wired keyboard and video set as above, continue with these steps (you may not have had to make changes with video, depending on the chkdsk steps).
1. With the power off, install the new SSD into any open drive bay.
Leave the original hard drive on SATA Port 0 - (often printed on the motherboard)
Use any available motherboard SATA port for the new SSD
Use any available power plug for the new SSD Drive
If you forgot to buy a new SATA cable, temporarily steal the CD Rom's SATA and power cable.
I found my sled/drive bay adapter did not fit in the slots - the screw holes did not line up. Turning the sled upside-down, but keeping the drive right-side-up, solved the problem. Another problem I had was my plastic adapter/sled's screw holes did not have threads. It was hard to make the screws work properly. I would have been happier with a metal sled.
2. With both the original hard drive and the SSD installed, boot the computer and launch Windows normally.
You will be booting with your old hard drive as drive C:. The SSD is temporarily a secondary drive.
3. Launch the previously-installed Crucial Storage Executive.
Storage Express is slow to start, with no screen activity. Be patient.
At the java prompt, "Allow Access on Public Networks"
It will open a browser window, which may be minimized or hiding behind other windows.
4. Select Firmware update
(Note: On my workstation, I did not know this option was here and instead I downloaded the bootable firmware update. It was difficult to convince my workstation to boot from CD and this caused UEFI errors that were painful to recover from. See this link: Your PC Needs Repairing - UEFI). This utility should make this easier.
5. After the firmware finishes its update, return to the Storage Executive utility.
Click "Enable Momentum Cache"
It will warn this is not recommended without a battery. Wink-wink: Skip this step if your desktop is not on a UPS battery backup.
Now that I've said that, most people, including me, ignore the warning and enable the cache anyway. (On my computers, I always use a UPS battery backup. UPS's save a lot of fried equipment and corrupted hard drives. You should get one.)
This change will require a reboot. Reboot and Launch Windows normally, again booting from your original hard disk.
Format and Enable Over-Provisioning
Enable Over Provisioning. This step is optional, but recommended.
Without Over Provisioning, the drive will be noticeably slower.
6. In Windows Control Panel, open "Administrative Tools"
Open "Computer Management"
a. Computer management may prompt (should prompt) "Initialize disk", Disk 1.
It will offer MBR or GPT. Choose GPT
b. Click Disk1 (the SSD), selecting the "unallocated partition"
c. Right-mouse-click "unallocated,"
Choose "New Simple Volume", click Next
Accept the offered size
Assign any drive letter (E:); this is unimportant
Select Quick Format
Close the Computer Management screen when done
 |
| Click for larger view. The new SSD is Disk 1 |
7. Re-launch Crucial Storage Exec (again, it has slow load times)
a. Turn ON the Over Provisioning switch (slider switch on bottom of panel)
b. Accept recommended size at 10%
c. Important: Click the blue "Set OP" button, far right, and confirm when prompted
d. Close Storage Exec

Important Note: If you later return to this screen, the ON/OFF switch will be off. The Partition is still in place; see "OP" on the far-right of the drive illustration. If you try to turn it back on a second time, it will fail, but the message won't say why. This makes them evil.
In Control Panel, Administrative Tools, "Computer Management", note the new partition, next to a larger, empty partition. The sizes are not relative, but notice 10% of 440 is about 40GB.

* Continue with the Cloning steps - but you cannot use the Automatic Cloning options.
Clone the Disk
Return to Windows
Leave all disks wired-as-is.
Leave all keyboards and monitors as-is
If you are using the Over Provisioning (recommended from above), be sure to follow the cloning steps carefully.
A. Install or launch Acronis HD (or your other cloning software). These remaining instructions assume the free version of Acronis. If you are using other software, the steps will be similar.
B, The opening screen shows three large circled menus. Ignore them. This is a user-interface design problem - they look like menu buttons, but they are not.
Instead, click "Get Started"
You are offered to create an account, or you can click "no internet connection".
The "no internet connection" is is buggy -- you must register and create an account before you can use the software.
When prompted, type the Serial Number from the Crucial box.
C. In "Tools", Select "Clone Disk".
Choose Manual.
(Reason: You are trying to protect the OP partition)

D. Click the Source Disk, where the Source Disk is your original drive. Then Next

E. Select the Destination Disk (e.g. the new SSD).

F. On left-nav,
Click "Move Method:"
then Manual (not "As-Is" or "Proportional")
Select the largest partition. On my disk NTFS 488GB.
Double-click the partition.
In the popup dialog, scale back the partition size by 10%
 |
| Click for larger view |
For example, on my 500GB disk, shows as 488.4GB
Scale this back 10% plus 1G fudge. In my case, changing to 488 - 48 - 1 = 439GB
Press Tab.
Note the "Space after" shows apx 49MB. This preserves the previously-built Over Protection Partition
Click the bottom "Accept," the Next, ignoring all other partitions.
Click Proceed.
You must Restart when prompted.
(Remove any CD's or DVD's from the CD-ROM drive before rebooting)

G. On Reboot, the clone will start. Expect 20 to 70 minutes, depending on your data, speeds, etc.
The status bar will not move in steps 1 through 5. Do not panic. Just wait.
Important: Check the [x] "Shutdown computer" checkbox while the copy is running.
(Read the ubber-important caution, below -- Do not allow the machine to reboot when the copy completes!)
Important

When the clone is done, do not allow the computer to boot.
H. While powered down, move the SATA data-cable from the old drive to the new SSD.
In other words, move the SSD drive to the motherboard's SATA port 0 (the same port as the old drive).
SATA Port numbers are usually clearly printed on the motherboard. Often it is hard to remove the cables from the motherboard side; I always move them from the drive's side.
Then, temporarily disconnect the old hard drive
Unplug the old drive's SATA cable and optionally its power-cable.
Unplug the old drive's SATA cable and optionally its power-cable.
Leave disconnected! (Do not allow both drives to boot on the first startup)
If you screw this up, like I did, Windows will boot but the Windows login screen will "flash on and off continuously" and the machine may never boot. Then the UEFI security on the original disk will be corrupted and the new drive will be equally confused. This will make you have a bad day.
If you followed the cautions from above, you would not be in this position. Disconnecting the old drive will not repair the already-damaged UEFI codes. Solution for corrupted UEFI can be found here: Your PC Needs Repairing - UEFI but the steps are not pretty.
Continue with these steps:
First-time reboot with only the SSD drive active.
I. Boot the computer, with only the SSD drive active. Leave video and keyboards as-is.
J. Allow Windows to load normally.
Log-in to Windows one time.
Shut down the computer for the last time.
Decision:
* To keep the old drive as a backup disk, shutdown the computer and re-connect the old drive, using any available SATA Port, any available power cable (any port but SATA 0). See steps below for recommended formatting.
K. Return the video cables and keyboards (if changed from the chkdsk step) to their original, production positions (dual monitors, wireless keyboards, etc.)
You may need to set your monitor's input back to Automatic (if you adjusted the monitor's onboard menu).
L. Reboot and launch Windows.
By this stage, the SSD is drive C: and is your new Windows boot disk.
If the old-drive is still installed, it will probably be assigned as drive (D:). It will have a copy of all your original programs, files and data. This can be confusing, but you can safely ignore the disk for the time being; see steps below for formatting recommendation.
If the old drive is still installed, the CD/DVD may have changed drive letters from "D:" to "E:" I recommend using the Control Panel's "Disk Management" to shift the drive's letter to Drive W: - this way you never have to worry about this again.
Except for an uninstall, you are essentially done.

Important - Un-install Acronis
M. Finally, as much as I like Acronis (the full-sized, purchased software), un-install the free version.
This is crippled software and can only be used for cloning and there is no reason to leave it installed. It is widely reported to cause crashes and instability.
Open the Control Panel, "Programs and Features"
Uninstall Acronis
Old Drive - Reformatting
If the old drive was left in the machine, I recommend re-formatting with these steps.
Reformatting makes a smaller target for viruses and other attack vectors. Leaving a duplicate of the original disk can be confusing. For backups, erase the old drive and make backups of the data -- not the programs. Do not use these steps for reformatting a new Windows C: drive, for a new Windows re-installation.
Related keyliner Article: Erasing all partitions after a clone and formatting.
Related keyliner Article: New Windows 10 Install; partitions not in recommended order.
These steps are geeky, but easy.
Use these steps instead of Windows Control Panel menus in order to erase old, hidden partitions remarkably, these steps are easier than using the Windows screens.
a. From the Cortana search, search for "CMD" (or Command)
b. "other-mouse-click" the Command Prompt, choosing "Run as Administrator" or (More.. Run as Administrator)
c. At the DOS Prompt, type "DiskPart" (no quotes)
d. Type "List Disk"
Note the displayed disks.
My computer shows DISK 0 (the 500G SSD, which is now the Windows C: SSD) and
DISK 1 (the original spinning disk, at 932GB)
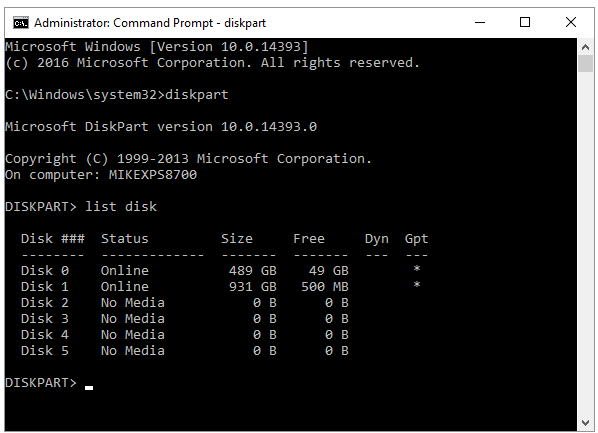
Other disks are SD card readers and they can be ignored.
e. Looking at the report, locate the old hard disk by looking at its size. Do this with care, but do not fear.
Type this command:
"Select Disk 1" (No quotes. Your disk# may vary, but it is likely this disk)
f. Type this command:
"Clean"
There is no warning, no prompt. The disk, and all partitions are immediately erased. Look for "DiskPart succeeded in cleaning the disk".
g. Create a new partition and format the disk. Type each of the following commands, pressing enter after each. Do not type the quotes. These steps assume you have selected the disk, from step e.
Choose either the slow format (recommended) or the quick format. The slow format may take an hour or more:
"Create partition primary"
"Select partition 1"
"Format fs=ntfs label=Data" (Slow format, better quality) or
"Format fs=ntfs label=Data Quick"
when the format is complete, continue with this command (assuming Drive D, do not type a colon):
"assign letter=D"
"Exit" to exit DiskPart
"Exit" to close the DOS window.
The drive is formatted and ready to use.
Possible Problems:
* DiskPart "Format" command fails with "There is no volume selected. Please select a volume and try again."
Solution: You missed a step. With the proper drive Selected, type this command: "Create partition primary" and continue with the steps above.
* No D: drive:
The drive formatted but does not appear in File Explorer.
The drive formatted and the Control Panel's Disk Manager shows a disk, but no drive letter was assigned.
Solution: You missed a step. If the DiskPart is still running, type "Assign Letter = D" (no colon). If Disk Partition was already closed, re-launch using steps above. Select the disk, select the partition, then Assign the drive letter; no need to re-format.
This completes the SSD Drive installation.
Comments welcome. I, and other readers, would like to hear your experiences.
Related articles:
keyliner: Your PC Needs Repairing - UEFI)
keyliner: Setting DVD or USB Drive Boot Order
keyliner: Disk Image Cleanup Steps
keyliner: CHKDSK does not run on reboot
keyliner: Erasing all partitions after a clone and formatting.
keyliner: New Windows 10 Install; partitions not in recommended order.
No comments:
Post a Comment
Comments are moderated and published upon review. (As an aside, not a single spam has been allowed through; why bother?)