Note: This article describes how to setup a typical home network using a DSL Modem and a now obsolete Linksys Router WRT110.
See these articles for newer Linksys Routers:
Linksys EA2700 - First Time Router Setup for Home Networks
Router Setup Steps - 5Ghz
Original Article:
These same instructions can be used to "re-program"/re-configure a Linksys router that is malfunctioning or if the password was lost and the router needs to be re-set. You will notice I do not use the vendor's Installation CD.
 In this type of network, a phone-line runs from the wall to the DSL Modem and a Cat-5 network cable connects the DSL Modem to the internal (Linksys) router. All wired and wireless workstations connect to the Linksys.
Related Articles:
If you have intermittent network failures, consider this article:
Windows 7 and Vista Network Problems (IPV6)
Router Testing Steps
Basic Wiring:
Skip this section if the wiring is already in place.
 A. On all phones, caller-id boxes, fax machines, answering machines, satellite receivers, etc., install a DSL noise filter that came with the Modem. Do *not* install a filter on the line that runs to the DSL modem.
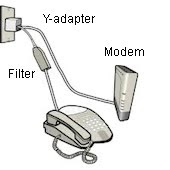 If a phone and the DSL-line need to share the same wall jack, either plug the phone into the RJ11-phone jack on the back of the DSL Modem (and a filter is not required) or purchase a standard RJ11 Y-Adapter and wire as illustrated on the left.
B. Run a standard phone-line cable from the wall-plate to the DSL Modem, plugging into the "DSL-Line-In", illustrated with the grey cable, above.
C. From the DSL modem, run a standard Cat-5 network cable (usually comes with the Modem) from the Ethernet (network) port to the router. This is illustrated above, in yellow. From the backside, the wiring looks like this:
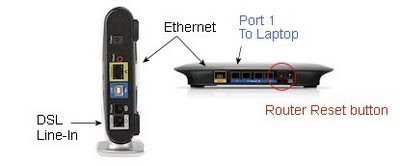 C. Finally, run a standard Cat-5 network cable from the Router's Port #1 to your desktop or laptop's Ethernet port. Even if you intend to use a wireless laptop, temporarily use a wired connection during the configuration steps because it is easier. Ideally, you would have two network cables -- one for the Modem-to-Router and a second for the Router-to-your-PC. But if you have only one, 'borrow' the Modem-to-Router cable for the configuration steps.
Configure the Linksys Router
Follow these steps to configure the linksys router. You will be changing from the factory-settings to slightly different settings for security and configuration reasons. Warning: If you have a functioning network, these instructions will re-set the network and you may need to re-visit existing workstations to get them re-connected.
1. Reset the router.
With the router powered on, use a pencil and press-and-hold the reset button (illustrated in Red, above. This is a recessed micro-switch button; feel the "click" when pressed). Hold the button for 5+ seconds, then release.
This sets the router to factory defaults and makes the the (Linksys) router's internal IP address:
192.168.1.1
(Other brand routers may use different default addresses)
2. Reboot your workstation.
Details: With your computer plugged into Port#1 with a Cat-5 cable (illustrated above as the blue cable), reboot your workstation. This will cause it to grab a new "DHCP" IP Address from the router. Technical note: An 'IPConfig / Release /Renew' will not work.
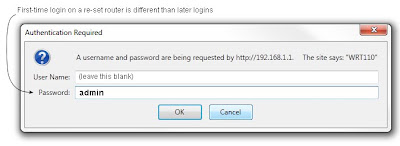
3. Launch a browser window and type this address in the URL line:
192.168.1.1 (This is the router's default address when re-set)
You will be prompted with a login screen. For the first-time (reset) login, use:
user-name: (blank on older models, use 'admin' on newer)
password: "admin"
Note: Subsequent logins will use different credentials and other brands of routers have other login steps -- see the documentation that came with the router for details.
 |
| or use "admin / admin" on newer models |
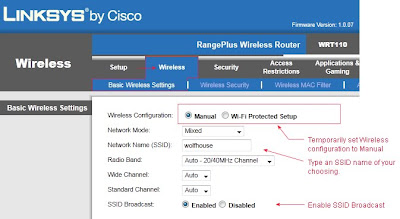
a. Choose "Manual" for the Wireless Configuration.
b. Invent an SSID (Broadcast) name for your soon-to-be-built wireless network.
For example, I use "wolfhouse". I noticed another networks in my neighborhood used broadcast names such as "Shut your Damn Dog up" (I do not have a dog).
If the router has an IPV6 section, make identical settings, including the SSID name.
Since this article was written, newer routers have additional settings.
See this Keyliner link: Router Setup - 5Ghz
Summary: Name the 5G network as "wolfhouse5G" and the 2.4 side as "wolfhouse24G"
There are other important differences, detailed in that article.
c. Confirm "SSID Broadcast" is enabled.
Note: Why Broadcast SSID? Some new Windows 7 / 8 features will not work without a broadcast SSID -- and hiding the SSID won't help keep the bad guys off your network. This can be sniffed in a heartbeat. If they are good enough to break the encryption, they have the SSID and your Mac addresses already. Quit wasting your time.
d. Click Save and wait approximately 30 seconds for the screen to return.
e. Return to this same screen and set Wireless Configuration back to "Wi-fi Protected Setup" (this is important).
f. Click Save again (and wait).
 Discussion:
Set the configuration to Manual so you can code an SSID name that is meaningful to you -- this way you do not get a system-generated name. Additionally, allow SSID to broadcast because Windows Vista and 7 require this to work properly. In the past, many people blocked the SSID broadcast in order to hide their network. With today's sniffers, there is little security benefits in doing this and I no longer recommend hiding the SSID. But you must set Wi-Fi back to protected mode for encryption. Don't forget to Save before moving to the next screen.
5. Click the top-tab "Wireless - Wireless Security"
Set Security Mode: "WPA2 Personal"
Set Encryption: "TKIP or AES" (Newer models do not prompt for this field)
Type a pass-phrase (password)
Click SAVE and wait until the screen returns
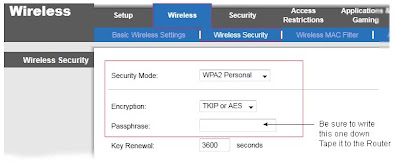 Discussion:
You really, really want encryption on your network.
The passphrase is the keyword other computers will use to gain access to your wireless network. Write the passphrase down so you don't forget it.
Note: The passphrase is not the same as the router's administration password.
6. Click the Administration tab.
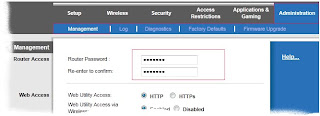
a. Change the Router's administrative password, typing a password of your choosing. This can be the same as the passphrase or different. (Do not leave it at the default "admin")
b. Click SAVE
c. You will be prompted to login again.
This time, the login is different: Use a user-ID of "admin":
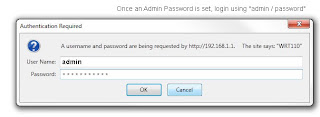 Tape the password to the bottom of the router or document it in another location you won't loose. You must have this password in order to logon to the router and make configuration changes. Without this information, you will have to re-set the router and re-configure all of your wireless devices.
 7. Basic IP Address Setup
In the Setup, Basic Setup tab, make these changes:
a. Internet Connection Type: Automatic Configuration - DHCP
b. Host Name: Any name of your choosing; I use the SSID name
c. Set the IP Address: 192.168.200.1
d. Subnet mask: 255.255.255.0
e. DHCP Server: Enabled
f. Start Address: 192.168.200.100
g. Maximum number of users: 50
h. Client Lease time; change from zero to 1440 minutes
i. Set your time-zone
j. Click Save! (Scroll down to see button)
k. Important: When the screen returns, close the browser window and *reboot* the computer.
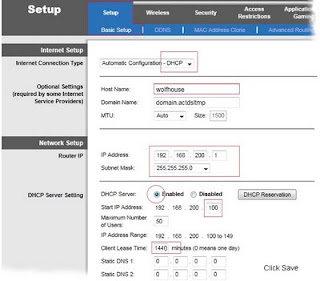
Discussion:
I like giving the router a different default address than a typical factory setting (e.g. 192.168.200.1). In the end, the network will look like this, where the workstations pickup variable DHCP network addresses, starting at 200.100:
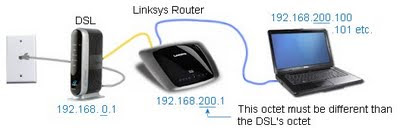 Note: The DSL Modem's address (192.168.0.1) has not been configured or discussed in this article.
This completes the Linksys Router's setup.
Consider backing up the router's configuration by clicking the Linksys Menu: Administration, Management, "Backup Configuration" (near the bottom of the screen). Save the config.bin file to your local C: drive.
When powering on the network, it is best to boot (power on) the DSL modem first. Wait a minute, then boot (power on) the Router. This gives the DSL modem time to establish its IP address so it can send it down the line.
Workstation Setup
Connect all wired connections per normal and reboot the workstation. When windows prompts for the network connection, choose "Home" and let it connect. Details on this step are not documented here.
Once connected, browse the Internet. If all is well, you are done. Otherwise, see the testing steps, below.
TESTING:
If the network is still failing, see this article for recommended testing steps.
Router Testing Steps
Related articles:
Linksys EA2700 - First Time Router Setup for Home Networks
Router Setup Steps - 5Ghz
Router Testing Steps
How to upgrade Linksys BIOS
Windows 7 and Vista Network Problems (IPV6)

No comments:
Post a Comment
Comments are moderated and published upon review. (As an aside, not a single spam has been allowed through; why bother?)