Showing posts sorted by relevance for query Brother wireless. Sort by date Show all posts

2010-12-21

Wireless Printer fails after Power Failure

Howto: Wireless printer quit printing after power failure. Solution: Change the printer's Channel configuration.

My Brother HL2170W wireless printer quit talking on the network after a neighborhood-wide power failure. When the router reset, it picked a different channel and the printer did not see the change. This can happen to any wireless device and most seem to recover - but, at least in this instance, the Brother printer did not. It had to be fixed manually.


Symptoms:
  • Windows control panel shows "printer offline"
  • Print jobs stacked in the queue
  • Printer configuration looked good - IP Addresses were preserved
  • Printer did not respond to a ping over the wireless
  • Rebooting the wireless router did not help
  • Could not login to the printer's configuration page over wireless, but could over a wired connection
  • Printer would print on the wired network but not the wireless
See also these similar symptoms:
Brother Printer in Perpetual Sleep


Did you just install a new Router?

See this Keyliner article:
Brother Wireless Printer Fails after New Router.

Testing:

Although not required: Assuming you followed this Keyliner article: Setting up a Brother Printer on Wireless, you would have configured the new printer for both wired and wireless --using the same IP Address.

In my case, the printer would choose 192.168.200.250 over either connection. With this setup, testing is easy: Plug in a cat5 network cable and print a test document. This proves the printer is functional and you do not have a workstation problem.

Additional testing:  From a DOS prompt, type "Ping 192.168.200.250"  (no quotes and your address may vary.  If the printer responds in xx milliseconds while on the wireless network, this article may not be the solution.  Note that a PING over a wired network may succeed when the Wireless network fails.


Likely Issue:

After the power failure, when the wireless (linksys or other) router rebooted, it re-negotiated a new channel because all of the other wireless routers in the neighborhood were doing the same thing at the same time. My network changed from Channel 3 to Channel 9 but the printer configuration remained on Channel 3.

It is best to leave the wireless router on the new channel. It chose that channel because of interference with other routers. Because of this, you will be forced to re-configure the printer.

If you have recently upgraded or replaced your router, it will have likely been set to a new channel.  Follow the steps in this article to teach the printer the new location.

Likely Solution:

In summary, follow these steps. See full details here: Setting up a Brother Printer on Wireless. Different-brand printers will have similar steps.

1. Connect the printer to a wired network.  Confirm status lights on NIC card.

It is *highly* recommended to use a wired connection when changing Wireless settings.

2.  Obtain the printer's IP Address:

Press the printer's GO button 3 times to print diagnostic pages.
On the network configuration pages, look for the wired IP Address on the 10/100Base-TX node.
Example address:  192.168.100.200

3. Launch a browser.

For the URL, type the printer's IP Address.  For example:  192.168.100.200

A configuration screen opens; this may take several moments.
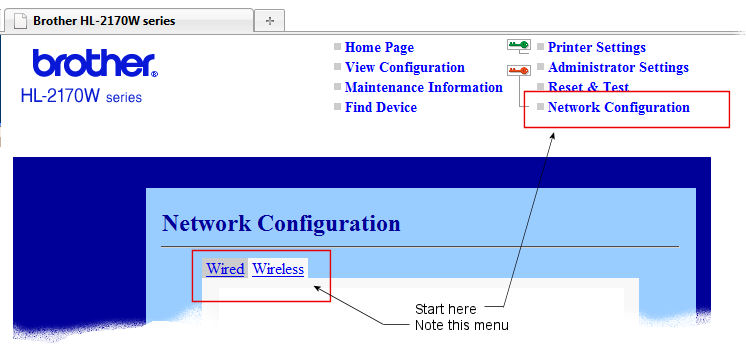
On the top menu, click "Network Configuration"
On the displayed menu/screen, click the "Wireless" tab

4. Click menu item "Configure Wireless" (about halfway down the screen).

Of interest, note the currently-selected Channel number.

5.  Click button "Browse" (browse for Network SSID)

Choose your network's SSID.
Note the new Channel number; likely different than before.
Click OK to save.


6. On the Brother configuration screen (illustrated below), backspace all four WEP Keys (assuming you are not using WEP -- you should not be)

WEP Key1 (set all four to blank)
WEP Key2
WEP Key3
WEP Key4


7. PassPhrase

Type the passphrase used in your router's setup (hopefully, you have that documented somewhere -- this is the key all wireless devices must use to attach to your network.  Laptops would use this same key.  If you do not have this key, you will have to reconfigure the network router.).

Leave the USER ID and Password fields blank

8. Save (submit) changes.

This will re-negotiate / re-set the channel
You may see this message:


Unplug the Cat-5 cable
Wait about 1 to 2 minutes.  The printer will cycle itself.  Do not power off.
Close the Browser windows; you are done.

TEST

To test, disconnect the wired connection and reboot the printer.
Test printing over the wireless.
If desired, from a DOS prompt, you can PING the address:  PING 192.168.100.200


Router Reboot Notes:

If you reboot your router, it will likely keep the same channel it had before because all of the other routers in the neighborhood will be stable. But if the entire neighborhood is rebooting after a power failure, the odds of keeping the same channel are slim.

Other Possible Issues:
Although not addressed in this article, another possibility is the printer was setup to pull a new IP Address from the DHCP auto-assigned pool. This is a poor way to configure a printer; it should be given a static IP address, far away from the variable DHCP pool. For this reason, I always configure my printers in the upper ranges, such as .240 or .250.

As I recall, if you install your printer using Brother's CD, the installation sets the printer to pull a DHCP address (non-static). This is a mistake. Following the Keyliner instructions, above, you have to go out of your way to configure the printer with a "Static" address and you would have to do extra steps to make the wired and wireless connections the same. This goes a long way towards solving many networked printer problems.

Related Links:
Reference for Brother Printer LED Indicators


Related articles:
Setting up a Brother Printer on Wireless
Brother Printer Toner Cartridges
Brother HL-2170W Laser Printer Review
Brother Wireless Printer Fails after New Router.
Brother Printer in Perpetual Sleep

2010-12-11

Brother Printer Wireless Fails after New Router

Brother Printer Wireless Fails after New Router with "Failed to Associate"

Issue: Brother laser printer HL2170W fails to print after installing a new Linksys (or other brand) router.  The wireless printer used to work on an older Linksys WRT110 router. 


Diagnostics:

A.  From the printer, press the GO button 3 times, printing a diagnostic page

On the printout, look for the Network Configuration Page "Brother NC-7400w IEEE 802.11b/g

Near the bottom, note the Wireless Link Status: "Failed to Associate"


B. You cannot reach the printer's web-config screens from wireless, but the config screens are reachable with a hard-wired Cat-5 cable.

C.  Print jobs may be spooled on the local workstations.

See this article for how to configure the printer to run on both Wired and Wireless networks

Keyliner Article - Configure Brother Printer for Network


Solution:

Summary:  Set the 2.4G side of the router to a WPA2/WPA Mixed mode and confirm the 5G side has a different broadcast SSID.  Then, rebrowse the wireless network from the printer's control panel.

1.  On your router (not the printer), confirm the 5G and 2.4G networks have different SSID names.

For example, on my Linksys router, there are duplicate configuration sections for 2.4G and 5G.
Set different SSID's names for both -- giving each similar names but with an appendage, something like this:

wolfhouse5g
wolfhouse24g

Here is my setup:
Click for larger view
2.  On the same configuration screen,

Set the 2.4G wireless network with Security Mode: "WPA2/WPA Mixed mode"

This way, older devices, such as wireless printers will still work properly.  Leave the 5G set as the default, WPA2 Personal, or as needed.


 3.  Login to the Printer's web-configuration screen. Note: It is *highly* recommended you use a wired Cat-5 connection when making changes to the Wireless settings.

Full Details in this article.
This is the same article you should use if the printer fails after a power failure.
http://keyliner.blogspot.com/2010/12/wireless-printer-fails-after-power.html

Summary:
a.  From a browser, type the printer's IP Address
b.  Login using "admin / (password you set when the printer was first configured)
c.  Open Network Configuration, Wireless Tab, Configure Wireless
d.  Browse for the SSID; choose the 2.4G SSID.  At the same time, it selects the channel.
e.  Cleanup the WEP keys; re-type the PassPhrase
f.  Save changes

4.  Immediately Unplug Cat-5 and wait for printer recycle:

After saving the new SSID, the printer displays this message. 
Unplug the printer's Cat-5 cable and wait approximately 2 minutes. 
The printer will cycle by itself:


5.  Test

From any workstation, send a print job to the printer.
All should be well.

Other Notes:
WPA/WPA-2 TKIP encryption changed with the new routers and if the SSID's for both networks were set to the same name, the Brother printer will pick the 5G network -- which it cannot actually use.

Updating the printer to the latest printer BIOS will not help. 

Other sites recommend using WEP encryption.  They are crazy.


Related Articles:
Brother Wireless Printer Fails after power failure
Configure Brother Printer for Network

2010-09-19

Setting up a Brother Printer on Wireless

Howto: Installing a Brother HL-2170W printer into a Wireless network. These basic steps can be followed with any wireless printer.

The Brother-printer owner's manual was somewhat confusing because the manual had many sections, each describing different ways to install and use the printer. I ignored the owner's guide and the installation software that came with the printer and decided to setup the printer manually. Doing this gives a better install than the automatic routines. Although there are a lot of steps, they go quickly and a complete setup should only take a few minutes.

These instructions assume a CAT-5 network cable for the base install (even if using wireless); this will make the initial installation smooth.

Related article: Wireless printer fails after power failure


Typical Home or Small Office Network

If you have a network-aware printer (either wired or wireless), hang the printer off the router and let it stand alone; do not connect the printer to a workstation with a USB cable. With this design, any computer can use the printer, regardless of the other workstations and you will not need to fiddle with Windows user accounts on the "main" computer.

This is a recommended design and this article discusses how to set up a Brother printer in this fashion.

Setting up a Brother HL-2170w (or similar) printer

The following Brother document, which is not included in the owner's manual, is a good set of instructions for setting up a wireless printer. Of interest, both the vendor instructions and mine ignore the software that shipped with the printer:

http://welcome.solutions.brother.com/BSC/public/us/us/en/faq/faq/000000/002500/000019/faq002519_000.html?reg=us&c=us&lang=en&prod=hl2170w_all&Cat=108
(Choose "Temporarily using a network printer to setup the printer")

However, as good as those instructions were, there were flaws. Glance at that article, then follow the steps in this document.

To make all of this work properly, you will need to run the "BRadmin.exe" program, which came with the CD, but the version on Brother's site is newer and that should be used instead (download link, below).

Keep these thoughts in mind as you go through the steps:
  • You will be using an administrative program called BRadmin Light; there is no need to install this or any other software to configure the printer.  BRadmin Light can be run directly from download without installing.

  • Define both a wired and wireless-network on the same printer, even though only one can be used at a time. By setting both, you have the flexibility to move the printer without re-configuring. This also aids in debugging if the wireless fails or becomes de-configured.

  • Always set the printer with a fixed IP address (described below). Do not use DHCP.

  • Even if you intend to use wireless, use a wired RJ45 network connection (a CAT5 data network cable) to configure the printer. This means you will have to set the printer close to the router for the first-time setup but this ensures an easy installation. Once you are done, the printer will automatically choose the best wired or wireless connection, which ever is available.

  • Do not connect the printer to your computer with USB.  This will do nothing but confuse the drivers on your workstation.

Setup Steps:

0. Ideally, download and install the latest version of BRadmin Light client

From the Brother.com support site, use this link.
Optionally, use the CD that came with the printer.

1. Determine a likely IP Address for the new printer.

From the Start Menu of your workstation, open a command prompt (DOS Prompt).
Type this command to discover your own workstation's IP Address. The digits will vary, depending on your network. Write this number down, you will use it later to help pick a new address for the printer:

(At a DOS Prompt), type
ipconfig (enter)


Example IP Addresses.  Note your workstation's IP Address - it will look similar to these addresses
192.168.1.5
192.168.100.11


2. Login to your router and record your wireless information.

The steps on how to do this are not fully documented here, as they vary by router (see this Keyliner article for hints). In general, launch a browser window and type the address of the router (typically 192.168.1.1 or 192.168.100.1 -- where the last octet is almost always ".1").

You will need your router's login credentials in order to continue. If you can't login to the router, you may not succeed in setting up your printer on a wireless network, but you could continue with a wired setup.

Once logged into the Router's main configuration screen:


3. Obtain the following information for all wired and wireless printer setups:
  • The range used for DHCP addresses
    (often these are allocated in a block of 50); note the range.
    Commonly 192.168.1.10 - 192.168.1.50, or something like 192.168.100.100 - 100.150.
  • This illustration is from my Linksys router:
Click image for larger view; click right-x to return

3b. If you are configuring the printer for wireless, continue browsing the menus, looking for other router information -- basically, you will be treating the printer as-if it were a new laptop joining the network.

You must have this information in order to continue with a wireless setup. On a Linksys router, you will find this information under the Wireless, Basic Wireless settings screen:
  • SSID Broadcast name
  • Type of Encryption (typically WPA-Personal / TKIP but older routers may use WEP)
  • Encryption WPA Passphrase or WEP password (you will have to know this).
  • Check to see if MAC address filtering is enabled

Example from a Linksys Router

If you can't login to the router and could not record the router's information, continue with a wired printer connection, guessing at the IP-Address range. You can see the SSID name from a laptop, as it connects and from here, you could guess at TKIP.

Log out of the router and close the browser window when done.


4. Plug a wired CAT-5 network cable

Plug a Cat-5 network cable directly into your router and then string the other end into the printer's RJ45 network port. (This is the router where your PC connects and there should be four or more ports to choose from. In many cases, this is a separate device from your DSL or Cable router. If all ports are occupied, temporarily borrow a connection from any other device other than your workstation.)

Reason: Connect a physical cat-5 cable even if you intend on using Wireless; this is the easiest way to configure the printer and is less complicated.


5. Launch the BRadmin Light client.
(When/if prompted for a Windows firewall access, grant permission)

Select the printer. It should appear in the list.

Login:
When prompted for a login password, use "access" (no password)
(later steps prompt for a user-id and password: use user-id: "admin" and password "access" or your other previously-set password).


6. Open the Web-based Home page or configure with BRadmin

Both methods are described; choose one or the other:

Web-based:
Other-mouse-click the selected printer,
Choose "Configuration: Device Home Page"
On the top menu, click "Network Configuration" (illustrated)


BRAdmin:
Optionally, other mouse-click the printer (from BRAdmin Light), choosing "Network Configuration", the Network Tab, and set the static IP Address and Gateway from that screen.


7. Set the Printer's base IP Address:

Continuing with either method (web-based is illustrated):

In the Network Configuration tab,

Choose 'Wired' (tab-menu)
Choose menu "Configure TCP/IP"

a. Set TCP/IP *Enable

b. Set the Boot Method to "Static" (important; not DHCP)

c. Type an IP Address that is *outside* of your normal Wireless DHCP range, recorded above.

I recommend 192.168.100.250 or 192.168.200.250 (match your workstation's IP Address, first three octets). Use this address if you could not examine the router's configuration; in other words, this is a good, safe guess.

d. Type a subnet mask 255.255.255.0

e. Set the Gateway address to the router's address (192.168.1.1 or 192.168.200.1, matching your workstation's first three octets).


f. Important: On this and all future screens, you must click SUBMIT (Save) before leaving the screen. Wait several seconds while the screen returns to the main menu.

If you do not set a static IP address, the printer will work for a few days/weeks, but will ultimately fail when the router is rebooted or resets.


8. Click OK to save the changes and Reboot the Printer.

Using either method, *Reboot the printer* for the changes to take effect.


Finish Configuring on the Printer's built-in Web-page:

9. Refresh BRAdmin:

In BRadmin Light, click "Refresh" to re-search the printer with its new address.

a. Other-mouse click the printer and choose "Device Home Page". Returning to the browser setup screen.

b. Click "Network Configuration" on the top menu (same as illustrated above).

c. Login with user-ID: "admin" / Password: "access" (no quotes; you may have set a different password)

Note the Wired and Wireless tabs.


10. In the Wired Tab, click "Configure TCP/IP"

Confirm the following:

a. Again set a Static IP address 192.168.100.250 (or as needed).

b. Confirm the connection is "Enabled".

c. Important: On this and all future screens, you must click SUBMIT (Save) before leaving the screen. Wait several seconds while the screen returns to the main menu.

d. Click to top menu "Network Configuration" to return to the previous screen.


11. Click the *Wireless* tab, make these changes:

a. Click "Configure TCP/IP"

b. Again, set a Static IP address 192.168.100.250 (or as needed).

IP Address: 192.168.100.250 (or as needed)
Subnet Mask: 255.255.255.0
Gateway: 192.168.100.1 (or as needed)
Boot Method: Static

Note, you are setting this address for a second time - once for wired and a second time for wireless -- making both the same. Confirm this connection is also "Enabled".

c. Click Submit (Save).
Wait for the screen to return (10 seconds).

d. Click to top menu "Network Configuration" to return to the previous screen.


12. Additional changes:

In the Interface tab, choose Auto Switching. This allows the printer to choose either the Wired or Wireless connection, depending on which is active. The printer favors a wired connection if present.


13. MAC Address Filtering?


If your wireless network router uses MAC Address Filtering (where you restricted only selected MAC addresses on your network), you will need to add the printer's wireless (not wired) MAC address to the allowed list. When setting MAC address filtering, do this work on the Router's web-config, not on the printer's screen.

Note: If you have WPA-Personal/TKIP encryption, MAC address filtering does not give any additional security. I now recommend disabling MAC Address filtering on the router. Windows 7 has issues with MAC address filtering and it should no longer be used.


14. Return to the Wireless tab

Click the lower menu "Configure Wireless"
  • Change to "1) Infrastructure Mode"

  • Browse for your Wireless Network (SSID Broadcast name).

    If you do not broadcast your SSID, enter the SSID and CHANNEL by hand. (Note: Hiding the SSID broadcast is no longer a recommended security practice because this method is easily hacked. )

  • Choose the Encryption method (as recorded from your initial router inventory); for most, this will be WPA-Personal/TKIP.

    If you are using WPA, manually backspace all four WEP keys displayed on the screen - this avoids an error message I have seen in the BRAdmin program. There seems to be a bug in this area; deleting all 4 passwords seems to fix the problem. See illustration, below.

  • Again, if using WPA-Personal, type your router's Passphrase, which you researched earlier -- this is the router's password, not necessarily the BRAdmin password.

  • Do not fill the last user-id/password fields at the bottom of the screen (not illustrated here)

15. Click Submit to Save your changes.

- Unplug the wired cat5 cable when prompted. The printer will now talk over the Wireless network. Note: You can still open these configuration screens from a wired-desktop by simply typing the printer's IP Address.

illustration assumes WPA, non-WEP encryption


TESTING


A. If using a wireless connection, unplug the Cat-5 network cable and re-boot the printer. Wait for a READY light.

B. From a DOS Command prompt:

(Start, RUN, "CMD") or Start, Accessories, 'Command Prompt,'

type this command (without quotes; assuming you used this IP Address):
"ping 192.168.100.250" (press enter).

Look for a Reply from in xx milliseconds. This means the printer is responding.


Install Drivers:

On each workstation that will print to this printer, use the CD to install the Windows Printer driver.

1. Control Panel, "Devices and Printers"

2. Select "Add a Printer,"
Select "Add a Network Printer"
Choose the printer from the list

(or if prompted this way: Choose this prompt: "Brother Peer-to-Peer Network Printer" - Print directly to a printer over the network. Choose a port-address of 192.168.100.250 (or as set).

Alternately, after Adding a Printer, choose "Add a Local Printer
Create a New Port
Switch from "Local" to "Standard TCP/IP Port
In the Hostname or IPAddress field, type 192.168.100.250
In the Port Name, type 192.168.100.250

3. Allow a test page to print.

4. Complete these same setup steps on the other computers on the network.

Note: because you are not using Windows Peer-to-Peer networking, drivers are not automatically downloaded from the main computer; you must install them separately. This is the only real drawback to this design.

Your un-registered comments on this article are welcome.


Related articles:
If your Brother printer quits printing on the wireless network after a power failure, see this article:
Wireless printer fails after power failure

Brother Printer Toner Cartridges

Brother HL-2170W Laser Printer Review

Reference for Brother Printer LED Indicators

2010-09-20

Brother HL2170W Printer in Perpetual Sleep

Issue:  Brother LaserJet (HL2170W) printer is in Sleep mode and does not wake up.  Printer does not print.  Printjobs stacked in queue. 

Other symptoms:
  • Printer Control Panel shows the printer is "offline"
  • The Printer Control Panel does not offer an option to put the printer "Online"
  • Power On/Off does not resolve the issue
  • Printer replies to a DOS PING test
  • BRAdminLight utility responds and can see the printer
  • Using BRAdminLight to reset to Factory defaults or to re-configure the printer, does not help
  • Diagnostic printing (from printer's configuration pages) works properly; pages print
This article assumes you are using Network Printing (and not a USB cable).


Diagnostics:

Follow these diagnostic steps to confirm the printer is talking on the network.

a.  From a DOS Prompt:  Ping 192.168.200.250   (where your IP Address may vary).  Ping responds in xx milliseconds; the printer responded to the PING properly.

If the printer does not respond to the expected IP Address, it's assigned address may have changed via "DHCP".  See the end of this article for a discussion on how to fix this.

b.  Using BRAdmin Light, confirm you can see the printer's configuration screens.  (BRAdmin is the utility used for configuring the printer when it was first brought online and installed in your network.)

If BRAdmin shows a different IP Address than the one you were expecting (see also, Printer Control Panel, PORTS, illustrated below), the printer is being re-assigned a different address via DHCP and this will confuse the printer control panel.  See the end of this article for recommended steps.

c.  Using a Browser, type the printer's URL (e.g. 192.168.200.250  (your address may vary)).  This should open the web-based configuration screens.  If prompted for login credentials, use  "admin" and "access" or the password you set when first configured.

These diagnostics show the printer is alive and well, talking on the network without problems.


Likely Solution:


In the workstation's Printer Control Panel, the TCP/IP port has likely changed.  Confirm the address is an IP Address and not some other type of port-setting.  In the illustration below, my printer had an "ADW" port, followed by a GUID ID.

If an IP Address is displayed, confirm the address (illustrated below as 192.168.200.250) matches the expected IP address used above in the PING test. 

Details:

1.  Open the Windows Control Panel, "Devices and Printers"

2.  Locate your printer:  Illustrated "Brother HL2170W series Printer"

a.  "Other-mouse-click" printer
b.  Choose "Printer Properties"  (do not choose Properties)
c.  Click the [Ports] tab

d.  Scroll down the list.  Confirm printer is setting on a real IP Address.

In my case, the printer was on a port named something like "ADW {EF6012...."  (followed by a GUID number).  It should be pointing to an IP Address, such as 192.168.200.250.  Your address may vary. 


If the Port is not an IP Address or is the wrong IP Address, continue with these steps (Windows 8 / Windows 7 similar):


e.  Click button: "Add Port"
     You will be adding a "Standard TCP/IP Port"


f.  Choose "Add a printer using TCP/IP address or Hostname"
g.  For the Port Address, type the IP Address of your printer.

Once setup, pending print jobs in the spool should immediately begin printing.


Bad Ports:

In my case, I am unsure how the printer's original TCP/IP port changed to a corrupted "ADW" value.  Using BRAdmin, I kept seeing the printer's status as "Sleep".  In fact, this is a red-herring.  During normal operations, the printer will always be in a Sleep mode when no jobs are pending.  Some sites recommend disabling Sleep; this is not recommended because of the power and wear-and-tear on the fuser assembly.


Followup Notes:

Once re-configured, you may find two Brother Printer icons in the Printer Control Panel.  The "real" printer will likely be marked as default.  You can safely delete the older printer icon.

DHCP Printers:

If you are finding the printer's IP address changes, especially after a power failure or after rebooting the printer, the printer is configured improperly -- using DHCP for its network address.  It should be using a Static (fixed) IP address.  Likely, you accepted the default settings when the printer was first configured and you likely used the installation CD that came with the printer.  DHCP addressing is a poor way to configure printers.  See the Keyliner article for proper steps:  Setting Up a Brother Wireless Printer.  Use these steps for both wired and wireless printers.

Related Articles:
Setting up a Brother Wireless Printer
Brother Wireless Printer fails after Power Failure
Brother Wireless Printer fails after a New Router
Extending Brother Printer Cartridges

2010-09-18

Brother HL-2170W Laser Printer - Review

Review: Non-technical Review comparing Brother printers with HP along with a cost-benefit decision on buying a new toner cartridge versus a whole new printer.

Brother makes good quality, inexpensive printers that do exactly what they are supposed to do. However, like all other manufacturers, the consumables are expensive. I've often found it makes more sense to buy a new printer and as you read this article, you will see this was my recent decision. I am pleased with the new HL-2170W printer.


Two years ago I bought a Brother HL-2040 laser printer (Keyliner reviewed here), and after a couple of toner cartridges, it ran dry. Once again, I was faced with this bizarre decision: A new cartridge cost $70 -- a new printer, with a toner cartridge, costs $70 to $100 depending on the model. Granted, the new printer's toner cartridge is an "introductory" cartridge and only prints 1,000 pages, but for me, this is still 9 months of printing and it gives me a chance to upgrade.


Faults with the Original

The original Brother 2040 printer did not come with a network card. This meant I had to share the printer on a Windows peer-to-peer network and the main computer had to be on before the other laptops in the house could print.

Because of the power requirements on the old Brother printer (480 watts), I vowed to never buy one like that again (previous review). What I discovered is most brands use this much power and all will cause issues with a household circuit.

Finally, one last consideration: Although I'm nowhere near the 10,000 page duty cycle, there are other consumables to worry about. The fuser assembly, pickup-rollers, gears, and the built-in power supply are all a concern. If you are reaching these limits, buy another printer rather than incur the obscene costs for other replacement parts. These are all reasons to choose a new printer.

Comparing Other Printers

Between HP and Brother, the Brother printers always seemed a better buy.

Brother had three different printers within a $70 to $150 price range (HL-2040, HL-2170W, HL-5340D - all on sale). HP started at $150 and went to $300 for similar models.

The only printer HP had that was price-competitive had numerous problems. It does not have a real paper-tray, and what it does have, it only holds 150 sheets.

Although wireless, the HP was only wireless and it did not have an RJ45 wired-jack. It is nice to have both options because a wired connection is always better than wireless. Additionally, the HP prints at 600dpi, which is less than the similarly priced Brother printers (1200dpi) and it only comes with 8MB of RAM, instead of 32.

But most importantly, this HP printers has a minuscule toner cartridge, which is more expensive (by page-count) than all other vendors. On the plus-side, this printer drew 380 watts, but this was not enough to sway my decision.

Moving to the more expensive HP printers, ones with comparable form-factors to the Brother printers, the feature-set was on-par but HP's prices were consistently and noticeably more expensive at each category. For all of these reasons, I bought a Brother printer again.

The Decision

If your old printer is approaching a 10,000 page duty cycle (apx. 7 toner cartridges), buy a new printer rather than risk a failed drum or fuser roller. If your older printer lacks features that you would like (such as a network connection, speed or memory), you might as well buy a new printer rather than replacing an empty toner cartridge -- providing you can get the printer on sale. If you can stay within the brand, keep the old printer and toner for spare parts.

See this Keyliner article on how to extend the life of your Brother toner cartridge. This article also discusses a trick to extend the drum-counter life. And even though I have not tried re-filling toner cartridges myself, I intend to the next time it is empty; Brother cartridges are extremely easy to refill.

If you have more than one computer, then all printers should be network aware. In my case, upgrading with a network wireless/wired connection made sense. I ended up with a less-complicated printing environment. However, if you only have one computer, and have no intention on buying a second machine, then you could save money, buying a non-networked printer, but this is probably short-sighted.

Pricing:

Normally Brother Printers are priced about $50 less than comparable other brands. But when they are on sale, as they are this month (2010.09), the decision is almost painless. Staples.com has most Brother printers on sale through the end of the month.

The HL-2170w, which is my recommended printer for home and small office users, is regularly $150 but on sale for $100. The non-networked HL-2040 is $70.

Staples.com also sells "refurbished" printers for $30 less on their website, with free delivery. Most of these printers are probably nearly-new and were returned by customers for various reasons. Because the box was opened, they can't be sold as new. Consider this as an option if you can wait a week on the shipment.

Related articles:
Brother 2040 Review
Extending the life of a Brother toner cartridge by 1,000 pages
Setting up a Brother Printer on Wireless

2012-06-08

Linksys EA2700 Router - First Time Setup

How to: Linksys EA2700 Router - First Time Setup.  Detailed article on home network setup and these instructions can be use on any brand or model.  These same instructions can be used to re-set a router that has malfunctioned due to a power problem or lost administration password.

Important:  If your DSL Modem has 4 or more (yellow) network ports, *and* if you have a secondary wireless router, do not use this article.  Instead, see Zyxel C1100Z DSL Modem setup for those instructions.

Related articles:
Installing a DSL Modem
Resetting a Wireless Password or Admin Password
Router 5ghz Wireless Setup Steps

Basic Wiring

A.  Wire the routers in this fashion.

Avoid using a Wireless connection when configuring or building your network.  If using a laptop or desktop to configure the network, temporarily connect the laptop via a Cat-5 cable directly to the new router (illustrated below with the blue cable); do this instead of using a wireless connection because it is risky and frustrating to configure a Wireless router using the wireless.

Ideally, you would have two network cables -- one for the Modem-to-Router and a second for the Router-to-your-PC. But if you have only one, 'borrow' the (yellow) Modem-to-Router cable for the following configuration steps.

When connecting your machine, attach to the blue Port on the back of the wireless router (port #1).  This is temporary, just to configure the router.

Illustrations show a Linksys WRT110 router (shown as "Port 1") connected to a DSL or Cable modem.  All routers, including the EA2700, work similarly.


Note: The DSL Modem (or Cable Modem) has only 1 (yellow) network port.  If yours has four ports, and you want to continue to use them, see this article: Zyxel C1100Z DSL Modem setup


B.  Install DSL Line Filters

If you have a DSL connection, instead of Cable, install DSL line filters on all non-modem devices, such as phones, answering machines, DVRs, home security alarms, etc.  If you have a cable modem, ignore this step. 

DSL filters are supplied with the DSL modem or they can be bought separately.
*Do not* install a filter on the line that runs to the DSL modem (illustrated in grey). 

If a phone and the DSL-line need to share the same wall jack, do one of the following:  Purchase a standard RJ11 Y-Adapter and wire as illustrated on the left.  Or, use the extra phone jack on the back of the DSL modem, plugging your phone directly into the router.


C. From the DSL or cable modem, run a standard Cat-5 network cable from the Ethernet (network) port to the router, illustrated above, in yellow.  On many modems and routers, the two ports are yellow.  A cable is usually provided with the modem when purchased:

D. Finally, run a second Cat-5 network cable from the Router's Port #1 to your desktop or laptop's Ethernet port, illustrated above with a blue cable.  (If you have only one cable, you can temporarily borrow the yellow cable.)

E.  Power on the devices in this order:

DSL/Cable Modem first; wait 1 minute.
Linksys Wireless Router; wait a moment or two.
Laptop/Desktop


Configure the Linksys Router

Follow these steps to configure the linksys router.

You will note that I do not use the Linksys setup software provided with the router. Instead, I connect directly to the router.  This gives better control over the process and you will find the setup steps are nearly as easy and you get better control.

1. (Optional) Reset the Router

If this is an existing router, reset to a factory default IP Address of 192.168.1.1 : by pressing the reset button (illustrated above, in red).  To reset, power-up the router, then use a pencil to press and hold the micro-switch button for 5 seconds, then release.

(Other brand routers may use different default addresses)


2. Reboot your workstation.

Details: With your computer plugged into wired Cat-5 Port#1 (illustrated above as the blue cable), reboot your workstation. This will cause it to grab a new "DHCP" IP Address from the router.

Technical note: An 'IPConfig / Release /Renew' will not work.  It is not recommended that you use a wireless connection to configure a router.


3. Login to the Configuration Screens.

Launch a browser and type this address in the URL line:
192.168.1.1    This is a linksys-brand default ip-address

First-time login will be:
admin / admin

(Older routers use a blank user-name / admin)

Note: Subsequent logins will use different credentials.  Other brands of routers have other login steps -- see the documentation that came with the router for details.


4. Basic Setup - IP Address:

After typing 192.168.1.1, you will arrive at this screen:
2014.04 Note: Screen illustrations from Linksys BIOS Version 1.0.12.  Newer versions of the router have significantly different screens.

If your initial screen looks like this, continue with this article.  Otherwise, be aware the screens will look different, but the basic steps are the same.

Click for larger view

In the Setup, Basic Setup tab, make these changes:

a. Internet Connection Type: Automatic Configuration - DHCP
b. Domain Name:  (accept default or use domain.actdsltmp)
c. MTU:  Auto - Size 1500

d. Host Name: Any name of your choosing;

Example: "wolfhouse"

e. Set the router's new IP Address and subnet mask.  (The address's third octect (200) must be different than the DSL or Cable Modem's third octect):

192.168.200.1
255.255.255.0

f. DHCP Server: Enabled

Start Address: 192.168.200.100
Maximum number of users: 50
Client Lease time; change from zero to 1440 minutes

g. Set the time-zone

h. Click "Save Settings" (Scroll down to see button... Don't forget to Save)

Note:  Always Save Settings before leaving any router-configuration screen.

i. Important: *reboot* the workstation to obtain a new IP Address.

Discussion: 
The Linksys router needs to live at an IPAddress range that is different than the DSL or cable modem.   I like to pick an address, such as 200.1 but many people like to choose 100.1 -- anything but something in the 000.x or .001.x octect range.

By enabling DHCP, you are allowing this router to dispense (broadcaset, distribute, assign) IP addresses to any device that arrives on the network.  Out of habit, I choose the start-IP address as 200.100.  Many people like to choose 200.50 -- it really does not matter the starting octect -- but it must be greater than ".1".  Limit the maximum number of users to 30 or 50.   Remember, this defines a range of assignable DHCP addresses (see below).  I like to leave addresses 200.200 - 254 for printers and other hard-coded, non DHCP addresses.


Results:  The new network will look like this:

Note: The DSL or Cable Modem's address (usually 192.168.0.1) has already been configured and how to set it's address is not discussed in this article. 

The DSL / Cable modem's address is usually 192.168.0.1 or 1.1.  The new Linksys router's address is set to 200.1.  Workstations connect, either by wired or wireless, and will pull a new, somewhat random address from the DHCP pool, starting at 192.168.200.100, 101, 102, ... through 150.


5.  Wireless Setup

Continue with the wireless setup. I recommend setting Wireless settings, even if you do not have any wireless devices.


On the top-row menu, click "Wireless", "Wireless Settings".
With newer routers, you will be setting different values for the 5Ghz and 2.4Ghz networks.


Do this:
Follow the steps documented in this Keyliner article and return here where done:
Link: Router Setup Steps - 5Ghz

Note: The article references important differences in the Network Modes, Security Modes and SSID names!  Encryption is also set within this article.  Don't forget to click "Save" before leaving that page.


6.  Wireless Guest Access

Returning to the main Linksys menus, select the Wireless menu, then sub-menu "Guest Access":


Click for larger view

Make these changes:
  • Allow Guest Access: Yes
  • Guest Network Name (auto-assigned: e.g. wolfhouse24G-Guest)
  • Guest Password:  Assign an easy-to-remember password that is different than the admin or regular passwords.  For example, "doghouse"
  • SSID Broadcast: Enabled
The key point is this password should be (had better be) different than the regular wireless access password and it needs to be different than the admin password, described below.  Make this password easy to remember and easy to tell people visiting your house.  More on this in a moment.

Save Settings before leaving this screen.


Wireless MAC Filter and SSID Broadcast

Contrary to popular wisdom, hiding broadcasted SSID's and using MAC-address filtering is no longer recommended and these sections in the config screen should be skipped.

Reason: Some new Windows 7 / 8 features will not work without a broadcast SSID -- and hiding the SSID won't help keep the bad guys off your network.  Mac Addresses are easily sniffed and spoofed and SSID's can be quickly found.  If a hacker was good enough to break the encryption, they already have your SSID and Mac addresses.  Quit wasting your time.


7.  Important Administration Change:

Click the "Administration" tab, then "Management"

Reset the Admin password, changing from "admin" to any other value.
Click SAVE SETTINGS

I recommend making the Admin password the same as the SSID / Wireless access password set above.  If you make them the same, do not tell your teenagers the wireless access code or they will know the router's admin.  I know several teenage boys who have caused mischief in this area.


Note:  You may need to re-login to the router (via browser window) if you need to make other changes.  The old admin/admin login credentials will no longer work.


8.  Write the Passwords Down

This password should not be lost or forgotten.  I recommend recording these values and store in an envelope near the router or use a luggage tag:


Router Address:           192.168.200.1
Broadcast SSID: _______________________

Starting DHCP Address:  192.168.200.100

Admin Password: __admin /______________

24G Wireless Password: ________________

5G Wireless Password: _________________

Guest Wireless: _______________________


Example:
Broadcast SSID:  wolfhouse
Starting DHCP Address: 192.168.200.1
Admin Password:  howling5g
24G Wireless Access Password:  howling24
5G Wireless Access Password: howling5g - or other password
Guest Wireless Access Password:  doghouse

*Note:  If the admin password is lost, you will have to reset the router (see step 1 - Reset button) and rebuild the network from scratch.  Once rebuilt, you will have to teach each wireless device the new access codes.  This is annoying.  Write this stuff down!


Done!
This completes the Linksys Router's setup.
See below for Workstation steps.

When powering on the network, it is best to boot (power on) the DSL modem first. Wait a few moments, then power the Router. This gives the DSL modem time to establish its IP address so it can send it down the line.


Workstation Setup

Wired Devices
Connect all wired connections per normal and reboot the workstation.  Wired devices will pull a DHCP address and no other actions are required, presuming the workstations use DHCP -- which is the norm.

Older Wireless Devices (using 2.4Ghz 802.11 a/b/g)

Wireless devices using older network cards on 802.11 a/b/ or /g can only connect to the 2.4Ghz network -- even though they may see both the 5G and 2.4G broadcast SSID's.  If the older devices can see and connect to the 5G network, you mis-configured the wireless per this article; see  Link: Router Setup Steps - 5Ghz.


If a older device are allowed to connect to the 5G network (meaning that channel is broadcasting on both frequencies),  they can connect and when they do, all 5G activity is disabled -- even if those other devices have 5G capability. The channel steps down to the lowest common denominator.  More expensive routers, those with 6 antennae, work around this by dedicating a circuit for each type of connection.

Newer Wireless Devices (using 5G 802.11n)
Newer devices can connect to either side of the network.  Choose the 5G SSID if you want the speed. 


My recommendations:

For children's machines, give them the 24G network, regardless of what their hardware allows.  This is a good reason to make the 24G and 5G passwords different -- never tell your children the 5G password.... Yes, this is mean -- but it is a matter of self-preservation and greed.

For high-volume video streaming (the TV, Netflix, wii), choose the 5G network if the hardware can see that broadcast SSID.

For your personal laptop, choose either the 5G or 24G, as you needs and hardware dictate.

Once connected, browse the Internet. If all is well, you are done. Otherwise, see the testing steps, below.


Printers:

By default, printers almost always use DHCP addresses.  This is stupid.  Re-configure the printer to use a hard-coded IP Address -- preferably one outside of the DHCP "50" block.  Details can be found in this article:  Setting Up a Brother Wireless Printer


TESTING:
If the network is still failing, see this article for recommended testing steps.
Router Testing Steps


Related articles:
Installing a DSL Modem
Router Setup Steps - 5Ghz
Router Testing Steps
Resetting a Wireless Password
How to upgrade Linksys BIOS
Windows 7 and Vista Network Problems (IPV6)
Setting Up a Brother Wireless Printer

2017-09-02

ZYXEL C1100Z DSL Modem Setup

How To:  Manually setup a Zyxel C1100Z DSL vDSL Modem

Setting up a DSL modem/router is easy.  You can follow the vendor's installation steps, which sometimes require installing software or connecting to a setup-website or you can follow the steps in this article.

These steps are more complete than the vendor's and will take about 20 minutes to complete.  Almost all DSL routers and cable routers follow similar procedures.  Use these instructions for new or re-configured devices.


Note: The instructions in this article should be used when the DSL router has multiple workstation ports (1-4). If your DSL modem has only 1 (yellow) port, see the EA2700 article, below.

Related article:
Keyliner: Linksys EA2700 Wireless Router - First Time Setup


Overview:
Your setup may not have optional devices.  However, I recommend using a separate wireless router because it has more capabilities and speeds than the wireless built into the DSL:

click for larger view


Basic Setup

1.  Wire the network in this fashion:

Click for larger image
a.  Plug the green RJ11 phone cable into the phone-wall jack. 

Plug the other end of the green RJ11 phone cable into the new DSL modem's "green" port.
Do not use a DSL line filter or DSL line dongle on the green line.

b.  Plug a (yellow) RJ45 network cable into any one of the four yellow ports, and plug the other end into your desktop or laptop's wired network jack.  This is a temporary connection for the setup.

If your workstation does not have a wired network jack, use the DSL modem's wireless for the setup, but this is not recommended.  It is easier to use a wired connection and the rest of the article assumes this.

c.  Connect the Router's power.

While the router is powering-on, do the following on your workstation or laptop:

-  Assuming you are using a wired connection: turn off your workstation's wireless antenna (especially if using a laptop.  Desktops may or may not use a wireless connection). 
See the system tray; click "Wi-fi" to disable. This forces the workstation to connect to the wired network.


- If you are using the DSL modem's wireless to configure the network, use the broadcast SSID and password printed on the side of the modem.

d.  Reboot your workstation to obtain a new IP address.

Note:  Your workstation will probably get an IP Address of 192.168.0.2


2.  Get the DSL Login credentials

From when the DSL line was first installed, you will need the DSL login credentials. This is the DSL circuit-login and is not the computer's login or any other login normally typed.  Usually, this is on a letter mailed to the house and is labeled PPP or PPPop login information.  If you have this, skip to step 3.
 
If you do not have the login credentials, continue

a. When rebooted, launch a browser and (at least with Century Link), the router will take you to a site, offering to login.  Using a recent phone bill, login with your ISP's account number and go through other screens to prove your identity.  Once you succeed, Century Link will display your DSL credentials.  Record the values; you will need them below.  Naturally, logins are case-sensitive.

If you still cannot find your DSL PPP login, contact your ISP.

Century Link / Qwest: 877.348.9005 or 888.777.9569
ATT 877.722.3755
Verizon 800.567.6789


Continue with the Setup

If you launched a browser (with CenturyLink), it will take you to a website, where you can follow the instructions on how to setup your modem.  Although the offered instructions are good, it does not actually do anything to your router -- the site is essentially an electronic tutorial and can be ignored in favor of these steps.

3.  Assuming you have rebooted the workstation, launch a browser and type this address:

192.168.0.1

You should be presented with this login page:


Type Administrator UserName:  "admin"
Type Administrator Password:  (see sticker/label on side of modem)

The UserID and password are case-sensitive.

If you do not get this login screen, confirm the yellow network cable is in one of the DSL Router's yellow ports - and not in the LAN/WAN port.  (Or, if you are using a wireless connection, confirm you connected to the wireless network printed on the router's label.)

Bad Password:  If you cannot login because of a bad password, the modem has a different password than sent from the factory (you would have done this previously). If the password is lost, the modem can be factory-reset by powering on the modem, using a paper-clip to press and hold the Reset button for 10 seconds.  Release the reset button, wait a minute, then try the login again.


4.  From the Zyxel main menu, select Quick Setup.


From step 2, type the DSL circuit login credentials. 
Your domain may be different than illustrated.
 
PPP Username:  *****@something.net
PPP Password

(uncheck [ ] Hide password; keeping you from having to type the password twice)

Change the "Custom Realm" pull-down menu, changing to your ISP's domain name.  For example, mine was changed to "@qwest.net"; yours may be "@CenturyLink", etc.  If your domain is not listed, leave as "Custom".

Click "Apply"


5. In "Advanced Setup", change the Administrator Password,

Recommended:  Change the administrator password to something you will remember.  The password must have upper and lower-case, a number, and a special-character -- which is odd, because the factory password is not so-restricted.

Consider this keyliner article: Password Schemes.  

Record the new password on the modem's label, and in your login documentation.  If you lose this password, you have to re-do all of these steps to recover.


6.  In the "Utilities" menu, click "Upgrade Firmware".

Follow the on-screen instructions.  You will basically download a firmware file, browse to it, and apply.  This is recommended.

As of 2017.09.01, Zyxel C1100Z's latest firmware is CZW0034.12.010.16.
If your version is older, it should be upgraded.  Return to this menu once or twice a year for upgrades.


7.  In the "Utilities" menu, set the Time-zone and Daylight Savings Time.


8.  Configure Wireless settings - even if you intend to disable this device's wireless.  This way, if you ever need to enable this part of the network, it will be pre-configured and ready to use.

In the "Wireless Setup" menu, set a new SSID broadcast name.

Change the network SSID name from "CenturyLinkxxxx" to a name of your choosing.  For example, my network is called "WolfhouseDSL".

If you have another, downstream wireless router, this name cannot be the same as the other router's SSID.  I append "DSL" here so I can tell the two apart.

Change the WPS PIN to a value you will remember.  Write this down.  This is used for automatic workstation setup, which some people like to use.

In "Wireless Security", change the Security Key/Passphrase to a string your will remember (this is the connection/passphrase for people to log into the wireless network).  Make sure this password is different than your Admin password.  Make it memorable.  For example, I use "wolfy DSL 1979".

Record this in your documentation.


9.  Decision:

If you have a second, wireless router (illustrated as 192.168.0.2), let that router handle the wireless traffic and disable the DSL modem's wireless.  I call this second router a "downstream router" and it will be faster and more capable than the wireless built into the DSL modem. This is recommended.

Because the DSL modem has 1-4 available ports, the downstream router will have special setup steps, documented in the next section. 

Caution:  If you are using Wireless to configure the DSL router, leave the wireless enabled until you are done with all configuration steps.  

If you are using a wired connection right now (to setup this network), and have a second, downstream wireless router, disable the Zyxel's Wireless now.  In the top-menu, "Wireless Setup," click "Disable"

Even if the Zyxel's Wireless is turned off, you can still connect wired desktops and laptops to the four yellow ports.


10.  Change the DHCP address range

Make this recommended change, moving the Zyxel's DHCP address pool from .2  to .10 -- giving room for other routers and hard-coded devices.

In the top-menu, Advanced Setup, choose the left-nav, "DHCP Settings"

Change the "Beginning DHCP address" from 192.168.0.2  to 192.168.0.10
Change the "Ending DHCP address" from 192.168.0.50     to 192.168.0.100

Optionally: I like to set the Lease Time to 3 days, although the 1-day default is acceptable.

"Apply" the changes.

The router is now configured and ready for use.


Secondary Wireless Router Wiring Changes


If you have a secondary wireless router (illustrated above as 192.168.0.2), do these wiring steps.  These steps will place all devices on the same subnet and the steps are a bit counter-intuitive.  Skip this entire section if you do not have a downstream router.

In summary, change the wireless router's IP address to a Static "192.168.0.2" address, then disable DHCP.  This is a one-time setup, just to get the new router on the proper network.

The steps vary by manufacturer, but in general:

a.  Unplug the wireless router from all other network wires.

b.  Plug your workstation's wired Ethernet cable into any yellow-port on the wireless router (similar to how you connected to the Zyxel DSL router).  Or use wireless to connect to this device; see the owner's manual for the default SSID broadcast name. 

c.  Reboot your workstation to get a new IP Address.

d.  With a browser, login to the wireless router's admin page, using the default router's address.  See the router's owner's manual, but usually:

192.168.1.1  or
192.168.100.1

Login with (the published default password).  For example, see this article for more detailed instructions:
Keyliner: Linksys EA2700 Wireless Router - First Time Setup

e.  In the advanced settings [Local Network], disable DHCP

This is important: Do not allow this router to give out IP addresses; this will conflict with the Zyxel -- even if you pick a different DHCP range.

f.  In Connectivity, "Internet Settings," set the router's internal IP Address to a hard-coded (Static) IP address:

Static IP:        192.168.0.2
Subnet Mask:      255.255.255.0
Default Gateway:  192.168.0.1
DNS 1:            8.8.8.8


where  "0.2" is on the same network as the DSL router (the third octet)

where .2 is below the DSL's router's starting DHCP Address Range  (which was moved to .10 - .100) in step 10, above.

where 192.168.0.1  is the same IP Address as the Zyxel DSL router

where DNS1 is "8.8.8.8".  This is Google's DNS server - as good of an address as any.  Your ISP would prefer you use their DNS server, but Google's is safer.   (Some ISP's slip-stream their own content into data-streams.)

Apply the changes.  When you do, you will temporarily loose connectivity to the router.
Continue with the next steps.

g.  Power off the downstream router.

Then, run a network cable from one of the DSL router's 1-4 ports, into the downstream router's 1-4 ports -- any port, on either side will work (illustrated above with a yellow cable).  Do not use either of the WAN/LAN ports -- you want this router to be on the same network as the main DSL router, and because of this, you cannot use the WAN/LAN ports.

h.  Move your workstation's Ethernet cable to any free-port (yellow) port, on either device.  I like to move the cable back to the DSL modem's 1-4 ports.  Again, avoid the white WAN/LAN ports.

i.  Again, reboot the workstation to get a new IP Address.  Yes, this is a drag.

j.  Once connected, open the browser and type this IP Address:  192.168.0.2 (the downstream Wireless Router's address) -- and again, login to the router's admin pages.  (Note: you can now also login to the DSL's router's admin by using the 0.1 address.)

Make these additional changes (see the Linksys article for more details):

- Set a memorable SSID -- make this different than the DSL's SSID -- example: Wolfhouse5G
- Set a Network password (for wireless access):  wolfy house 5G
- If the router has a second channel (e.g. 2.4ghz), SSID:  Wolfhouse24G
- Set a second password (for wireless access):  wolfy house 24G

If the router supports a third channel Guest network (most do):
- Set the SSID broadcast to "Wolfhouse Guest"
- Set the guest password (for wireless access): wolfy house guest

k.  Finally, change the Router's (admin) password, to a value of your choosing.  Write this down.

The wireless router's setup is complete.


Optional Switch

If you have an optional 8-port switch, illustrated above, do the following.

- Run a (yellow) network cable from any of the yellow 1-4 ports on the DSL modem to any yellow 1-8 port on the switch.  Do not use the WAN/LAN ports.  For minor performance reasons, you should not run the network cable from the downstream wireless to the switch; instead, go directly to the DSL modem's 1-4 ports.

-power-on the switch; you are done.  No software configuration required.


Analog Devices

If you have a land-line phone, the phone can be plugged into the Zyxel's phone jack and no DSL filter is required for this connection.  If you have other analog phones or analog phone devices, such as phone-based alarm systems, satellite receivers, answering machines, etc., you must use a DSL line filter on each of those jacks.  These will have to be purchased separately and can be found anywhere analog phones are sold. 


Printers, TVs

With printers and an internet-connected TV, I recommend running wired Cat-5 network cables.

If you can, run a wired connection for the printer; it is less of a hassle -- many printers (especially Brother printers) dislike it when the wireless router moves to a different channel after a power failure.  A wired connection prevents these types of problems.

Related article:  Keyliner Brother Wireless printer fails after power failure.

And, because of DHCP, printers tend to move around and get new IP addresses when they reboot.  This is a pain and it forces you to re-build printer connections at each workstation.  Regardless if wired or wireless, set the printer to a fixed or static IP address.  From the printer's main panel, set a hard-coded IP Address.  I like to use these settings:

Static IP Address:  192.168.0.200
Subnet Mask:        255.255.255.0

Default Gateway:    192.168.0.1

where 192.168.0  is the same network as the Zyxel DSL router.
where .200 is an address outside of the DSL Router's DHCP range.
where 192.168.0.1 is the Zyxel's IP Address

Similarly, I also set the TV/Roku to a fixed address:  192.168.0.210  (keeping the number below .254).  Because it is such a high-bandwidth device, the TV should be on the wired network.  I always smile at people who buy a 100mb high-speed network connection for their house and then run the TV over a 10mb wireless network.


Power

Sometimes, after a power failure, these routers loose their gourds and have to be re-configured.  Save yourself the hassle and buy a small battery-backup UPS for the network devices.  Plug the DSL modem and downstream routers and switches into the UPS.  Make this separate from the PC's UPS.

Most UPS's have two sides:  A battery-protected side and a simpler surge-protection side.  Be sure to use the battery side.

When powering on the network.  Power-on the DSL modem first.  Wait a minute, then power on the other devices.


Final Network Test

From any workstation, wired or wireless, running on the new network, open a browser and make one last connection to the new Zyxel router:

192.168.0.1

Login with your new admin credentials and confirm you can reach the configuration menus.  You should be successful. Then open a browser session to something like www.google.com.  The page should display.

If you have a downstream wireless router (illustrated above), now would be a good time to turn off the Zyxel's internal wireless.  From any workstation, return to the 192.168.0.1's configuration screens and disable.

Using any workstation, confirm you can get to the downstream wireless router's admin screen by typing this address:  192.168.0.2

If all this works, you are golden.


Record Keeping

It is embarrassing and painful to lose your router's passwords.
Write this information in a safe place because if the Internet is down, you can't exactly jump on the net to find your contact information.  Don't wait to do this because you will forget.

ISP Name: ______________________________________________

ISP Technical Support Number: _____________________________

DSL PPP Login Credentials: _________________ /  _____________

DSL/ISP Account Number: _________________________________
(Often the home phone number.  If no home phone, see bill for separate account number)

DSL Modem Model Number: _______________________________

DSL Modem IP Address:  192.168.0.1 ________________________

DSL Modem Admin Login:  admin / __________________________

DSL Wireless SSID Broadcast Name: _________________________ [  ] Disabled

DSL Wireless SSID Password: _______________________________ [  ] Disabled

Downstream Wireless Model Number: _________________________

Downstream Wireless Router IP Address:  192.168.0.2 ____________
(Optional, if you have a separate Wireless router; see below)


Downstream Wireless 5G SSID: ______________________________


5G Password: _____________________________________________

24G SSID: _______________________________________________

24G Password: ____________________________________________

Guest SSID:  ______________________________________________

Guest SSID Password: _______________________________________

Printer IP Address:  _________________________________________


Related articles:
Reset Linksys Wireless Password
Linksys EA2700 Router First Time Setup
Installing a NetGear DM111PSP ADSL Modem