Contents:
- Getting more life out of a Brother Toner Cartridge
- New Cartridges and Old Drums
- Resetting the Drum Counter
- Toner LED solid Yellow
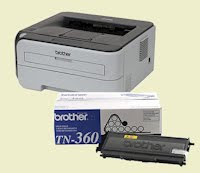
 My Brother printer ran out of toner and instantly stopped printing -- even though it printed perfectly well earlier in the day. When this happens, you can coax more out the cartridge by gently rocking it back and forth. But ultimately, this Toner-out light will stay on and the printer will quit printing.
It turns out the toner cartridge is probably not empty. The web reports most people consistently get another 800 to 1,000 pages by covering a sensor hole and tricking the printer. Most on the web noted that the supposedly "empty" cartridges still have a lot of toner in them and blame Brother for being nefarious.
I think the real reason is more benign. Measuring toner levels is more of an art than a science and without spending a ton of money on an interior electronics, Brother used a relatively simple but flawed mechanism to measure toner. Why did they put in extra toner? They wanted to ensure they reached their advertised page count -- with no chance of falling short. In other words, they over-filled the cartridge to make sure they were honest -- but it still it seems wasteful not to use all of the available toner.
The cartridge has additional of life remaining even when the toner light turns on
A 2,500 page replacement cartridge is $70.
A new drum-roller assembly is $120.
A new printer, with a 1,000-page "introductory" cartridge, is $80.
Sometimes it pays to buy a new printer.
A new drum-roller assembly is $120.
A new printer, with a 1,000-page "introductory" cartridge, is $80.
Sometimes it pays to buy a new printer.
Tricking the Printer: Covering the Sensors
Follow these steps to extend the life for any of these printers or cartridges. This step also seems to resolve a solid-yellow toner LED on new cartridges:
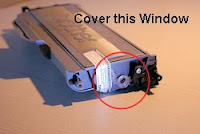
 1. On the side of the toner cartridge is a clear round window. Cover it with any opaque tape (this also fixes the solid yellow toner light / error you might get when you move cartridges from one printer to another). Color it with a sharpie if you'd like.
Optionally, and this is not necessarily recommended, look inside the toner-bay on the printer itself and cover the sensor holes there. Doing it this way permanently disables the toner-sensors for all cartridges.
2. Gently rock the cartridge back and forth and side-to-side to re-distribute the toner.
3. On the top, outside right-edge of the cartridge is a blue or green slider. Slide it back and forth a half-dozen times to clean the corona wire. Be sure to return the slider to the far-right position.
Return the cartridge to the printer and try printing again. All should be well. Print until the quality of output degrades (gray print).
Additional notes: Searching the web you can find other tricks about these toner cartridges. The cartridge has a mechanical "flag"; once it reaches its limit, the cartridge stops all printing. With a minor dis-assembly, you can reset this geared mechanism and get a bit more life out of the toner. If you do this, you may get a gray-haze on the paper as the older, recycled toner is forced onto the paper. As the drum ages, the flag forces a larger current onto the paper to help the toner stick, rolling back this flag can cause the gray film. If you refill your cartridge with third-party refillers, you can reset this flag all the way. Details on this can be found elsewhere on the web.
When you buy a new Cartridge:
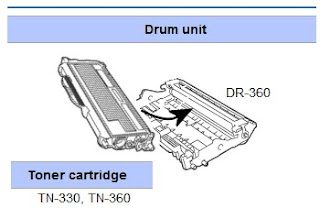
Don't make this mistake: When you return your used cartridge (recycle), be sure to take only the toner - and not the drum. On Brother 2170w printers (and probably other models), these are separate components, where one fits into the other, even though both are removed at the same time.
 Return the Toner and leave the Drum (DR-360) assembly with the printer. Only purchase the Drum unit when you have reached your 12,000 page service life (see below) and the "Drum" light is illuminated on the the printer's main panel. As a side note, do not leave the drum unit exposed to bright or prolonged light.
Replacing the Drum Roller - Don't
If you have reached the Drum's end-of-life (12,000 pages), and top panel displays a drum error, consider re-setting the drum-counter to zero and keep running with the same drum until print quality fails. Many have reported 20,000 and more copies on the same unit. This will save about $120 -- which is amazing because the entire printer was only $100 to begin with.
- Do not use these steps for replacing a cartridge
- Do not use these steps for toner errors
- These steps are for the HL-2170w and the HL-2140 with a Drum Error. See Brother support for other models.
1. Turn printer on. Confirm the DRUM LED is blinking.
2. While the printer is still on, open the front cover and remove the toner and drum unit (as illustrated above).
3. At this step, you would replace the drum-unit with another; I propose you skip this and continue with the old drum roller.
4. Return the toner and drum unit to the printer. Leave the door opened.
5. Press and hold the the white button (GO button) for about 4 seconds, until all LEDs light:
Once all LEDs are lit, release the button
6. Close the front cover. The printer will think you have installed a new Drum and it will reset the counters to zero.
Toner Light Solid Yellow on a New Cartridge
On a new Brother HL-2170W printer, after attempting to print the network configuration / printer setup pages, the printer slipped into an error condition where the Toner LED was solid yellow and the printer refused to print -- even though it had a new cartridge and had printed earlier.
Despite what you read on the web, there is no sequence of buttons you can push that will reliably solve this problem on an HL-2040 or 2170w printer. Resetting the Drum counter (pressing GO 5 times and other such steps) will not help.
Solution:
1. Brother's suggestion of removing the cartridge and separating the toner assembly from the drum; then re-inserting is meaningless; as there are no obvious electronic connections between the two devices, but you had best try it anyway. I tried this a dozen times before deciding it was pointless.
2. Rocking the toner back and forth a bit more vigorously than usual may temporarily fix the problem (when you do this, it clouds the sensor windows and makes the printer think all is well.) Be sure to clean the corona wire.
3. If this is a new Brother-branded cartridge, contact Brother Support (call their support number US: 877.276.8437. If you email, you will spend two days with nothing but canned email responses that cover steps 1 and 2 above.)
Once I called Brother Support, and after reading my cartridge's serial number, they reported a known "manufacturing defect" within an unspecified range of serial numbers. They promptly offered to replace the cartridge and a new one is in the mail. You may or may not be that lucky.
In my case, compliments to Brother Technical support on identifying and acting on the problem, because something was clearly wrong. If your cartridge is not in the serial number range, read-on.
3. On a lark, I used the "Covering the Sensors" step from above and surprisingly, this masked the problem and I could once again print. This is not as Brother intended and the cartridge I had was certainly malfunctioning - but I got nearly a year's worth of use out of the failed cartridge.
Commentary:
It won't be long before Brother puts electronics into the cartridge and raises the price in order to stop these tricks. This is what HP did. At that point, we consumers should simply revolt with protests in the streets. I understand Brother wanting only the finest print quality -- but I remember the good old days when the toner ran dry, the print looked poor and we consumers would say, "I guess it is time to buy another toner cartridge." We don't need a machine to tell us. The way Brother and HP do it seems too self-serving, hence these stupid printer tricks.
Known Cartridges where this article applies:
LC 51 cartridges
TN-560
TN-540
TN-3130
HL-1850
HL-2140
HL-2170
HL-2030
HL-5170
HL-5250DN
DCP1000
MFC-8870DW
Related Links:
Reference for Brother Printer LED Indicators
Related articlesKeyliner Brother HL-1020 Printer Review
Keyliner Brother HL-2170w Printer Review
Setting up a Brother Printer on Wireless
