2011-10-20

Excel Code: VB ReturnFirst/Last and SuperTrim

Reference: These Excel/VB macros for ReturnFirstWord, ReturnLastWord and SuperTrim are very handy.  Download these routines, free of charge, without registration, from Keyliner's Public GDrive site.  Details on how to use these functions can be found in other Keyliner articles.  This article was streamlined and re-published.

Contents:
=ReturnFirstWord
=ReturnLastWord

=FindLastSpacePosition (numeric result)
=SuperTrim; Trims multiple redundant leading, trailing *and* interior spaces

=CountWords

These Excel UDF Macros (User Defined Functions) can be downloaded and attached to a speadsheet in a matter of minutes.  Once in place, they can be used in any Excel formula.  Other Keyliner routines, such as Excel CityStateZip Parse Functions use these modules.
 

Installation and Use

Source-code can be downloaded from the Keyliner public GDrive site  (formerly, this article listed the code, but the code became too ungainly to post in a blog).  You are welcome to use this code in your personal or commercial projects.

1.  Download Excel Macros from link:
(You do not need to register as a user to download)
Keyliner' Public GDrive


Download:
A800_UtilStrings.bas


2. Save the downloaded files to any directory, such as:
C:\Data\Source\CommonVB\A800_UtilStrings.bas


3. Launch Excel and Enable Excel Macros.

Microsoft considers all macros a security risk and this can be a nuisance.
Do the following to enable the macros.
  • Launch Excel; click the Orb (formerly the File Menu); choose Excel Options
  • Click Trust Center, Trust Center Settings
  • Macro Settings
  • Enable All Macros
  • Older versions of Office have similar settings.

4.  Launch Excel to a blank sheet and import the VB code using these standard Excel steps:

Click the "orb", Excel Options. 

On the left, choose "Popular"
Click [x] Show Developer tab in the ribbon

5.  Press Alt-F11 (Starts the VBA / Macro Editor)

6. On the tree-diagram, illustrated below, select your sheet ("Book1"), then:
  • Other-Mouse-Click (Book1),
  • Choose "Import File"
  • Browse and select the previously-saved module, e.g. C:\Data\Source\CommonVB\A800_UtilStrings.bas
  • You will see the code appear under the "Modules" folder (not yet in the illustration below but will be when you complete these steps)
7. Close the Visual Basic editor and return the original sheet; clicking the big "X".


Testing:

A. In Cell A1, type an example string, with leading, trailing and extra internal spaces. Press Enter when done:

example: "  Now is    the time "


B.  In cell B1, type this formula:

=SuperTrim(A1)

Results:  "Now is the time"  (with interior spaces trimmed)

C.  In cell B2, type this formula:

=ReturnLastWord(A1)


Results:  "time"


Related Keyliner Articles:
Excel UDF (User Defined Functions)

Excel VLookup - a complete tutorial
Excel Coloring Alternate Rows
Excel Parsing City-State-Zip
Excel Importing Text with Leading Zeroes
Using VBA to Send Email

2011-10-19

Salutation List Reference

Reference list for Salutations (English)

Prefixes, salutations or honorifics, such as "Dear Rt Hon Mr." John Q. Smith,

I had a request to parse prefix Salutations from a database of names and had troubles finding a comprehensive list.   Below is that list, along with links on how I did the parsing.

Shorter, common salutations are punctuated with and without periods while longer ones, by convention, are listed without punctuation (e.g. Rt Hon Mr  vs  Rt. Hon. Mr.). The referenced parsing routines use this list and the logic is easily changed for additional entries.

Leave an un-registered comment if you have additional salutations.  I purposely dropped the Pope and the Queen, figuring we would never need to write to them using a database and mail-merge.

Related articles:
Parsing First and Last Names in Excel
Parsing Salutation in Excel (Parses this list)

Parsing City State Zipcodes in Excel
Excel User-defined formulas

English Prefixed Salutations

Admiral
Air Cdre
Air Commodore
Air Marshal
Amb
Amb.
Ambassador
Baron
Brig
Brig Gen
Brig General
Brig.
Brigadier
Brigadier General
Bro
Bro.
Brother
Canon
Capt
Capt.
Captain
Cardinal
Cdr
Cdr.
Chief
Chief Warrant Officer
Cik
Cik.
Cmdr
Cmdr.
Col
Col.
Colonel
Commandant
Commander
Commissioner
Commodore
Congressman
Corporal
Cpl
Cpl.
Cpt.
Cpt
Dr
Dr.
Dr and Mrs
Dr. and Mrs.
Dr & Mrs
Dr & Mrs.
Father
First Lieutenant
First Officer
Flt Lieut
Fr.
Gen
Gen.
Generaal
General
Gov.
Governor
Group Captain
Grp Capt
Hon
Hon.
Honorable
Hr
Hr.
Judge
Justice
Lieut
Lieut Cdr
Lieut Col
Lieut Gen
Lieut.
Lieutenant Colonel
Lieutenant General
Lt Col
Lt Col.
Lt.
Maj Gen
Maj.
Major
Major General
Master Warrant Officer
Mayor
Miss
Mr
Mr.
Mrs
Mrs.
Ms
Ms.
Pr
Pr.
Pastor
President
Private
Prof
Prof Dr
Prof Dr.
Prof Sir
Prof.
Professor
Pvt
Pvt.
Rabbi
Rep.
Representative
Rev
Rev Canon
Rev Dr
Rev Mother
Rev.
Reverend
Rt Hon
Rt Hon Mr
Rt Hon Mr.
Rt Hon Ms
Rt Hon Ms.
Rt Hon Mrs
Rt Hon Mrs.
Rt Hon.
Rva
Sec.
Second Lieutenant
Secretary
Sen
Sen.
Senator
Sergeant
Sergeant
Sgt.
Sister
Sr
Sr D
Sr.
Sra
Srta
Sultan
Tan Sri
Tan Sri Dato
The Hon Dr
The Hon Dr.
The Hon Justice
The Hon Miss
The Hon Mr
The Hon Mr.
The Hon Mrs
The Hon Mrs.
The Hon Ms
The Hon Ms.
The Hon Sir
The Honorable
The Most Reverend
The Reverend
The Venerable
The Very Rev
The Very Rev.
The Very Reverend
Vice Admiral
Warrant Officer

2011-10-16

Excel - Macro Editor Removes Spaces

How To: The Excel 2007 Macro Editor is automatically removing spaces between words while typing code.

Problem: 
While typing a new function name or other text in the Excel Visual Basic Macro, the editor  is removing the spaces between words as you type (automatically, unexpectedly, auto removing, auto-correcting).  For example, you may be attempting to type a new function name:

Public Function MyFunction()
but the editor will correct the text as "PublicFunctionMyFunction()"


Note: You have also likely installed Microsoft Visual Studio 2010 sometime previously.  This product introduced a Load Test Report Add-in that is apparently causing this bug.  This article is current as-of Office 2007, SP2.  I suspect Office 2010 exhibits the same issue.


Solution:

1.   De-activate the Excel "Load Test Report Addin"  (add-in) using these steps:

a.  Click the Excel "orb" (File menu)
b.  Click the bottom-right button, "Excel Options"
c.  Click left-side "Add-Ins" menu
d.  In bottom, center pull-down, Choose "Manage" "COM Add-ins".  Click Go


2.  Uncheck [ ] "Load Test Report Addin"


3.  Press Alt-F11 to return to the Macro editor.  The problem should be resolved.

Making this change is permanent (for this workstation) and the change sticks for the current worksheet and all new and existing sheets.

Keywords:
VB VBA Editor auto-delete auto-deletes auto delete spaces at the end of the line, spaces as typing, spaces while typing, removes spaces, collapses spaces

2011-10-11

Excel - Enable Macro Developer Options

How To:  Excel Developer Options - How to enable Macro and Macro Editing for Excel 2007/2010/2013.  This is an excerpt from a previous article

1. Launch Excel and Enable Excel Macros.

Microsoft considers all macros a security risk and this can be a nuisance.
Do the following to enable the macros.  This is a one-time step for all macros.

  • Launch Excel; click the Orb (formerly the File Menu); choose Excel Options
  • Click Trust Center, Trust Center Settings
  • Macro Settings
  • Enable All Macros
  • Older versions of Office have similar settings.

2.  Expose Developer Options

Office 2008
a.  Click the "orb" (or File Menu), Excel Options 
b.  On the left, choose "Popular"
c.  Click [x] Show Developer tab in the ribbon
d.  Click OK and return to the sheet

Office 2010
a.  Click File, Excel Options, "Customize Ribbon"
b.  In the second-column ("Customize Ribbon: Main Tabs"), check [x] Developer
c.  Click OK and return to the sheet


3.  Enable Option Explicit Variables
In Office 2010 and above:
From any Blank Sheet, press Alt-F11 to open the VBA Editor

a.   Select Menu "Tools", Options, [Editor Tab],
b.  Check [x] Require Variable Declaration

This replaces the "Option Explicit" line you used to have to type in macros -- forcing you to declare variables before using - a recommended practice.

Related Posts:
Parsing First and Last Names in Excel
Parsing City State Zip in Excel
SuperTrim in Excel
User Defined Functions in Excel

2011-08-23

PaintShop Pro Fuzzy Illustration Text

How: Using PaintShop Pro to write crisp text. Default PSP text is fuzzy, indistinct. This article describes how to fix this problem.

When using PaintShop Pro (X4 and older versions) for illustrative text, you will be disappointed in the quality. Small text will be especially indistinct and fuzzy. Larger font sizes do not exhibit these problems.

For example, here is a screen shot that needed additional text to help with the illustration. The upper-right shows the default PSP text. The paragraph below shows the improved text recommended by this article.

Reason:

By design, the program composes fonts in two parts, using an outline and a fill. While this works great with larger sized fonts, it falls apart when the font is 14 points or smaller. PSP likes to take a font and color the 'stroke-width' differently than the 'fill.' As the font gets smaller, the outline competes with the fill and everything becomes indistinct. Anti-aliasing also introduces problems at these finer point sizes.

Setting the Font:

For best results, I recommend these settings, for all point sizes.
In summary, don't use the outlined "stroke width" and flip the foreground colors:

1. Select the Text tool "A" from the toolbar menu.

2. On the top toolbar, set the "Stroke Width" to 0.0
(you can leave this setting permanently - the measurement sticks with the font tool).

3. Turn Anti-aliasing off for fonts 14 points or smaller (see Anti-Alias on top button bar, near stroke width).

4. Most importantly, switch the foreground and background colors.

This is the key:
Set the background color to the color you want the text to be by "flipping" the foreground and background colors on the materials pallet.  The background color will become the text color when the stroke-width is set to 0.0.  If the Material Pallet is not visible, click View, Pallets, Materials.


Illustrated below, the text color is set to red.


In practice, flipping the colors is a nuisance. You'll flip the colors, type your text, then return to other drawing tools -- where you will find the colors are wrong and you will have to flip them again.

Related Articles:
Windows 7 and Paint Shop Pro Not Working
Using PSP to Crop Images respecting Aspect Ratios

2011-07-16

Cleaning Startup Programs

Howto: This article discusses how to use MSConfig to cleanup a computer's startup programs, providing faster boot times, less memory, faster computers, with less junk. This article was written for Windows 7, Vista and XP and was updated on 2011.07.

See also:
Windows 7 Streamline Start Menus (Organizing the Start Menu)
Windows XP/Vista Streamline Start Menus
Cleaning Scareware and other Viruses

Cleaning up Startup Programs

The other day my laptop booted and bugged me about a printer update. During this past two years I have never once wished for a printer update -- how did it know? There is only one explanation: For the past two years, a program that does nothing but look for updates has been running.

Programs like this hog bandwidth and kill boot times.


How is Your PC?

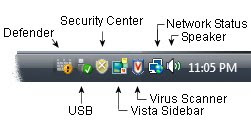
In the lower-right corner, look at the System Tray (you may need to click the arrow to expand it). If you have more than a half-dozen icons, I'd bet most are pointless and seldom, if ever, used. Every icon in the system tray represents a program that takes CPU-time and for every one exposed in the tray, there are probably a half-dozen hidden ones.

* Are you being bugged about an auto update?
* Does your PC take more than 70 seconds to boot?
* Does your System Tray have 8, 10 or more icons?

Here are all the icons on my desktop computer. I consider this a healthy system.


Ask these questions:
  • Does the icon show useful information?
  • Does the icon help in your day-to-day work?
  • Do the icons benefit you?
Sadly, the System Tray represents a fraction of the startup programs a computer must endure. Although some should not or cannot be disabled, most are expendable. This article will help to identify them.


Cleaning Up
with MSCONFIG

To clean up the startup programs, do the following.

1. Click Start, Run, and type "MSConfig"
If the RUN command is not visible, see this article.
(See also the recent article on another Microsoft utility: AutoRuns)

2. Select the "Startup" tab at the top of the screen.

3. Uncheck items that you think are safe to disable, after reading the comments below.

(Click image for larger view; click right-x to return)


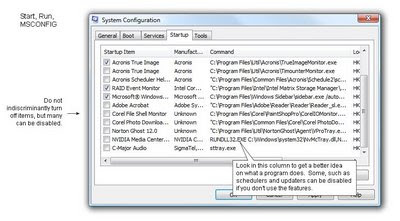
Items marked with a 'check' run when the computer boots and generally stay running even though you may not see them. Unchecked items are disabled (but remain installed). Most of the computers I've met have 20 to 30 items in the list with most enabled. Oink.

MSConfig does not offer help on what is safe to disable but you can get a better idea by widening the Command column (drag the column-width header). Often, just by the file-path, you can tell what the program is.

For instance, my computer had two programs running in an HP directory: "HPWuschd." and "HPcmpmgr". The first fetched updates (schd = scheduled) but what about the second? Google to the rescue.


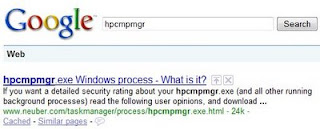
After searching "hpcmpmgr", I found what the program does. "hpcmpmgr.exe is the main process belonging to the HP Component Manager, and is important for their multimedia products." This sounds important. It continued with, "This program is a non-essential process but should not be terminated unless suspected of causing problems." Reading further, the program also checks for Printer-driver updates. Ah-ha! There are two programs doing the same thing!


Ignore Lawyer-induced Language:

When you look up any process in Google, they will always waffle and say, "leave it running unless it is causing problems." Pay no attention to wishy-washy, lawyer-induced language.

Instead, latch onto the 'non-essential' phrase. If you see that kind of terminology you can almost guarantee the program is optional and you can use MSConfig to uncheck it. (for that matter, 'essential' programs can often be taken with a grain of salt.)

After unchecking a program, consider rebooting the computer. Test the device or associated program in question. In my case, I have two HP Printers and an HP Digital Camera; all worked even though these programs were disabled. I now have two less programs in my startup files.
Safety Check:

After unchecking and rebooting, MSCONFIG displays a warning - offering the chance to re-enable these programs. Give the PC a few days and a few reboots before permanently dismissing the warning. Once you click "Don't bug me again," MSConfig won't say a word until you make another change. This is a nice safety feature and it allows you to easily un-do what you did.


Important Sounding, but not really

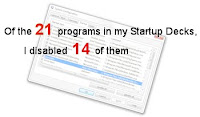
Of the 21 programs in my startup list, I disabled 14 of them.
Here is a taste on what I found; each of these were disabled:

- Acrobat Reader Updater
- Acrobat PreLoader
- Adobe ARM
- Adobe Reader and Acrobat Manager (ARM - Auto-update)
- Adobe Reader Speed Launcher
- Corel Photo-Downloader
- Standby Service (Standby.exe Corel)
- DellSupportCenter
- Java(TM) Platform SE Auto Updater
- Sun Java Update Scheduler
- NVidia Media Center Library
- Dell QuickSet
- (Quicken) QTask
- Quicken Startup
- RealSched

Cleaning crap like this can easily take 60 seconds or more off boot times and I have worked on dirty machines where I took 5 minutes off boot times.  Here are more comments and examples of things to delete:

- Dell QuickSet (power management software)
Reachable via a Windows control panel

- Tfswctrl (something to do with HP's CDRom burner)
I noted that I can still burn CD's. Nobody seemed to know exactly what this program did. But more interestingly, I retired that old HP CDR last year. It pays to search your startup folders every now and then.

- ISUSPM (Dreamweaver auto-update program)
The odds are next-to-nil that my two-versions-behind copy of Dreamweaver will have an update. Yet every day my computer searched for an update. What a waste.

- Qttask
(Quicken Checkbook bill minder - Pop-up reminders about past-due bills). I don't use this feature but Quicken installed it on the off-chance I might.

- RealSche (RealPlayer Update)
We already know they have an update. They have one every week. I certainly don't need a reminder.

- My DVD movie player had an important-sounding driver in the Startup, "InterVideo WinCinema". This was one of those rare drivers where I couldn't find any information telling me what this program did. Finally, one minor site had enough guts to say "This program is not required." I disabled it a year ago and get this, I can still watch movies on my laptop.

AutoUpdaters - A dime-a-dozen:


Most applications include an update-menu within the program and some of these programs may be several years old and will probably never have an update (think about your DVD Movie player, photo-editors, printers, etc.). Why launch a program each time you boot? For most of these programs, open the application, click Help, "Check for Updates" while others are visible in the control panel. For example, Corel Update, Microsoft Office Update, Acrobat Updater, all can be updated manually.

Opinion: If you disable some auto-updaters, such as Adobe's Acrobat ARM, you will have to manage updates yourself. Periodically, launch Acrobat and select, Help, Update -- saving your computer the startup headaches. For any other auto-updaters, look inside of the program for an "update" menu -- most have them.

Video Drivers:
As an aside, when installing new video drivers, from NVidia or ATI, only install the "base" drivers. For example, here are my recommendations:

When installing, always choose "Custom (Advanced)"

In Components:
[ ] Nvidia Update (recommend checking manually)
[ ] Physx System Software (Check [X] if you are a gamer)
[ ] 3D Vision Controller Driver
[X] Graphics Driver
[ ] 3D Vision Driver
... catching this stuff during a custom install saves you from having to remove them in MSConfig.


What Not to Delete

The laptop's wireless ethernet card probably has a few goodies that you shouldn't mess with. On my computer you can recognize the directory "Intel\Wireless\Bin". You'll also want to leave your virus and spyware scanners as well as your firewall software. Hardware drivers, such as your Touchpad (APOINT.exe), Video drivers (Nvidia, ATI), and Sound drivers should be left alone.

Usually both Video and Sound Drivers put icons in the system tray that are not removable. Some vendors give the option to hide the icon. Other-mouse-click the icon and look for a "don't display in System Tray." You may ask, What if I need to get to the icon?" Visit the control panel; all of your options are there.

If in doubt about what an item is, search the web, using the "startup item's" name to see what other people have discovered. Remember, words like "optional" or "non-essential" are clues.

Here are some of the tasks that I left running:
+ APoint
+ Realtek HD Audio Manager
+ Intel(R) CommonUserInterface (multiple)
+ Acronis Scheduler Helper (Acronis backup requires this)
+ Acronis True Image
+ Corel File Shell Monitor (PSP licensing?)
+ Microsoft Security Client (MSE)
+ Microsoft Intellipoint (Mouse)
+ Microsoft Windows(R) Operating System (Sidebar)
+ Microsoft Windows Operating System (ctfmon.exe)
+ NVidia / ATI drivers
+ IconUtility (Alcor Card Reader)
+ Unknown (Roxio CD Bruner

Your system, and its particular hardware, may have different needs.

STARTUP Groups

Some programs, such as older versions of Microsoft Office, put programs in the Windows "Startup Group" (folder). See Start, Programs, STARTUP to see what is lurking there. Usually they can be deleted. This includes Adobe Acrobat's pre-load, Microsoft's Office Startup, MOM, DAD, Typing Tutor Pre-loaders, etc. I've never found an icon that was required to live in this group. Consider moving the icons to another folder before deleting them, this way you can return them if needed.

Check Occasionally

At least once every few months, especially if you have been installing new software or hardware, look through the list and do some weeding. Somebody is always sneaking something in there. As always, reboot and test. If find something quit working (such as your scanner or camera), launch MSConfig and recheck the box and reboot.

RegEdit:

If you are familiar with Regedit, all MSConfig changes live in this structure:
HKLM\Software\Microsoft\Windows\CurrentVersion\Run and \RunOnce.

Windows XP places a subfolder below, where msconfig hides the items you unchecked. Vista tucks them in a different location:
HKLM\Software\Microsoft\Shared Tools\MSConfig\startupREG

If you are skilled with Regedit, you can remove items from here, but MSConfig/Autoruns is easier to use and less dangerous.

Other Steps
Vaguely related to this is your Start Menu. Although cleaning this up does not improve your computer's boot times, it can certainly improve how much you like using the computer. Read the following articles on how to streamline your Start Menu.

Related Articles:
Windows 7 Streamline Start Menus (organizing the Start Menu)
Windows XP/Vista Streamline Start Menus
Disk Cleanup Steps
Optimizing the Swap File
CPU Utilization (AVG)

2011-07-09

WordPerfect - Hanging Indents - Paragraph Headers

Reports and other papers often need Hanging Indented paragraphs or Margin-released headers.


Hanging Indents:

A Hanging Indent takes the first line of the paragraph, leaving it against the margin, while all remaining lines in the paragraph are indented one tab-stop. At the next paragraph break (hard-return), the new paragraph returns to the normal margins.

To build a hanging indented paragraph:
1. Place the cursor in front of the first character in the paragraph.front of the first line.
2. Select menu: Format, Paragraph, Hanging Paragraph (most people use a shortcut: Ctrl-F7). You could also fiddle with the ruler-bar aka the Microsoft Word way, but that takes too much time and effort.

Hanging Indents usually are used to offset "quoted" material, although a double-indented paragraph is a better formatting decision in those cases. In either case, the paragraph, and all of its text, 'wrap as paragraphs should,' staying as one continuous block of text.

Reveal codes will show two codes at the front of the paragraph: an [Hd Left Ind] and [Hd Back Tab].

Some people mistakenly try to use Hanging Indents for section-headers, illustrated above as a Margin-Release Hanging Indent. The trouble with this idea is all other paragraphs in the paper would have to be indented manually, essentially bypassing the margin settings.

Margin-Released Hanging Indents:

If you need what I like to call a "Margin-Released Hanging Indent:"


  • press Shift-Tab to move the cursor one tab-stop to the left of the Margin.
  • Begin typing the "paragraph-header"
  • Press Enter to start a new paragraph along the existing margin


Notice how you can do this with a simple menu/keystroke; there is no need to fiddle with the ruler-bar or margins and all subsequent paragraphs stay along the original margin. "Out-dent" new headers by exception, only as needed.

In Reveal Codes, the margin release is known as a "HD Back Tab" (hard back-tab).


Keep in mind that these types of headers are nothing more than a short paragraph that is shorter than one line. The risk is, at a page-break, they may stay on one-side of the page while the following text jumps to the next page. See this article (WordPerfect - Protect Text Across Page Breaks) for hints on how to handle this.

I wrote an entire book about this article's topic.  Search Amazon for "Adventures with WordPerfect"


Related Articles:
WordPerfect - Block Protect Text Across Page Breaks
WordPerfect - Using WP for School Papers - Page Numbering

WordPerfect - Protect Text Across Page Breaks

WordPerfect Howto: Keeping Text together across page-boundaries. Block Protecting text across page-boundaries. Block protecting lists.

Problem:
A document has a margin-release header (somewhat like a hanging indent) that is approaching a page-boundary. The text below the header crossed the page-break and the header is now orphaned.

Ideally, the heading and at least a sentence or two of its text should stay grouped together on one side of the page-break or the other. Standard "Widows and Orphans" won't work in this example because the header is technically a separate paragraph.

The "improper way":

The improper way to fix this problem is to ram a manual hard-page-break [Ctrl-Enter] above the header, forcing the header and its text to the next page. This solves the immediate problem but becomes a maintenance headache.  If you use a hard-page-break, it may end up in the middle of a page as other text is inserted or deleted; sooner or later, you will be forced to clean up the mess.

Issues:
  • Manually typing Hard-Page-Breaks [Ctrl-Enter] in any flowing text should be avoided. Manual page-breaks require too much maintenance over the life of the document.
  • Widow and Orphan controls do not apply here because technically, the "header" is a separate paragraph.

Solution: 

"Block-protect" the header and (part of) the next paragraph, locking them together as one object. As the blocked text reaches a page-boundary, it leaps to the next page as one group. If text above is deleted, and enough space becomes available, the entire block automatically moves to the previous page.


Steps:
  • Highlight the header and at least two sentences into the paragraph. Often, it is easier to highlight the entire next paragraph.
  • Select menu: Format, "Keep Text Together"
  • Select [x] Block Protect

Results:
The text-header and next paragraph cross the page-boundary as one entity.


Reveal codes will look like this:

Click image for larger view, click "right-x" to return
Hints:
  • With a hanging Header, as illustrated above, start highlighting to the Left of the the codes. In other words, highlight left of the HdBack Tab and Bold.
  • Block protect *all* headers and their next paragraphs, even if they are not at risk of crossing a page boundary. This saves you the trouble of chasing them as the document's length changes.
  • If the next paragraphs are "long", block-protect only the first few sentences -- but in general, I tend to block the entire paragraph.

    LISTS
  • Use this same technique to block-protect items in a list.
  • Block protect the entire list (if short), or at least the first several items (if long)
  • Block protect the list, even if it is not at risk of a page-break.

  • Often, as I'm writing long papers, I don't bother protecting the text until near the end -- ignoring all page-breaks, letting the text fall where it may. Then, starting at the top, I go through the document, protecting all headings and lists. The paper will be perfect and it will survive all future edits.


Macro Hint:

Block protecting text is a common occurrence in long papers. Because it is used so frequently, I recommend writing a simple WP macro and assigning it to the never-used F1-Help. With this, you can quickly protect text without wading through the menus.

The "block-protect" macro is short and can be recorded, or you can use this two-line macro:

Application (WordPerfect; "WordPerfect"; Default!; "EN")
BlockProtect (State: On!)


Related Articles:
WordPerfect Page Numbering for School Papers
WordPerfect - Hanging Indents / Paragraph Headers
WordPerfect X5 - A Quick Review

2011-07-04

Using WordPerfect for School Papers

This article describes how to use WordPerfect on a normal High-School or College paper. With these steps, your papers will have proper page numbering and pages will always "break" correctly. You will not need to make manual page-breaks nor will you need to delete previously-built page-breaks. In short, the paper will behave no matter what text is inserted or deleted.

These instructions work with all versions of WordPerfect for Windows and was written using WP X5 and still work in the same in version X8. For best results, follow these steps, in this order.

Contents:
  • Fixing White-Space Behaviors
  • Setting a Default Font
  • Setting default Tab Settings on Ruler Bar
  • Margin Releases
  • Paragraph Widows and Orphans
  • Reveal Codes
  • Draft View
  • Fancy Page Numbering
  • Headers
  • Cover Page
  • Suppressing Page Numbers / Footers
  • Reset Page Number to 1
  • First Page / Duplexed First Page (Odd)

This article was the genesis of a new book I wrote.  Search Amazon for "Adventures with WordPerfect".  This is everything you need to know about using WordPerfect to write technical papers, thesis papers, and the like.


I used this techniques for my six-volume computer programming book, "War and Peace Programming in C#"

Initial Setup:

Make these one-time recommended changes to WordPerfect's preferences. This makes editing all future documents easier. If you have already made these changes, skip to the Starting a New Paper section.

A. Set the Cursor "Active in text"
This keeps mouse-clicks from inserting tabs in the middle of the document. I have no earthly idea why WP would default the setting the way they did. By turning this off, the word processor will behave more naturally.
  • In Tools, Settings, Display
  • Select the first tab, [Documents]
  • Mark "Active in Text"
  • Click OK and close the preference screens


B. Set a Default Font:
  • From a blank document, select Format, Font.
  • Choose Times New Roman (a True Type font)
  • Size 11 or 12 (11 looks more professional)

  • On the same Font menu, click the bottom "Settings" button.
  • Choose "Set face and point size as a default for all documents"
  • Click OK

Following the standards set by nearly all printed magazines and newspapers, printed material should be a serif-font (Times New Roman) while online material is typically a sans-serif font (Arial).


C. Set optional default tabs:
Set a default tab (ruler-bar) for this and all new documents. By default, tab stops are every 1/2 inch -- which is too wide. Set the tab-settings every 1/4" inch. This also sets a Margin Release. Even if you like tab-settings at 1/2", you should still set the negative -.50 margin release.


Setting Tabs:
  • Format, Styles: Choose "DocumentStyles"
  • Click Edit to open the "Style Editor"
  • Important:  Confirm "[x] Use as default" is checked in the lower-right corner
  • Click the mouse in the "Contents" section
  • Click Format, Line, TabSet

  • Confirm Tab Type = Left
  • Change Tab Position to -0.5 (negative point 5)
  • Click box [x] Repeat every .25 (point 25)
  • Click "Set"
  • Click Close, returning to the Styles Editor.  Ok.

Margin Release Example:

Notice how tab stops are set 1/2" to the left of the Left margin (-.5) -- this is called a "Margin Release." Often, in a paper, a Hanging Header is needed. With this setting, you can quickly type a bolded title that "sticks out past the margin" without having to fiddle with the ruler-bar or with margins.

Click illustration for a larger view; click right-x to return

To use a Margin Release:
  • At the beginning of a paragraph, press Shift-Tab to hang the heading. Press Shift-Tab a second time to jump one more stop to the left.

D. Set Widow and Orphans
(This keeps the first and last line of a paragraph from 'orphaning" at the bottom of a page-break -- it always forces at least two lines before a page-break. No more chasing text that happens to live at the bottom of a page.)

Still in the Styles Editor, select Format, "Keep Text Together"
[x] Prevent first and last lines of paragraphs from being separated across pages" (check)
Click Ok


E. Optionally, set a default Font in the "Default DocumentStyle"
Set the font using the instructions from above. You will note it appears in the default Document Style.  From this screen, you can insert any codes (settings) you need in all future (default) documents.

Confirm the settings.

From the main Styles Editor screen, confirm the Tab Set and Wid/Orph are set in the Reveal-codes 'Contents' window (the order does not matter).


  • Click "OK" to save
  • Click "Yes" when prompted "Apply this style to new documents as they are created."

This completes the default WP preferences.


Starting a new Paper

With the settings above, all new papers begin with a preferred default font, tab settings and Margin-releases. Widows and Orphans are also set. The remaining settings, below, could also be set in the Default/Preferences, but I prefer setting them manually at the document level because papers have different needs. These changes will be "Document" changes (rather than defaults).

When making any Document change, remember WordPerfect makes its changes at the cursor's position, down. In other words, where ever the blinking cursor is, the change takes effect from that point until the end of the document. This is noticeably different (and better) than Microsoft Word -- which makes all of its changes at the "current paragraph".

1. Begin by Exposing Reveal Codes

If you have not already done so, expose WordPerfect's famous Reveal Codes. This makes editing a complicated document easier because you can see all codes, including bolds, underlines, font-changes, footnotes, etc.

Click and drag-up the reveal-codes pane (lower-right corner), as illustrated, exposing a half-inch or so:


2. Set Draft View (recommended)

Although WordPerfect can edit documents in a full "What-You-See is What you Get" mode, it is easier to edit in Draft mode. This way, you don't have to scroll past white-space and Headers, Footers and Footnotes don't get in the way.
  • From the top menu, select View, "Draft"

The rest of this document assumes "Draft view"


3. Set Page Numbering for all Pages

The easy way to set page numbering is with menu - Format, Page, "Numbering".  Be sure the cursor is at the top of the document when making this change.  This type of page-numbering shows at the bottom center of each page.


If a more complicated page indicator is needed, use a Page Footer.
For example, this footer shows a horizontal line, your name, a page number and the Course title:


When building the footer, the same line of text will have left-justified, centered and right-justified text (try doing this in MS Word...).

To build the footer, create "Footer A":
In summary:


Detailed Footer Steps:

a. Place the cursor at the top of the document.  Alternately, place the cursor on the first page where you want the header-and-footers to begin, usually after the cover page.  Changes to Headers and Footers take effect on the current page and flow down, through the remainder of the document.  However, as you will see below, you can control when the header/footer "activates."  I prefer to set all document-level codes at the top of the first page, where they are easier to find.

b. Select menu Insert, Header/Footer.

c. Choose "Footer A", then "Create"

(Because of Draft View, a new document window opens, which obscures the original document. Do not panic -- your document/paper is in the background.)

d. Press Enter (Return) one time. (I like a blank line, separating the footer from the text above)

e. Optionally, insert a Horizontal Line by choosing menu: Insert, Line, "Horizontal Line". Note Reveal Codes shows a [Graph Line].

f. Press Enter (Return) after the graphic-line.
g. Type Your name (e.g. J.Smith); this aligns along the left margin.

h. Insert the current Page Number:
  • Press "Shift-F7" (Center)
  • Select Menu: Format, Page, "Insert Page Number"
  • Choose "Page"
  • Click "Insert"

Notice how you can center the page-number-text on the same line, even though other text was already typed. Your name stays along the left margin while the new text centers. Once again, this shows how WordPerfect is different than MSWord. Most text controls (Centering) take effect at the cursor position -- they do not apply to the entire line or paragraph. This allows you to make complicated footers using only a few keystrokes.

Alternately, after centering, you could type the word "Page " (space), then "Insert the Page Number," giving a "Page #".

i. Next, type the Class-name with these formatting steps:

Immediately after the [Pg Num Disp] reveal-code (at your current cursor position), press Alt-F7 (Flush Right) and type "Biology 202".

The screen, with Reveal Codes, will look like this:

Click image for a larger view, click right-x to return

j. Click the Document's "X" (near the upper-right, illustrated above); this returns you to the original document.

Because you are in Draft Mode, the footers are not visible while typing in the main paper.  They can be seen in Print Preview or by switching to Full View mode (not recommended).


Headers with the Paper's Name

Similarly, define a Header at the the top of each page in the paper. For example, here is the paper's name, justified to the right:


a. Confirm the cursor is near the top of the document (the exact position in Reveal Codes is not particularly important. If you have made no other editing changes, the Header will appear next to the previously-built Footer, as seen in Reveal Codes; this is acceptable.)

b. Select top menu:
  • Insert, Header/Footer
  • Choose Header A
  • Create
    (Opening a new editing window, obscuring the original document).
  • Press Alt-F7 (Flush, Right)
  • Type your Paper's name; e.g. The Secret Lives of Turtles
  • Press Enter one time (I like a blank line below the header)

Click the document's "X" to close this window, returning you to the (blank) document (note: this does not close WordPerfect).  Because you are in Draft View, the Header is hidden while you type in the main document.


Cover Page


Up to this point, you have a document defined with a default font, margins, tab-settings, and page-number footers (which will be disabled for the first page in a moment). Follow these steps to write the Paper's Cover Page.

a. Disable the Headers and Footer for this page only.
  • Select menu: Format, Page, "Suppress"
  • Check "Header A"
  • Check "Footer A"
  • Click OK

Note: I prefer to define the document's Headers and Footers on the first page of the document and then disable them where not needed. This way, their location is easily remembered and easily found. Alternatively, you could create the Headers and Footers on the first "real" page of the paper and let them "flow down" through the remainder of the document.

b. Press 8 or 9 Returns (Enter), to move the cursor down the page.

c. Press Shift-F7 (Center) and type the document's title "The Secret Lives of Turtles".

d. Highlight the text and change the font by pressing F9.
  • Choose "Extra Large"
  • Click OK


e. Click the white area after the large text
(note how the editing cursor appears after the closing [ExtLarge] Reveal Code).

Continue building the remaining text of the cover page, pressing Shift-F7 to center each line and press Return to move to a new line. Results will look similar to this:

The Secret Lives of Turtles

Your Name
Biology 202
July, 2011


f. Press Ctrl-Enter to insert a Hard Page Break,
moving you to the first "real" page in the paper.


First Page Duplexed

Decision: If the paper is being printed duplex (front-and-back), the first "real" page should begin on an odd-numbered page; not on the back of the cover-page (page-2).

The cheap and sleazy way to accomplish this is to insert a second Hard-Page (ctrl-Enter), moving you to "page-3". Do this now.
  • Press Ctrl-Enter (insert a second Hard Page Break)

Alternately: on the first page-break, Menu: Format, Page, "Force Page: Odd"


First Page of Paper

Because of the cover page(s), the first "real" page in the paper starts on physical page-2 /or 3 -- but it should be numbered as page "1".

Resetting the Page Number:

a. With the editing cursor on the last page, select menu: Format, Page, Numbering.
b. Click "Set Value", type "1"


Change the Page-Number layout on Page 1:

Traditionally, page 1 nomenclature should be at the bottom, center of the page, with no other accouterments -- in other words, no fancy footer. Once again, go into the Suppress menu and make this minor change:

a. Menu: Format, Page, Suppress
b. Click only on "Footer B"
c. Check [x] Print Page Number at Bottom Center


Begin Typing your Paper!

This completes the Paper's setup. You can now begin typing the paper. You will find all page numbers behave appropriately, and automatically with professional-looking formatting. After typing a few pages, switch to View, "Page" to see the results -- but I recommend switching back to "Draft" to keep editing.


Related Articles:
Hanging Indents (out-dents)
"Block-Protecting" text - automatically forcing a page-break if an illustration and related text crosses a page-boundary.
WordPerfect X5 - A Quick Review

Future WordPerfect Articles:

Using Tabbed-Tables
Insert Graphics and Illustrations


Your comments are welcome.

2011-06-27

WMP12 Audio CDs do not play in Car or Stereo

Windows Media Player 12 (Windows 7 WMP) Audio CDs do not play in Car, Stereo or other non-computer players. The Burned disk is not playable.  This article explains how to fix this problem.

Problem: Windows 7 Media Player (WMP) 12's burned Audio disks will not play in a non-computer audio player.  The disks will not play on an older home stereo or the car stereo.  These devices report various errors, such as No disk, Invalid Disk, Not a music CD, etc..

This is not the obvious problem where a "Data / MP3" disk was burned.  You may find some Windows 7 computers can burn disks without these problems.

Symptoms:
  • Disk was burned as an "Audio" CD and something was clearly written to the disk
  • Stereo (non-computer) reports "No Disk" or Invalid Disk
  • WMP may show the disk as "Unknown" even though a Title was saved
  • Burning the Disk at Slow Speeds; without Gaps; as "WPL", etc, makes no difference; all burned disks fail.
  • WMP files are saved MP3 in the original library, but this is immaterial.
  • Burned disk plays in the computer that burned the disk and that copy of WMP shows the tracks even though Windows Explorer shows only 1 file
  • Windows Explorer shows one file, "Files Ready to Be Written to the Disk (1), with a filename of desktop.ini. No *.cda files are found on the disk
  • Disk may or may not play in a different computer
  • I suspect you have Windows 7 Home Premium or Windows 7 Ultimate installed, along with "Windows Media Center"
Example Windows Explorer View of failed disk:

Burn Notes:

Before burning an Audio CD, note the following well-known points:

Most Car CD players (especially older players) cannot play "data" or "MP3" music CDs. The CD's must be recorded in "Audio" format (commonly called Redbook). This article assumes you are trying to spin a standard, traditional Audio CD.

The CDs must be burned on CD-R disks. Do not use CD-RW or DVDR. Also, some ancient CD players can only read "74" minute CDs but almost all modern disk blanks are 80-minutes. This is probably not an issue with your player because all devices in the past (factoid:) 15 years can read 80-minute disks.

You can store your WMP music library as MP3 (recommended). The format the music is stored as is immaterial to this problem. When all issues are resolved, you can still use the MP3 files to burn audio without manually converting to AAC, WAV or other formats.


Standard WMP Audio Burn Steps:

When burning an Audio CD, use these WMP 12 settings, assuming you want to spin a standard Audio CD. Likely, you have already tried these steps, and failed, but these are required settings and need to be discussed. However, I suspect the real solution can be found near the end of this article.


A. In WMP, click the [Burn] tab and then "Clear list" to start fresh.

B. Drag an album or tracks from your library to the Burn list. If the album is currently playing, consider clearing the play list in the [Play] tab before burning, just to be safe.

C. In the Options pull-down
  • Confirm "Audio CD" is selected
  • Choose "More Burn Options"

D. In "More Burn Options"

Set Burn Speed to "Slow" for the most reliable results
[x] Automatically eject the disk after burning (checked)
[x] Apply volume leveling across tracks (optional)
[ ] Burn CD without Gaps (unchecked)

Choose "WPL" in "Add a list of all burned files to the disk in this format"
[ ] Use Media information to arrange files in folders on disk

Click OK to save the options.

E. Near the [Burn] tab, click "Start Burn"


Solution to the Audio CD Problem:

Although the steps above are required for any Audio disk, my computer still failed to burn a valid disk. I found the solution after noting that one of my Windows 7 computers correctly burned disks while a second did not.

The difference between the two machines was "Windows Media Center" was installed on the failing computer. Un-installing Media Center, then re-installing WMP solved the problem. Follow these steps.


1. In Windows Control Panel, open "Programs and Features"


2. On the left Navigation, click "Turn Windows Features on or off". This takes several moments to open.


3. In "Media Features",

[ ] Uncheck "Windows Media Center"
[ ] Uncheck "Windows Media Player"

This de-installs Windows Media Center and Windows Media Player. WMP will be re-installed in a moment. Windows will prompt that some features will be disabled. Continue and reboot when prompted.

Note: During the re-install, your Music Library (music collection) will remain as-is and will re-attach in a moment.


4. After rebooting, return to the Control Panel, "Programs and Features."
re-Open Media Features,


[x] Re-select the "Windows Media Player" option and click Ok.

This re-installs WMP and your existing music library will automatically re-attach.


5. Audio CD's should now burn properly. Test with the settings from above.

Re-installing (0nly) WMP resolved the issue; originally, the author left Windows Media Center un-installed for the first test. Upon later testing, I found Windows Media Center can be re-installed without damaging the Audio burn solution but I did this in a two-stage install. I did not test re-installing both programs at the same time. Your comments on this would be welcomed.


6. Optionally, return to Media Features and re-check (re-install) Windows Media Center. Test again. CDs should still burn properly. The Author did not test checking both WMP and Windows Media Center at the same time during the original re-install.


Your un-registered comments on this article are welcome.

Related articles:
Adding an MP3 folder to your existing WMP library
Streamline Windows 7 (including how to move the WMP library to a different data folder)

2011-06-07

Website Recommendations

Website Recommendations. Worth repeating  Keyliner recommended websites.

Besides this site, I have found these sites to be particularly interesting.
This posting is periodically updated.

Podcast:  99% Invisible
http://99percentinvisible.org

Bezier Curves - a primer.
Interactive Mathematics


A Vision of Students Today:
A remarkable video by Professor Michael Wesch. An anthropological study.
Searching his name will also bring up other similar videos. Check this one out first.
http://www.youtube.com/watch?v=dGCJ46vyR9o&NR=1


and this: The Machine is Us


Other Videos on Public Education:
RSA Animate - Changing Education Paradigms


Gapminder:
Statistical analysis of various trends, such as birth rates, HIV, CO2 emissions and others. This is very interesting information, presented by Hans Rosling. This is part of a GNU project called TEDTalks.
http://www.gapminder.org/videos/


Photography:
This is one of the finest collections of juried photographs I have found.
Start by clicking the top-menu "Photos" link.
http://1x.com/


xkcd.com Comics
Computer and scientific humor
http://xkcd.com


A SHORT LOVE STORY IN STOP MOTION
from Carlos Lascano on Vimeo.
Beautifully done; wonderful music. I have come back many times to view this short film.

A collection of interesting Video and Print advertisements. I particularly liked this one:
Adweek.com/AdFreak

A nicely-done song. 
Give it a minute or so to see the humor.
http://www.youtube.com/watch?v=d9NF2edxy-M

The history of the world in One Minute
http://www.themarysue.com/melodysheep-our-story-earth-montage/


Keywords:
website recommendations recommended websites favorite websites