Install - Raspberry PI Webserver Step-by-Step instructions
Build an Apache2 Webserver at your home
After switching my domain provider to GoDaddy, I discovered I could not host a simple webpage on the domain without paying a monthly fee (my previous provider hosted simple sites for free). My needs are unremarkable -- a few pages of static text and I am not paying $12 a month for the privilege.
I thought: Why not build my own webserver and point my domain that direction?
Oh my gosh, no, you say! Trust me. This is not hard.
Using an inexpensive Raspberry Pi (a small computer for $50 - now $80!), you can install a free operating system, install the web server, and be online with a basic page all within a few hours. Literally!
This was all new to me, having never done this before. This article shows the steps. You do not need to know Linux, or the hardware:
* Raspberry Pi Hardware
* Installing Linux
* Installing Apache Webserver
* Configuring your router
* Pointing your Domain to your website
* Encrypting https with an ssl cert
This is a long article but easy steps. No panic. Take it one step at-a-time.
Related article: Installing a Raspberry Pi pi-Hole Ad-blocker https://keyliner.blogspot.com/2018/01/network-wide-blocking-of-ads-tracking.html
Assumptions:
* You own a registered domain. Mine is keyliner.com. Domains run about $15 or $20 per year, which is separate from the webhosting fees I am avoiding.
* You must be able to login into your Domain Provider's website as an
administrator. e.g. GoDaddy, or other provider. If you own a domain (such as keyliner.com), you will have a
login.
* You must be able to login to your home router as administrator. This article shows a NetGear Wireless router. All routers work similarly. Steps illustrated below.
* Purchase a small computer called a Raspberry Pi. You might need a USB SD-card reader.
Raspberry Pi, you say?
To make this work, build a small dedicated computer using a device
called a Raspberry Pi.
"I don't know anything about that!" Neither did I!
And yet, with
zero experience, I built the server, installed the Linux operating system, and configured everything -- all in about two hours.
The operating system and webserver software are free. The only expense is a (now $80) computer.
What is a Raspberry Pi?
A Pi is a small computer, the size of a deck of cards, running Linux. It
has 4 USB ports, an HDMI video port, an RJ45 wired network port,
Bluetooth, a wireless adapter, and a slot for an SD-card.
Google-search to find a reseller. I bought mine from Walmart.com. Any
Pi version will work, where I am using an older version 3. Version 4 is
the newer (2022), and version 5 was just announced (2023.10).
You will also need the following:
HDMI cable to connect to your TV or monitor (temporary, just for setup).
Short .5 or 1 Meter (2 - 3 ft) Ethernet patch cable ($5)
Wired or wireless Keyboard (borrow from your PC, temporary)
Wired or wireless Mouse (borrow from your PC, temporary)
16GB or 32GB Micro SD card, with adapter.
***Do not buy a 64GB or larger drive; it is not needed, nor will it work.
The SD card acts as the Pi's hard drive. This is the Micro SD card,
which is smaller than a postage stamp. Buy at any
electronics or office store for about $15. Get the card with a standard-sized adapter so it can plug
it into a laptop or desktop's SD slot -- if you don't have a slot, you will have to buy an USB SD Card Reader.
After setup, the Pi does not need an attached keyboard, mouse, or monitor. It can be a little box, sitting in the corner, minding its own business.
Prerequisites:
A. Find an IP Address for the Pi
The Raspberry Pi needs a place to live. Identify a static (fixed) IP address on your home network/internal network. Start with your local workstation and discover your network's IP-address range with these easy but geeky steps:
From a DOS / Command prompt (windows-R, "CMD"), type this command:
ipconfig (enter)
* Note your IPV4 address, illustrated.
Yours will probably read something like
192.168.0.10 or
192.168.1.17 etc.
mine happens to be 192.168.100.10
* Note the default Gateway's dot-1 address: (mine is 192.168.100.1) - This is your main router. The ".100" is the subnet. *If* the secondary (wireless) router has a Default Gateway IP Address of ".2", ignore it and do all the work on the (.1) address.
The Pi needs an address in this same subnet.
Practically-speaking, you can guess, and I'd bet picking that last octect as 192.168.100.245 will work. For that last
octet, pick a high number, below 250. I chose .245.
Test the proposed address:
From your workstation, open a DOS prompt. Type this command:
PING 192.168.100.245
If no device answers ("destination unreachable"), then this address is probably safe to use. Otherwise, try a different near-by-number (.244, .243, etc.). Write this address down.
Technical
notes for those who care: Home routers assign automatic DHCP addresses
to each workstation using a range (or pool) of numbers. This range
varies by router. Some start at 2 - through 100, others
start at 10 through 150. The range does not matter, but the Raspberry
Pi needs a number outside that range, where I am choosing .245 (stay below .250).
Optionally, you can research this by logging into the router: Type the "x.x.x.1" dot-one IP Address in a browser URL. A login panel appears. Login as "admin" and use the password the router was installed with (sometimes printed on the back of the router), or as-set in your long-lost documentation. (See later in this article if you can't login).
Once logged in, find an advanced setup menu for "LAN Setup" and "Use the Router as a "DHCP Server" (menus will vary). Confirm the exact DHCP
Address range it uses. It will show something like 10 through 150. Then pick a number outside of that range (151, 200, 210, 245, etc.).
Continue with these software installs:
B. Install a console program called Putty

On your local workstation, download and install a small DOS program called Putty.exe (a remote desktop console). This program will be used later to help administer the Pi. Optionally,
place the putty.exe's tile on the start menu to make the program
easy-to-find.
Install, but don't worry about using the program yet.
link:
https://www.putty.org
C. Install a Remote Desktop program, VNC
On your local workstation, download and install a remote desktop viewer called "VNC".
This is also handy for remote administration because you can use your PC's mouse-and-keyboard on the Pi's desktop from another room. Technically, this program is not needed for this project, but is handy.
link:
https://www.realvnc.com/en/connect/download/viewerSelect "Standalone EXE x64 Installer"
Install, but don't worry about using this program yet -- plus, it won't work until the server-side is configured. Build an icon/tile for your desktop or start menu.
D. Install FileZilla - an FTP Client

On your local workstation, download and install FileZilla (an ftpClient), or use any other FTP client. This is needed for webpage development.
Link:
https://filezilla-project.org/download.php?type=clientInstall, but don't worry about using this program yet. Put an icon on your desktop or start menu.
E. Find your "external-facing" IP address:
From your local workstation, Google-search "What is my IP".
Write down your "external-facing" IP address. This is no where near your home network's addressing.
For example, as-of this writing, mine is "96.19.200.6".
Important Note: This address can change when your router is rebooted or after a power failure. From your ISP, you can pay extra for a fixed, "Static" IP address. I am too cheap. My address sticks around for months-at-a-time, and if it changes, I am willing to have downtime while I change my "A-Record" (see below).
-----------------------------------------------------------
Raspberry Pi Hardware Setup
-----------------------------------------------------------
A
new Raspberry Pi is a small circuit board. Snap the board into the
kit's plastic case, and if the kit came with self-adhesive heat-sinks,
apply them now. This is all obvious as you assemble the box.
Next, download and install the Linux operating system:
A. On your local workstation, plug in your SD-card Reader/adapter; if Windows offers to format the drive, skip.
B. From a PC, Google "Raspberry Pi OS" download or this link
https://www.raspberrypi.com/softwareClick the "Windows" download button and download "Imager.exe" (2023: Version 1.7.5)
C. Locate the downloaded imager.exe program,
Right-Mouse-Click and choose "Run as Administrator"
Pick which device you are installing (Raspberry Pi 3, 4, or 5)
Select the top Operating System, Raspberry Pi OS (64-bit)"
Choose storage: (selecting the 16/32GB card)
Choose "EDIT" on OS Customisation, and allow it to erase your 16/32gb card (British spelling).
In the OS Customisation menu,
Set HostName to "keyliner" (your domain name)
Set username to "admini"
Set password to ____________________
[x] Configure Wireless Lan (Optional, and will not be permanent. This
can be used during the initial setup, but must be abandoned.
[x] Set Locale and Settings; keyboard layout
In the [Services] tab, [x] Enable SSH with Password Authentication
Click Save
D. Back at the "Use OS customization" panel, click "Yes" (use the customisation)
Allow the SD card to write. This takes about 10 minutes on a fast Internet connection
E. Insert the Micro-SD card into the Raspberry Pi's card-slot.
- Remove the Micro-SD card from the SD-adapter
- >Insert into the Raspberry Pi's card-slot
- The SD-card installs "up-side-down," into the board's slot
- Push until it clicks in place
F. Connect an HDMI cable to a TV or Monitor (I used my TV).
- Connect a USB Keyboard to the Pi's USB ports (borrow from your desktop; can be wireless)
- Connect a USB Mouse (can be wireless)
- For the initial setup, use either a wired or wireless
connection. Wired is preferred.
For a Wired RJ45: If near the main router, connect an RJ45 network cable to
any open port on any router. (Do not plug into the router's "uplink"
port; instead plug into one of the 4 or 8 port areas). Connect the other end to the Pi's RJ45 port.
If Wireless, continue with the USB power supply step; later connect to the wireless network.
-
Connect the USB 2.5a power-supply to the Pi. (Any 2.5a micro-USB cell charger will work. Usually supplied in a the Pi-kit.)
The Raspberry Pi will boot (visible on TV or monitor).
You may need to switch the INPUT to find the right HDMI port.
Black
Screen: I had troubles, when partway through the install, the TV said
"signal not found." The TV was routed through a stereo, and the stereo
would go into power-save mode. Rebooting the stereo returned the TV's
Pi image.
---------------------------------------------------------------------------
Raspberry Pi Operating System Install
---------------------------------------------------------------------------
When
the Pi first-time boots with the new SD-card installed, it arrives at
the Linux desktop. This will take several minutes for the first-time
boot and there will be lots of screen blinking.
1. Click the Raspberry icon in the upper-left of the screenSelect the Raspberry icon
Preferences
Raspberry Pi Configuration
In the [Interfaces] tab
Turn on SSH
Turn on VNC
2. Set the Pi to a static (fixed) IP address
On the top menu bar, far right, locate the up-down-icon.
See: Advanced Options, Edit Connections.
Select "Ethernet, Wired Connection 1"
Click the gear icon
In IPV4 Settings, Add a new address.
In the three horizontal fields, type these values:
Address: (see above, e.g. 192.168.100.245)
Netmask: type "24" (or 255.255.255.0)
Gateway: 192.168.100.1
(this illustration is dated and the address is 100.245)
c. Save and Close the window
d. Return to the upper-right up-down arrow menu: "Turn Off Wireless Lan"
(this assumes the pi is connected to an RJ45 Wired Network Connection)
Note: You
can use wireless for the initial setup. If so, also set the wireless
IP to this same address, but once this box goes into production, it
really needs to be a wired connection.
3. RebootFrom the Raspberry menu, top left,
Select: Logout, Reboot
Login again.
From the desktop, launch the chromium browser and confirm
you can see the Internet (open Google.com or something).
4. PatchIn
the top, left-side menu, near the Raspberry icon, locate the "terminal"
icon. This opens to a DOS-like screen. Update the Pi's OS with
these case-sensitive commands:
sudo apt-get update
sudo apt-get upgrade -y
There is more patching in a later step.Testing:
5. Test Putty From your Windows workstation, launch "putty.exe"
In the Host Name or IP Address, type "192.168.100.
245" (or "keyliner.local")
You will be prompted, "This is a new connection. Do you trust it?"
Login using "admini" and the password (case-sensitive)
This confirms the program works. Close the Putty window.
6. Test and Install VNC Remote Control SoftwareVNC is a remote desktop (which is different than the Terminal).
First, enable the VNC service by logging into the Pi-server (using Putty, or from the server's desktop "Terminal" program). Login to the server as "admini".
a) At the command prompt, type
sudo raspi-config
b) From the DOS-like menu, select "Interface Options";
Select 'Enable VNC' (not illustrated).
Press Esc a few times to save the changes and return to the top menu.
Select "Display Options", "VNC Resolution"
Set the Resolution to 1280x720
Close the (putty) terminal window
c) Continue from your local Windows workstation:
Launch the previously-installed Windows application "VNC" (Real VNC)
Select the small link at the bottom of the screen, labeld: "Use RealVNC without signing in"
(You do not need to register or login to their website to use this program.)
d) Create a new connection by typing "192.168.100.245"
Accept "VNC Server not recognized...do you trust this..."
Confirm you can see the desktop. Wiggle the mouse, browse, etc..
Close VNC and return to Windows.
VNC
seems to have a bug and will not connect a second time using the same
configuration. To reload the desktop's VNC connection, delete the
previously-built ".245" connection and rebuild each time needed.
Unclear how to resolve this or what I am doing wrong. My expert friend says use a different program than VNC, but VNC seemed the easiest to install.
I have not revisited this problem. See this keyliner article for other details:
7. Fix the Chromium Web Browser
It seems the default install has a problem with the Chromium web browser and VNC connections. If the webbrowser Chromium is launched from within VNC, the browser will "blink" (blinking), and the URL-bar does not display. Make these changes:
a. From Windows, again, launch the Putty Terminal emulator.
Connect to 192.168.100.245
b. Type this command:
sudo nano /boot/config.txt
where "sudo" means "super-user-do"
and "nano" is a text editor
c. Without using the mouse, scroll-down, locating this line. Remove the #pound-sign/comment character, leaving this statement:
hdmi_force_hotplug=1
d. In the same file, down one or two lines, un-comment (remove the #-signs) from these two statements:
hdmi_group=1
htmi_mode=4 (change from _mode=1 to _mode=4)
e. Save the file with ctrl-O (output). Press ENTER to confirm the filename.
f. From the same terminal window, reboot with this command:
sudo reboot
Woo-Hoo!
Congratulations. The Raspberry Pi's Operating System is installed and ready for the web server installation.
As an aside, the server's domain name and other settings can be changed with this menu:
From a Terminal or Putty window:
sudo raspi-config
---------------------------------------------------------------------------
Installing Apache2 Webserver
---------------------------------------------------------------------------
1. From either your workstation's Putty program, VNC, or from the server's own desktop, open a terminal window (a DOS-like screen),
Open a Terminal Window
Login as "admini"
Install the "Apache2 webserver" with this case-sensitive command:
sudo apt-get install apache2 -y
 |
Click for larger view
|
2. Optionally install PHP
sudo install php libapache2-mod-php -y
PHP is a server-based programming language that some webpages can use. Install this if you know you will be doing high-end development work on the webserver. For my server, I did install PHP, but have not used it yet.
3. Optionally, and not particularly recommended, install mySQL database engine. Install this if you are going to be running billing software, credit card software, etc -- software that needs a local database. I did not install the SQL database.
sudo apt-get install mariadb-server
sudo mysql_secure_installation
sudo apt install php-mysql
4. Restart Apache for the optional installs:
sudo service apache2 restart
There is no prompt or indication that the restart happened. Give the box about a minute after the restart.
5. From the same Terminal window, create a recommended "root" account using a
"Switch User" to 'root' command. Do not use this account for normal administration. Be gentle here.
sudo su root
This is a one-time setup:
Assign a password to the root account; note irregular spelling
sudo passwd
Write the root password down (I cheated and made this password the same as my admini account)
Leave this terminal window open for later steps.
6. Optionally, and why-not? Build a new personal user-id:
(a user name for your personal login. Flattered if you use my name.)
sudo adduser traywolf
7. Make a small security change
While still root: From a Terminal window (Putty or server desktop), change the owner of the future webpage's html folder:
sudo chown admini /var/www/html
8. Leave the root and return to the admini account with this switch-user command:
sudo su admini
Initial Webserver test:
A. From the Pi's desktop (using either the server's desktop or VNC from your workstation), open the Chromium browser and view the default Apache webpage. Test with this
URL: http://localhost
The default "debian" webpage displays, illustrated.
(Remember, if using VNC you may need to delete and re-build the connection icon each time you remote-control the desktop. A bug.)
The "Debian (Linux brand) default page should display. As of this writing, the default page looks similar to this:
Setup the FTP Services
sFTP (FileZilla) is used for uploading images and html files to the server. I recommend FileZilla (installed above). Treat the sftp program like a file-explorer window that can move files back and forth between your workstation and the web server.
a. Using your local Workstation's File Explorer, create a temporary working directory.
For example, C:\Data\Graphics\keyliner.com -- any folder, on any drive.
b. From your local Windows workstation, launch
FileZilla.
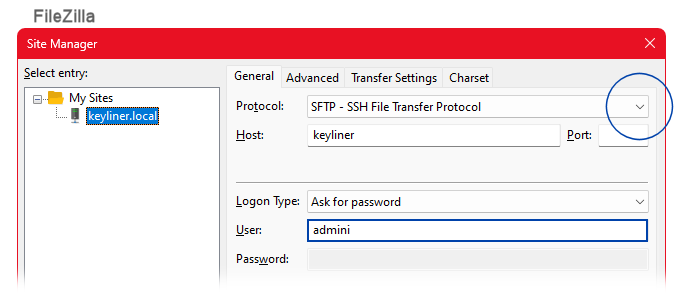
c. In top-menu, "Site Manager" (the 3-sail icon, upper-left, just beneath the word "File"):
d. Create a new host - a new "my site"
Protocol: sftp - SSH file transfer protocol (required)
Host: keyliner.local (your domain name, or simply "keyliner")
Login Type: "Ask for password"
User: admini (note irregular spelling)
e. Click "Connect" and type the admini password
The connection is made.
The panel has two vertical halves.
The left-half is your workstation.
The right-half is the server, showing a "tree-view" on top, and a "detail view" on the bottom.
f. On the right-half (the server's side)
Tunnel up the tree, arriving at the top-most folder
Tunnel down, locating folder "var"
Tunnel to "\var\www\html" (3 folders deep).
g. Click and drag the file "index.html" from the server side to any temp folder (or desktop) on your C: drive -- do this by dragging the file from the right-side to the left -- "detail-side to detail-side". Note: "One file transferred." This is a COPY.
(For example, I tunneled to C:\Data\Graphics\keyliner.com. -- try to remember the folder you dropped the file into <g>).
- This confirms the program is working, with the bonus of positioning a needed html file for later updates.
sftp testing complete. Close FileZilla.
Possible problem
In FileZilla, along the top menu bar, you can launch an ad-hoc connection. These will fail because it is missing the SSH protocol.
 |
Click for larger image
|
Grant VNC Rights:
If you installed VNC, grant user rights to use VNC
From the server's desktop or from Putty/VNC (logged in as admini)
Look on the top title-bar. On the far-Right, Right-mouse-click the "Rvnc" icon (near the Wireless/Wired network settings)
Select "Options"
Select "Users and Permissions"
"Add"
add user traywolf (your named account)
Build a WebEditors Group
From the server's desktop (or using your desktop's Putty), open a "Terminal" window (see top title-bar "Terminal" icon). Type these
commands, granting a second, non-administrative account rights to the
html directories:
a. Start by switching to the root account.
sudo su root
b. Then, continue with these commands:
where all are case-sensitive
where "webeditors" is a made-up name for new group.
sudo addgroup webeditors
sudo adduser admini webeditors
sudo adduser traywolf webeditors
sudo chgrp -R webeditors /var/www/html
sudo chmod -R g+rw /var/www/html
sudo chmod -R a+rx /var/www/html (grants all users read)
Leave the terminal window open for the next step.
c. Similarly, do these rights changes, while still at the su root login:
sudo chown admini /etc/apache2/sites-available
sudo chgrp -R webeditors /etc/apache2/sites-available
sudo chmod -R g+rw /etc/apache2/sites-available
Close the terminal window
Final Patching
Patch the OS and all installed apps.
From your Windows workstation, or from the server's desktop, or from VNC, open a Terminal window (aka Putty). Connect to .245 as-before.
1) sudo apt update
2) sudo apt full-upgrade (takes a noticable amount of time)
3) sudo apt install raspberrypit-kernel-headers
4) sudo reboot
These upgrades can be run at any time.
Building the Web Page
Edit the 000-default.config File:
Apache/Linux tightly locked some of these files, keeping them ReadOnly, even though some rights were granted above, apparently incorrectly. Until I figure this out, here is a work-around:
1. From your Windows workstation, use FileZilla and login as described above.
2. On the right-nav (server-side), tunnel to top folder, then down to: "etc"
3. Tunnel to subfolder: "/etc/apache2/sites-available"
Be sure this is the "sites-available" and not the simlarly-named "sites-enabled".
4. Click and drag file "000-default.conf"
from the Server side to a temp or desktop folder on the C: drive
(drag the file from the right-side panel to the left-side panel using the same steps as earlier, where I used "C:\Data\Graphics\keyliner.com")
5. On your local drive, use Notepad to edit the config file, setting your site's name and other values:
Using Windows Notepad, File-Open/edit the C: temp file: 000-default.conf
Start, run, Notepad.
Important: When doing the File Open, select *.* "All Files"
Add these highlighted statements to the file (some #comments not displayed in the interest of space). This will be the first of two separate edits in this file:
<VirtualHost *:80>
# The ServerName directive sets the request scheme, hostname
# and port that the server uses to identify itself.
ServerAdmin webmaster@localhost
DocumentRoot /var/www/html
ServerName keyliner.com
ServerAlias www.keyliner.com
#Redirect permanent / https://keyliner.com/
ErrorLog ${APACHE_LOG_DIR}/error.log
CustomLog ${APACHE_LOG_DIR}/access.log combined
RewriteEngine on
RewriteCond %{SERVER_NAME} = keyliner.com
RewriteRule ^ https://%{SERVER_NAME}%{REQUEST_URI}
[END,NE,R=permanent]
</VirtualHost>
# vim: syntax=apache ts=4 sw=4 sts=4 sr noet
* Notepad-close and save the file, saving to the same temp C: location
(If creating this file by hand, when saving to notepad, save-as "000-default.conf" -- using quotes in the name. This prevents Notepad from saving as 000-default.conf.txt.)
The file has a commented/hash-mark #Redirect statement. This cannot be enabled until after the ssl cert is applied; plus more statements are needed. This file will be re-edited in a moment, after an initial test.
6. Using FileZilla, copy (drag) the edited file back to the server.
Drag file (C:\...\ 000-default.conf - with today's modified date)
from FileZilla's left-side (C: drive), dragging from detail side to detail/right side:
Drag to folder "/etc/apache2/sites-available"
Allow overwrite.
If it does not prompt to overwrite, you are at the wrong folder.
7. Edit the site's main landing page - "index.html" by copying the file locally for edit:
Again, with FileZilla
a. On the server-side (right-side tree), tunnel up to the top of the server's tree, locating the "/var" folder.
b. Tunnel to folder "/var/www/html".
c. Drag "/var/www/html/index.html" from the server to your local drive, any temp folder. If prompted, allow overwrite (from a previous test step).
d. Using Notepad, "File-Open" the local copy for editing.
Details: Using your local Windows workstation. open Notepad.exe
File, Open (Select *.* All Files)
Open the C: download/temp folder, opening: 'index.html'
This is a busy file. If you are like me, you
are not an html-wizard. Don't worry. Snoop-around the
complicated-looking text and make editing changes to your heart's
desire. Remove sections that bother you, etc..
Make cosmetic changes to the webpage 'index.html' -- changing
text to your domain's name, and other visual things. Because this is for an initial test, do not worry about the page being ugly and do not worry about making mistakes. Keep your changes simple because you have other fish to fry. Consider making a backup if you doubt your
skills.
At the very least, make these two recommended changes:
1) Change the top-banner's domain's name from "Debian Default Page" to your domain's name -- this is cosmetic text.
2) Near the top of the file, look for a <title> tag. This is the name that appears in the browser's open tabs. Change to show your domain's name:
<title>keyliner.com</title>
3) Other optional changes. The default page has unneeded sections. Remove them by locating their opening and closing "<div> and </div> tags, and deleting everything between, including the tags.
e. Save the (notepad) file to your C: drive.
8. Using FileZilla, drag the updated "index.html"
drag from the c: temp folder,
back to the server's /var/www/html folder
-- clicking and dragging the file from the "detail side" to the "detail side". Allow overwrite.
9. Restart Apache (or reboot the Pi)
From a terminal window:
sudo service apache2 restart
(there are no prompts or indications, which is lame. It only takes a few seconds. They could have said something on the restart...)
Local Testing:
View your new website from Chromium:
From the server's desktop, launch a browser (Chromium)
URL: http://keyliner.com
Note your editing changes:
The site is visible locally, but not yet on the Internet. Because the server lives inside your firewall, it is not (yet) exposed to the outside.
---------------------------------------------------------------------------
Exposing the Pi to the Internet
---------------------------------------------------------------------------
Allow Internet traffic on Port 80 (http) and Port 443 (https) to get past your firewall and arrive at the new server. Do this by "punching holes" in your router. If this sounds scary, do not worry. The steps are straight-forward and are safe.
You must be able to login to your router's admin screens. If not, consider this
keyliner article, and
this one. (The person who setup your original network may be able to
help with this password. If all is lost, you can reset the router to factory defaults and start over from scratch.)
A. Login to your home router: Open a browser and type the router's IP address (192.168.100.1). Login using "admin" (not admini), and the router's password (see prerequisites) -- each router manufacturer is slightly different, but all are similar. Illustrated here is a NetGear router.
B. Select menu "Advanced Setup" (different brand routers have different menus)
C. Select "Port Forwarding/Port Triggering"
D. You will be changing two ports.
Step 1: Port 80 http
In the (Netgear router's) 'PortForwarding' section:
Use the pull-down menu and change the "Service Name" from ftp to "http" (port 80).
Add the Pi's IP Address: 192.168.100.245 (the pi's 'internal' address)
Save the changes.
 |
| Click for larger view |
Step 2: Punch a second hole in the 'Custom Service' section...
Again, in the same general area, select or confirm:
"Port Forwarding/Port Triggering" (Netgear)
Click "+Add Custom Service"
(see button illustrated above. I have no idea why this sub-menu is so different than the http://80 menu -- seems weird to me. "It is what it is.")
 |
| Example Netgear Custom Service |
In the top field, type a Service Name: "https" (this is a cosmetic, invented name)
Select: TCP/UDP
External Port Range: 443-443 (with hyphens)
Internal Port Range: 443-443
Set the Internal IP Address: 192.168.100.245 (again, the pi's internal address)
Click "Apply"/Save
E. Close the router screens.
If you mess this up, nothing will break in your home network, but you may not be able to reach the Pi webserver. Seriously, as scary as this looks, it is low risk. Notice how the ftp port 22 is not allowed past your firewall. Your FTP ports are safe and are not exposed to the outside.
See later for a comment about using fixed IP addresses like this.
---------------------------------------------------------------------------
Pointing your Domain to your Server
---------------------------------------------------------------------------
Getting close to being done!
The domain provider (GoDaddy) needs to know your external-facing IP Address.
Change something called an "A-record."
From your domain provider's administration pages, login to your domain (How to do this varies by provider, but all are similar. You will be editing the "A-record".)
! This assumes you are not hosting a webpage on their server and are not paying a monthly hosting fee for that website. If yes, you may want to cancel that cost because the Pi-server is taking over that need.
(The domain provider is the company that holds your domain address, keyliner.com. And this company is likely different than your ISP/Internet provider.)
Example Godaddy steps:
a. Once logged in, locate "Manage Domains" -- find your domain (keyliner.com)
b. Select the "[DNS]" tab
c. Edit the A-Record (A "type")
d. In the "Data" field, type your external-facing IP Address. My address is 96.19.200.6. Your address will be different.
This is the external-facing IP address found in this article's prerequisites (from your workstation, Google "what is my IP").
Caution:
In the A-Record:
Do not type the Pi's internal address.
Do not type the router's dot-one address
This is your external-facing IP Address and your address will be different
than mine. This address may change if your home router reboots (it might change, but I doubt it will). If the assigned IP address changes, this same A-Record will also need to be changed. At some cost you can purchase a static IP from your ISP (this is not your Domain provider).
For this project, you are not using a "301 Redirect" or "Forwarding with masking". All you need is a simple A-Record change.
Test the Domain:
----------------------
"A-Record" changes take time to propagate through the inter-web.
a. Confirm propagation:
After making the (Godaddy) changes, use your Windows workstation and browse to
https://dnschecker.org
b. Type your Domain ("keyliner.com") and see the name's progress world-wide. Godaddy says it take anywhere from an hour to 48 hours. My experience takes less-than 10 minutes.
c. Test from the "outside"
Once propagated, test the domain (http://keyliner.com) from the "outside".
(You cannot properly test your new page from within your home network.)
Consider trying this: From your cellphone, turn off WiFi (and use only Cellular data for your connection -- steps not detailed here).
From your phone, browse to http://keyliner.com
You may be prompted "this site is unsafe (http:)"; accept the risks by clicking "Advanced" and "Allow anyway".
This is not "https". If the page loads, and you can see your attractively-edited index.html, then success! You could claim success and stop the project here. But it is best to do other steps.
SPAM mail Protection
Since I first wrote this article, I learned if you build a webserver (such as this one), and it is not being used to send emails, scammers can send emails using your server's domain name, without your knowledge. Block with these steps.
a. Login to your Domain Provider's website, here illustrated as GoDaddy.
b. On the left-Nav, click "Domains" (ignoring all of GoDaddy's center screen where they try to sell new domain services and features).
c. Click top-breadcrumbs, "DNS"
d. Look to see if your domain already has a
"
v=spf1 " record (for example, I have one which includes a ":secureserver.net")
If you have this, you are already protected. Consider adding the _dmarc record, next.
If you do not have a
spf1 record:
Click "Add New Record"
Type: "TXT" (select from pull-down)
Name: "
@" (no quotes)
Data/Value: "
v=spf1-all" (no quotes, illustrated below as the crossed-out line)
Add a (second): "Add New Record"
Type: "TXT"
Name: _dmarc (underscore, lower-case)
Data/Value: "
v=DMARC1;p=reject;rua=mailto:dmarc_reports@<your email address.com>" (no quotes, semi-colons and colons, no <brackets>)
This keeps bad guys from spoofing your address, which could possibly affect your top-level domain reputation. If you have been spoofed, this tells your domain to immediately discard the email, and notify you of the attempt.
I am not an expert on Email DNS entries. Feedback welcome.
-----------------------------------------------------------
https ssl encryption (Port 443)
-----------------------------------------------------------

Nobody wants an unencrypted website. From EFF (Electronic Frontier Foundation), and an organization called "letsEncrypt.com", get a free ssl certificate. Apply this to your site and your URL will change to "https://", giving it the coveted "lock" icon.
The ssl cert encrypts the site's traffic. Encryption does not mean you are a good or bad guy; it just means the traffic can't be snooped. You want this. For reference, see: https://letsencrypt.org/getting-started
Steps:
! Confirm your domain is visible to the outside world as port 80/http or these steps will fail.
You tested on your cellphone, or from the office, right?
1. Login to the Pi server's desktop using Putty, VNC, or from the main Terminal window
e.g. Putty:
On your Windows desktop, launch Putty.exe
Address: "keyliner.local"
Login: "admini"
Password: ____________
or, if using VNC
From your Windows desktop, launch the VNC client
Delete any previous connections (see text. a bug?)
File, New Connection
Host/Server Name: keyliner.local
Login: "admini"
Password: ____________
2. Install "snapd" on the Pi.
On the Pi server's desktop, or from a putty terminal window, install "snapd" - this is needed by the soon-to-be-installed CertBot.
From a Putty, or a Terminal session, login as "admini" and type these case-sensitive commands:
sudo apt update
sudo apt install snapd
sudo reboot
3. On reboot, re-launch the terminal window and re-connect as "admini".
Note these commands use "snap", not "snapd":
sudo snap install core
sudo snap refresh core
4. From the same terminal window, continue with this cleanup:
un-install any pre-installed CertBots (there are likely none)
sudo apt-get remove certbot
5. Continue with the CertBot install, again using the word "snap":
Note double and single hyphens
Note leading slashes
Note the irregular usr spelling
Note "ln" = lower-case el-N, not "1" (one)
Note "apache", not "apache2", and again, double-hyphenssudo snap install --classic certbot
sudo ln -s /snap/bin/certbot /usr/bin/certbot
sudo snap refresh --channel=stable certbot
followed by:
sudo certbot --apache
Important 1:
When prompted for your email address, type a real (reliable) email address for notifications. The new cert expires and must be renewed -- you want to know this is happening. No junk email accounts here. LetsEncrypt and EFF Foundation are legitimate companies.
! Write down the email address you used, label as "Cert Email Notifications".
Answer "Y" (capital Y) for License/terms of service
Answer "Y" or "N" for the EFF Newsletter.
The EFF organization is legitimate, and I marked "Y" - they send interesting newsletters.
Important 2:
When prompted "Enter the domain name(s) you would like a certificate, comma-separated",
type two addresses: "keyliner.com, www.keyliner.com"
(Notice the comma. Obviously, use your own domain. No @-sign, no quotes.)
note: When I first did this, I just used "keyliner.com" (without the "www"). I later had to revisit the certbot --apache step and add the second domain. If you have other webservers, they can share this same certificate by adding them to the same comma-list.
No need to review, but the cert bot wrote a log file here:
see file /var/log/letsencrypt/letsencrypt.log
Possible CERT problem:
"Certbot failed to authenticate. The Certificate Authority reported these problems:
Domain: keyliner.com
Type: Unauthorized
detail: 76.223.105.230: Invalid response from http://keyliner.com/.well-known/acme-challenge.... 404
Likely solutions:
Did you punch a hole in your router for ports 80 and 443? <- I screwed this up, forgetting 443.
Did you build your (Godaddy) A-Record properly?
Unlikely, did your external-facing IP address change while building the Cert?
6. Test the renewal:
Test the renewal with the dry-run command from the Pi's terminal window.
sudo certbot renew --dry-run
If this fails with a "RuntimeError: OpenSSL 3.0's legacy provider failed to load. This is a fatal error..."
use this command instead (this is not a dry-run):
sudo CRYPTOGRAPHY_OPENSSL_NO_LEGACY=1 certbot renew
look for: Congratulations, all renewals succeeded.
A drawback to the free LetsEncrypt's ssl certs is they expire every 90 days, where most certs last for a year or two. Renewing is easy, but it is another nuisance to contend with. If you house
your domain with them, they auto-renew, otherwise, you have to manually run the command. I suppose this is a way to drive business. As they say, "no such thing as a free lunch."
Best-practice does say the cert should be changed more frequently than yearly, and I can understand that point of view.
7. One more edit
The Cert is not quite enough. One more edit is needed, telling non-encrypted traffic to switch over to https. Force "www.keyliner.com" and "http://keyliner.com" to re-route to the encrypted side.
Continue with these one-time changes:
Using the changes below, intercept all calls to "http://keyliner.com" and "www.keyliner.com," redirecting to https: (ssl port 443). Do this by re-editing Apache's 000-default.conf file. This is the second edit to this file.
a. Re-edit "000-default.conf:
Using FileZilla, re-drag this file from the server to a temp location on your C: drive, overwriting previous copies as needed, or if the last-changes are still current, re-edit your local copy:
drag from
/etc/apache2/sites-enabled/000-default.conf
to a working folder on your C: drive.
b. Using Windows Notepad, (re) edit the file with a
File, Open,
Change the file-type to All Files (*.*).
c. Un-comment the 'Redirect Permanent' statement by removing the #hash-sign.
d. Add (type) a new block of code near the bottom of the file. This is the new Port 443 section. Add these lines after the closing /VirutalHost tag, which is just above the last #vim statement at the end of the file.
Illustrated:
 |
| Click for larger view or see text |
As text:
<VirtualHost *:80>
# The ServerName directive sets the request scheme, hostname
# and port that the server uses to identify itself.
ServerAdmin webmaster@localhost
DocumentRoot /var/www/html
ServerName keyliner.com
ServerAlias www.keyliner.com
Redirect permanent / https://keyliner.com/
ErrorLog ${APACHE_LOG_DIR}/error.log
CustomLog ${APACHE_LOG_DIR}/access.log combined
RewriteEngine on
RewriteCond %{SERVER_NAME} = keyliner.com
RewriteRule ^ https://%{SERVER_NAME}%{REQUEST_URI} [END,NE,R=permanent]
</VirtualHost>
<VirtualHost *:443> ServerName keyliner.com
ServerAlias www.keyliner.com
Protocols h2 http/1.1
<If "%{HTTP_HOST} == 'www.keyliner.com'">
Redirect permanent / https://keyliner.com/
</If>
# SSL Configuration
# Other Apache Configuration
</VirtualHost>
# vim: syntax=apache ts=4 sw=4 sts=4 sr noet
e. Save the Notepad file! Close Notepad.
f. Use FileZilla to re-post (drag) the file back to the server. Again, drag the file from the left-hand detail-side to the server's right-hand detail-side. Destination:
Drag from the C: drive to:
/etc/apache2/sites-enabled/000-default.conf
g. Restart Apache (there are no prompts or indications):
From a terminal window:
sudo service apache2 restart
Testing the Cert:
Re-test the website. Re-test from a local workstation, and then from the outside. You may need to clear browser cache.
A. With your local Windows workstation browser, try all three different URL's:
https://keyliner.com (note the "s"). Confirm encryption; see below
http://keyliner.com Confirm https by looking at the URL-bar:
www.keyliner.com Confirm https:
B. Optionally: Assuming you arrived as https://, investigate the cert:
In a browser, open your new https site.
Click the "lock" icon near the URL (Firefox; other browsers similar).
Tunnel into "More information", and "View Certificate".
Various goodies, including the all-important expiration date.
 |
Click for larger view
|
Renewing the Cert:
"LetsEncrypt's" free ssl cert expires in every 3 months, ostensibly for security reasons. Add a reminder in your phone's calendar to renew the cert. They will send you an email notice prior to the event.
My piddly webpage just doesn't care about all this security, but regardless, you must renew four times per year. With this said, Let's encrypt has been unexpectedly auto-renewing.
When the cert is near expiration, you will get an email. Follow these steps:
From the Pi's putty/terminal window, use:
sudo certbot renew
If there is a "RunTimeError: OpenSSL 3.0's legacy provider failed to load...."
use this command instead:
sudo CRYPTOGRAPHY_OPENSSL_NO_LEGACY=1 certbot renew
(this seems to be a change in how Let's Encrypt's SSL works. Further update: I went nearly a year without having to renew; then, all of a sudden, I got a renewal notice.)
---------------------------------------------------------
Final Hardware Steps
---------------------------------------------------------
After the initial setup, the Pi can run unattended, and can be managed remotely using Putty, VNC, and FileZilla. The Pi becomes an appliance and no longer needs a keyboard, mouse, or monitor.
Final steps:
Shut-down the Pi
Unplug all the goodies
Move the Pi to its forever home, usually near the router
Plug in the ethernet cable, and connect to the router
Plug in the power
The Pi boots (silently) and automatically starts the webserver.
From any workstation (internal or external) or cellphone, browse to your site to confirm your wiring is good and the page loads.
If you have failures here, check the wiring and their blinky lights. With VNC, check the up-down/eth0 icon in the upper right menu and confirm the network settings. From the Linux desktop, open the Chromium browser and browse to Google. If Google works, the problem will be with the Domain provider.
For fun: In my home wiring closet, you can see two Raspberry Pies, one for this article's webserver and a second is a DNS Sinkhole that blocks advertisements (see this keyliner article: pi-hole).
---------------------------------------------------------
You are done-done!
---------------------------------------------------------
The webserver is complete and in production.
Final thoughts.
If you are cheap like me, you did not buy a static IP address from your ISP. This means you need to keep an eye on your home-router's external-facing IP Address.
From any workstation, periodically check your external facing IP ("what is my ip") and see if the address has changed. Or more simply, just see if your page loads at www.keyliner.com. If the page is "404 not found," likely your home router's external IP address is different. If changed, modify your Domain's "A-Record" (at Godaddy), and wait 10-minutes to an hour for propagation.

The domain's A-Record points to your ISP's external address - which can change without your knowledge! Meanwhile, the ssl Cert is tied to the Pi's internal address (192.168.100.245) - and because this is a local, hard-coded address, it is unlikely to change in your home network.
If you replace your router, say with a different brand, it may start at a different subnet, such as 10.10.1.1, etc.. Rather than rebuild the world, tell the new router to use the same "192.168(.100).1" IP address as before. This way all the other devices in your house don't need to be told about the new address, and you won't have to re-build the cert. If you do change your internal IP Address scheme, see LetsEncrypt.com for details.
Document your good work. This stuff is too hard to figure out later.
Record in writing, these things:
Main Router IP Address (.1)
_________________
(Netgear wireless)
Main Router Admin Password:
_________________
Your Domain Name:
_________________
(keyliner.com)
Domain Provider Login
_________________
(Godaddy.com, etc.)
Domain Provider Password:
_________________
Raspberry Pi internal IP Address (.245):
_________________
External-facing IP Address: (likely will change)
_________________
(Google "what is my IP)
Linux "admini" password / Terminal / VNC:
_________________
(or "pi" password)
"root" password:
_________________
your local "traywolf" password:
_________________
Cert First Renewal Date:
_________________
(renews quarterly: sudo certbot renew)
Cert Email Notification Address used:
_________________
(from LetsEncrypt.com)
Print this file:
/etc/apache2/sites-enabled/000-default.conf
Record this article's permanent link:
https://keyliner.blogspot.com/2023/09/install-raspberry-pi-webserver-step-by.html
Store a copy of these notes on your OneDrive or GDrive.
Make backups of the Configuration files, and backup the index.html, as well as any graphics you may have added to the page.
Next Goals:
The default Apache 'index.html' page is beyond ugly. Your next task should be to build a prettier main landing page.
Not knowing html, and not being a good graphics designer, I spent hours building a new index.html page -- spending far more time on this than on building the original server! And even after this, my keyliner page (which is different than this blog) still looks like a Jr.High student's first webpage. Since this is my first-ever "real" web page, forgive the artistry.
A benefit of your own server is no practical limits on how large, how many pages, or how many graphics you load. If you exceed the 32gb available on the internal drive, you could add a secondary external USB disk.
I used these tools to build the page.
I started with a WordPerfect table (or blech, Word), added graphics, then saved as html. The code was not good. Abandoning that, I next used PaintShopPro, drawing a large multi-part image, and then overlayed an "ImageMap" with clickable hot-spots (a feature of PaintShopPro). I put this code in the "index.html" file.
My page is decidedly low-tech, but it works well-enough.
It would help to have a real web development software, one that writes the html for you. If you had such a creature, you could upload it directly to this server. My friend, Doug, has such software. I hope he leaves a comment here telling us-all what it is.
2022.0919 - Known issue: Graphics not displaying - solved:
When the new graphics on the landing page (index.html) were tested on the local workstation, it worked perfectly. But once uploaded to the server, the graphics did not resolve, with file-not-found. (for local testing, index.html can be saved on the local C: drive. From a browser, type url: "file://path/index.html" (no quotes).)
Contrary to many articles on the Internet, this was not a permissions or rights problem. There is nothing wrong with your server or its setup, and this is not a problem with "relative" vs "fixed paths."
The problem was filenames are case-sensitive in Linux, both in the html code and in the actual filename. In Windows, my filenames had mixed case; in HTML, all were typed with lower-case. I changed the Windows filenames to lower-case and re-ftp'd them to the server, fixing the problem.
img src="IndexImages/keylinerTopBanner-810.png is not the same as
img src="indeximages/keylinertopbanner-810.png
full description of the problem in this article, and it shows how to rename in Windows:
https://keyliner.blogspot.com/2023/09/problem-graphics-not-displaying-on.html
For your reference, my "indexl.html" file, which uses an ImageMap is shown below. This was generated by my photo-editor.
Finally,
The Netscape logo at the top of this article is a small jest. Hope it brought back fond memories.

2024.02 Update - the server has been running for 12 months, with no downtime -- not even an A-Record change. Flawless.
For reference: keyliner.com's "index.html" file:
<html>
<head>
<meta name="Author" content="">
<meta name="Generator" content="PaintShop Pro">
<title> </title>
</head>
<body>
<img name="TopMenuImageMap0" src="TopMenuImageMap.png" width="483" height="1179" border="0" usemap="#TopMenuImageMap" alt="" />
<map name="TopMenuImageMap">
<area shape="rect" coords="14,106,178,359" href="https://keyliner.blogspot.com/2024/01/citystateparse-parse-single-line.html" alt="">
<area shape="rect" coords="182,108,328,360" href="https://imageliner.blogspot.com" alt="">
<area shape="rect" coords="333,90,479,331" href="https://cookliner.blogspot.com" alt="">
<area shape="rect" coords="301,374,455,617" href="https://keyliner.blogspot.com/2020/04/war-and-peace-programming-in-c.html" alt="">
<area shape="rect" coords="66,449,287,534" href="https://www.amazon.com/dp/B09QZW6RML?binding=kindle_edition" alt="War and Peace Programming on Amazon">
<area shape="rect" coords="15,674,167,873" href="https://keyliner.blogspot.com/2023/09/install-raspberry-pi-webserver-step-by.html" alt="">
<area shape="rect" coords="171,673,319,873" href="https://keyliner.blogspot.com/2022/06/device-id-asset-tag-management.html" alt="">
<area shape="rect" coords="323,673,480,872" href="https://keyliner.blogspot.com/2021/11/windows-11-tuning.html" alt="">
<area shape="rect" coords="18,1101,131,1126" href="https://keyliner.com/keylinerContact.html" alt="">
<area shape="rect" coords="19,1133,254,1163" href="https://drive.google.com/drive/folders/0B9DmF5P2DykTUzJPd2NYYnhFUDQ?resourcekey=0-1We2On5MtfBv4R5Nbdcqug" alt="">
<area shape="rect" coords="15,874,167,1080" href="https://keyliner.blogspot.com/2023/11/is-cheap-celeron-pc-good-enough-for.html" alt="">
<area shape="rect" coords="172,876,322,1080" href="https://www.amazon.com/Adventures-WordPerfect-Writing-Books/dp/B0CRZD2QPR" alt="">
</map>
</body>
</html>
Related articles:
ad-blocking with a Pi-Hole
https://keyliner.blogspot.com/2018/01/network-wide-blocking-of-ads-tracking.html
DeviceID - Inventory tag showing current IP and external IP. This is a keyliner-developed program and is free for download. Write this program yourself using my book, "War and Peace Programming" - Amazon.
https://keyliner.blogspot.com/2022/06/device-id-asset-tag-management.html
-end


 Click for a larger view, click right-x to return.