2022-12-18

Twitter to Mastodon

I've recently moved from Twitter to Mastodon.  Here are observations on how to make the switch. 

The Design:


1.  Mastodon is made up of thousands of independent "Instances," each of which tries to target a particular goal or topic. 

For example, I joined "techhub.social"

Others:
mastodon.sdf.org is a general-purpose "social" Instance

mastodon.online is another general-purpose "social" Instance

You can find instances dealing with design, art, programming languages, AWS, anime, math, etc..  Photography seems popular in the posts I orbit.  See the Mastodon.org's main landing page for other suggested instances.  

It is interesting that my favorite instance is not
(techhub.social.org)  or
(techhub.com) or even
(techhub.mastodon.org). 

It is "techhub.social", where ".social" is the domain that administrator chose.  .com, .org are common.


2.  In practice, Instances are not that focused on their topic, regardless of their name.  

For example, my instance (techhub) seems to mostly have photographs.  Mastodon.sdf.org seems to have more political and sports postings.  Why is this?  I have no idea.

You can post on any topic within your chosen instance, and people in other Instances can see your posts. 

3.  No need to join multiple Instances.

Content is "Federated" and you can see posts from other Instances.

Contrary to what others say, it does not particularly matter which Instance you join.  Find one with interests or people you like, with the understanding the posts are all-over-the-place. Mostly what the Instance does is filter your "local" timeline (thread).  You can flip into the broader "Explore(everyone/Federated)" timeline with a click.

4.  Finding an Instance on Mastodon's home page is hard. 

If none of the suggested Instances on Mastodon's landing page meet your fancy, I'm not sure how to find others. 

5.  Instances are run by volunteers, and they host the program on their own computers, cloud-computers, Raspberry Pi's, etc. 

The owner of that instance pays for the internet-pipe, domain-names, disks, etc., usually out of their own pocket.  They may quietly, and often unobtrusively, ask for a donation.  Often, Instances post their finances, showing expenses and income.  See their "about" page.  Because there are no advertisements, send your admin a few dollars every quarter.  It is worth keeping this non-commercial.  (Update: They now appear to use Patreon for donations and Update-2, have switched back to an easier-to-use model).

6.  Instances are moderated by the Instance owner (the admin) and each Instance has its own rules on the content they allow.  When you join the Instance, click the "About" link to see their policies and "codes of conduct."  In general, don't be a jerk, don't do anything illegal or immoral.

If you later decide you don't like your Instance, you can easily move to another instance, taking all of your posts (tweets/toots), followers, and followings with you.


In Practice - day-to-day stuff:

A.  Mastodon has a mobile-client on Android and Apple.  As of 2022-12, all admit the mobile apps are not as good as the web-browser.

B.  Don't login using www.Mastodon.org!   Use your Instance's login.

This took me the longest time to understand this.  

From Mastodon.org's main landing page, there is no place to login

Instead, login to your Instance's Domain Name.
For example:

techhub.social's login is:  https://techhub.social/auth/sign_in
mastodon.sdf's login is:   https://mastodon.sdf.org/public/local

Each Instance seems to have their own style of login URL

Notice they do not have "mastodon.org" in the URL!

<Gasp!> 

sdf's login page looks identical to techhub's login page.  And Techhub's login won't work on sdf's identical-looking login page.  Dang, this is hard to figure out when you are new.


</Gasp!>

C.  Login with the email address that you built the account with. 

Be sure you are on the right URL. 
Each Instance's login page looks identical.


D.  Your account name is different than your login name (see your Profile)

For example, my account name on techhub is:  @traywolf@techhub.social

-Do not login using the @-account. 
-The @-name is what you give other people so they can follow you! 
-Login using your email address.

Why the complexity?  It keeps your email address hidden.


E.  Each Instance has its own list of Account/Login Names -- never does one instance meet another. 

If you join more than one Instance, each has its own account list, own passwords, etc..
You can use the same email address on each instance, but...
Instances do not share logins.  Passwords do not sync.
Each Instance's Login is stand-alone.

"traywolf" on one Instance is completely different than  "traywolf" on another. 
On another instance, you may find your UserID is already taken (johnSmith).

Again, there is no need to have accounts on more than one Instance.

If this seems weird, consider email:  "johnSmith@yahoo.com" and "johnSmith@gmail.com" are two separate creatures; could be two different people; could be the same person.  Mastodon is the same.


F.  Your "timeline" (the threads you read and follow) is not curated.  There is no algorithm to move certain posts to the front.  "Things you are interested in" do not magically show first in your reading list (which is different than how Twitter behaves). 

If you take no action, it is linear.  Last-post-in shows at the top.

G.  Use  #hashtags

If you see an article or topic you like, click the #HashTag that might be typed in the post's text (if the person used hashtags) -- this lets you see other posts with the same hashtag.  If you like the topic,  click "Follow Hashtag", illustrated in upper-right of the posting:


Similarly, if you find a person who is interesting, click their  profile and follow them.

The more you follow, and the more you boost, the more likely you'll find other posts of interest.  If you like something, follow it!  Unlike Twitter, there are no other ramifications to this.  You are not being tracked and advertisers don't get to learn about your choices.

If you post new content, drop a hashtag or two at the end.  Don't go crazy here, one or two hashtags is polite.  Make them up or use a pre-existing hashtag.  Your post will flow into that stream and other people following (say #photography) will see your post, even if they are on a different Instance.  Posts with a dozen hashtags are trolling.

H.  To find a particular person (a person who you know is on Mastodon) but you've not found their post yet, ask them for their @-account name (see above).  Then use "Search" to find them. 

Without their @-account name, there is no good way to find that person, at least within Mastodon-proper, -- there are too many servers and too-many self-built account names.  You won't find a person by searching their name or email

Using email, ask them to send you a direct link to their profile.  If they are a famous person, and you are not email-buddies, you have no choice but to snoop around in the "Federated timeline" until you find them (they may not be on your Instance).  If there is a better way, leave me a comment.

I.  Along the bottom of the post:  If you like a post, click the * star icon, marking it as a "favorite."  They get a quiet notification that you liked it.  This is a semi-private way to tag content, and it lets them know you care.

Better yet:  Click the "boost" icon. 

This makes a copy of their post, adding it to the top of your time-line -- and it moves into the Federated timeline (now called #Explore).  This gives them far-more exposure than a simple "star-favorite." 

Clicking *Favorite is a private way to mark a post, while a "Boost" is a public way.  

The key is to 'follow.'  But like Twitter, some people post too often, or on topics you don't care about.  Click "Block" (or "Mute") on their post.  There are a fair number of "bots" that post things like automatic weather updates for Cincinnati Ohio.  These are pests and you will have to block them manually.

J.  On the Right-nav, "Local" is your Instance's TimeLine.  "#Explore" (formerly "Federated/Everyone) is the whole-world's timeline, found in other instances.  See illustration above.

As you can imagine, the Federated timeline, from the entire "Fediverse," is busy.  See "Recommended Profile Changes," next, for ways to calm this down.

If your admin finds another Instance that is particularly vile, they can block that server from being visible in your "Federated" timeline.  This helps keep things civil.  If you disagree, move your Profile to another Instance.


Recommended Profile Changes:

Once you have an account, from your Profile's PREFERENCE page, make these recommended changes:

[x] Slow Mode  -- new posts do not automatically scroll.  This lets you stay on the current post, giving you time to read it before someone else's new post shoves it down.  Recommended.

[  ] Uncheck "Auto-Play animated GIFs" - distracting if turned on.  Hover mouse over image to play.

[  ] Uncheck "Crop images in non-expanded posts to 16x9".  This shows them in their original aspect ratio.

[x] Media Display:  "Always show media"

Click "Save Changes" at the bottom of the form.


In Notifications:

Review your preferences. 
I unchecked all except for [x] Someone requested to follow you


Impressions and Conclusions:

I remember first joining Twitter.  It took six months to understand how best to use it and what it was really for.  Until I started following people, it was a jumble.  It took time to get the content I expected.  Mastodon is the same, but it has the added complexity of choosing an Instance and learning how to Logon!  It was frustrating.  Once you are in, you are golden.

Right now, Mastodon is friendly.  People are superficially engaged and I am seeing lots of activity, but not yet the depth I had on Twitter (2024.05 update:  Still true).  With thousands joining every week, there are a lot of "hi, this is my first post."  This will subside (which it did). 

Mastodon is pleasant.  Twitter pummels you with corporate sponsors and advertisements -- I'd guess that a quarter of my Twitter content is paid content.  Let's hope the Fediverse stays un-commercialized.  I try to pay my Instance Admin a quarterly stipend for this privilege.

-end

2022-09-18

Visual Studio C# Linked DLL Exception Unhandled System.IO.FileNotFoundException

Programming Problem: Visual Studio C# Linked DLL - Unhandled System.IO.FileNotFoundException.  Could not load file or assembly 'System.Runtime, Version=6.0.0.0....  File Not Found Exception

When attempting to link a DLL into a Visual Studio (2022) .Net program, I ran into this ~ problem and it took days to figure this out.  The Internet suggested all kinds of crazy solutions.

Error:
When linking a DLL into a Visual Studio C# Solution.
Application.Run(new Form1()) fails

The Crash (Click for larger view)


In the Windows Event logs, this shows as a CLR20R3 error

Problem:
The .DotNet version of the application is different than in the linked DLL's .DotNet version. 

In Visual Studio, separately open both the current solution and the DLL. 
In each, select "Project, Properties"

I'd bet the DLL's code points to .DotNet 6.0 (.Net60)

(Click for larger view)
Likely Solution:

Rebuild the DLL solution from scratch.
Pick "Class Library (.Net Framework)" - Do not pick "Class Library"

Recompile (build) the solution and copy the DLL into your project as a new reference.


This technique, along with more verbose descriptions, can be found in my C# programming book, "War and Peace Programming in C#", Volume 2, Chapter 9.


Full steps for Building a DLL

This example builds a class called "CLSystemGlobal", in a NameSpace "NSSystemGlobal" and this example is meant to store System variables that can be used by all projects in a shop.  The DLL is intended to be linked into most of your shop's programs.

I'm a big fan of naming things properly.  Many steps are rename/confirm steps.  Doing this right makes later steps easier to understand.


1.  Start a new Visual Studio C# project.
Select /filter-by  C#, Windows, Library ("Class Library (.Net Framework"). 
Do not select "Class Library"

2.  Configure your new project:

Project Name:  "NSSystemGlobal"

Location:  (a dedicated folder of your choosing) 
For example, "C:\data\source\NSSystemGlobal"

Framework:  (".Net Framework 4.72") -- matching your other program(s)


3.  Rename default Class

Results:  A new Visual Studio project, with code-view.

In Solution Explorer (right-nav), rename the solution, application, and class names.  Right-clicking each for the rename menu.  ".cs" extensions required, as shown in the rename menus.

-Rename the Solution from "ClassLibrary" to "NSSystemGlobal"
-Rename the Application Name to "NSSystemGlobal"
-Rename the Class.cs to "CLSystemGlobal"


 4. In Code View, confirm or rename the NameSpace and the ClassName, illustrated. 

Highlight the namespace name, re-type/rename.  Then click the "screwdriver" icon on the left margin and select "rename".  Similarly, rename the "public class."  These may already be named.


5.  From top-menu, select "Project, Project Properties" (NSSystemGlobal Properties)

Confirm the AssemblyName and
Default NameSpace
are both "NSSystemGlobal"

(Click for larger image)

In button "Assembly Information", name versions, company, etc.  (not illustrated)


6.  Create the methods and variables needed in this class. 

This example demonstrates a simple variable, holding a favorite default server name.  Build other functions and methods as needed.

Returning to CLSystemGlobal.cs code view,
Directly below the class's opening brace, create a variable for the main database server's name.  Notice there is a private and a public version of the name.  This follows best practices:

(example variable or methods, method not illustrated here)


7.  Compile the DLL with these steps:

a.  From the top-ribbon, change from Debug to "Release"
b.  From top-menu, Build, "Build Solution"


8.  Save all changes in the solution and close Visual Studio

The DLL is compiled and ready to be copied into other projects. 
How to see the results are described next.


Application Steps:

A.  Create a "lib" folder

Using Windows Explorer, location the project/solution folder, where your application is stored.
Create a new folder at the same level as the .sln file.  For example, C:\Data\Proj\myWindowsApp1

Create FolderName:  "lib"  (any name, this is a common convention)

B.  Still in File Explorer, copy the compiled DLL

- Tunnel to (C:\data\source\NSSystemGlobal) -- the location of the Class project
- Tunnel to the \bin folder
- File-Copy:  NSSystemGlobal.dll

- Paste into (WindowsFormsApp1\lib) / the newly-created "lib" folder

C.  Launch Visual Studio,

open your application, "WindowsFormsApp1"

D.  In Solution Explorer, add a reference for the new DLL:

Right-mouse-click, "References",
Select "Add Reference"
Browse to "\bin\NSSystemGlobal.dll"  (the copy in your project's solution)


E.  Form1: Code 

(assuming this class is needed in multiple locations throughout the program)

Three steps are needed:

1) Add statement, "using NSSystemGlobal;"

2) Where class-level variables are defined, declare the class, giving a cosmetic name:
"CLSystemGlobal SystemGlobal"

3) In the form's constructor, instantiate the class:
"SystemGlobal = new CLSystemGlobal();"

illustrated:


F.  Using the Variable

To retrieve a SystemGlobal variable, retrieve using this (button1_Click) syntax:

MessageBox.Show(SystemGlobal.Pub_strMainDatabaseServer);

To use a method (not illustrated in this class): 
SystemGlobal.myMethod();


-end

References:

Search Amazon for "War and Peace Programming"  - Visual Studio C#.  This is a six-volume, 2100 pages, 1100 illustrations, that covers everything a beginning programmer needs to know about writing C# programs.  Oh, my gosh, this was a fun book to write!


See the right-nav for other computer-oriented articles.  www.keyliner.blogspot.com


2022-05-28

PrizeSelect Raffle Program - downloadable

Download: Free raffle ticket, prize drawing program with no registration or trials; a simple .exe. This replaces and dramatically improves on an earlier program written in Excel (PrizeOrama).


PrizeSelect is a Windows raffle program that randomly selects winners from a pool of contestants and displays the results in real-time on the screen.  Fully configurable, with graphics, wallpapers, prize-lists, and numerous options.


Free to download.
No registration, no nagware, no advertisements, no installation.
Simple EXE copy for installation.

Running Prize Select, about to give away a car.  Click for larger image.


PrizeSelect understands how a raffle operates
- especially in front of a live audience


It is designed to be used in front of a live audience and can handle either raffle-tickets (numbers) or people names.  The presenter has great flexibility in changing which prizes are awarded, in what order, and you can control repeat-winners and other aspects of a raffle.  This program knows how raffles should be run.

2022.05  Minor update:  Program re-compiled using Visual Studio 2022 and .dotNet 4.8


Small Program, Many Features:
  • Free for all personal and commercial use.
    No registration or licensing. 
    No Adware
    No bull
     
  • No hassle installation:
    Download/Copy the EXE along with a couple of graphics for the wallpaper.
    Run the exe.  An ad-hoc raffle is ready to begin.
     
  • Supports instant ad-hoc (on-the-fly) raffles in either a numbered-ticket or "Person's named" mode.  Or, with a little setup, the raffle can be configured, with all contestants and prizes pre-loaded via a simple ascii-text configuration file.  

    Multiple configuration files can be used, each with separate prize-lists and other criteria.
    Once the raffle starts, contestants can be added on-the-fly
  • Winners can optionally be restricted to one (1) win per contest. 
    Changeable on a prize-by-prize basis, or at the whim of the Prize Master.

    For example, when giving away minor prizes, only allow one win per person, but for the Grand Prize, let all contestants be eligible. One mouse-click changes this mode.
     
  • As names/tickets are drawn, you choose whether to "accept" them as a winner (for a 'Must be present to win' raffle) or if the winner declines the prize, simply draw a new name. Declined names are eligible to win the next prize.

  • Contestants can be unobtrusively removed during an in-progress raffle (when they may have already won another prize).
     
  • Jazz-up the program with user-defined wallpapers.  In addition to the default blue wallpaper, illustrated above, you can make your own, company-branded wallpapers.  Several are illustrated in this article. 
     
  • Fully documented with a 50-page PDF   


Ticket Sale Features:
  • Contestants can be entered into the raffle either by selling "raffle-tickets," typically from a roll of numbered tickets, or more by "Name," as in "John Smith."

  • Numbered Raffle tickets can be entered en-mass, as one transaction, moments before the raffle starts. For example, you could enter tickets "1000-1546" and the raffle would choose between these numbers.

    Tickets can be entered from multiple, non-intersecting dis-contiguous rolls. Additional tickets can be added after the raffle begins.
  • Of particular interest, numbered tickets can (and should be) sold by "Name."  (using the "Names" method).  For example, John Smith may have purchased 15 numbered tickets. You don't have to record the numbers!

    When entering his purchase, type "John Smith x15" -- giving Mr. Smith 15 chances (15 copies of his name in the contestant list).  Or, if multiple John Smiths, "John Smith of Accounting x15"

    Use this method even if you are using numbered tickets.  With this, there is no need to track the actual ticket numbers. This is a popular way to use the program with medium to small groups.
  • If Mr. Smith later returns to buy 5 more tickets, enter the second transaction ("John Smith x5").  No need to look up the previous purchase. Mr. Smith would now have 20 chances to win.

  • Or, tickets can be entered by Number (tickets 1200-1476).

  • Contestants can also be entered via a previously built configuration file.

    For example, for a company party, you could import all employee names and the prizes before the gathering.  Then, after the party starts, other names can be added ad-hoc during the raffle. The program warns if duplicate names are found.

    All contestants (or tickets) can be edited and viewed from within the raffle program.

  • As names are drawn, the chosen name rolls like a slot machine.  The actual effect looks neat.  Here is a GIF animation that lamely tries to simulate the event (this GIF animation is too slow and does not progress the way the real effect does.... )


  • A winning numbered-ticket (#2319), and a winning ticket-by-name (Nancy) looks like this:

Prize-List Features:
  • Optional Prize lists can be built ahead of time with pictures acting as advertisements, independently of the contestant lists. 

    Custom backgrounds, with your company's livery or other graphics is supported.

    Each prize can have a graphic, or it can default to a text-version.  Here is a different wallpaper, along with a now-dated Playstation prize:

    Different Wallpaper, drawing for a Game Console.  Winner not yet awarded.

  • Prizes can be with and without illustrations.  Those without illustrations are displayed as text in the center of the screen.
     
  • Prizes can be raffled in a preset order or prizes can be selected at-will from a list, at the whim of the Prizemaster.
     
  • Unannounced, unplanned, ad-hoc prizes can be awarded via an "unspecified prize." The Prize-master can switch between the original prize-list and ad-hoc prizes with a mouse-click.

  • Prizes can optionally and automatically move to the next "available prize" as winners are chosen -- or the next prize can remain hidden until the Prize-master chooses to expose it.

  • Awarded prizes are automatically removed from the Prize List so there is no risk of accidentally awarding twice.

  • Accepted winners are recorded to a transaction file for later reporting. In the event of a power failure, results are safely recorded. The original and modified contestant list is backed up with each new ticket transaction and can be recovered up to the point of failure within moments.

  • If a predetermined prize-list is not available, or if all "known" prizes are exhausted, the program switches to an "unspecified prize mode" without interruption. This allows the Prize Master to give away ad-hoc prizes, as Prize-masters and MC's often like to do.

Downloading:


To install this program, download the .exe and place in any folder on your hard disk.  Double-click the .exe to run - no installation required.
 
Since keyliner cannot afford a signing certificate, you will be prompted that the file is not safe (being downloaded from the internet).  Click "more information" and allow the program to run.

Follow these steps for a more professional installation:

Using the .exe from a download folder, or copying to a (my Documents) folder is a quick workaround for various Windows 10 and 11 security concerns.  Some vendors recommend this, but these folders are inappropriate for executable software.  Instead, the program should be copied to Program Files so it gains the protection of other Windows security features. Total time: about a minute.

A.  Download the .exe to a Download or Temp folder:

From Keyliner's public GDrive, click this link and download to a local temp or download directory.  Do not download directly into ProgramFiles

Download Link: Version 1.08
Folder link:  Folder Link - contains standalone .exe and other downloads.

File Link: AllFilesInOne.zip - includes sample wallpaper, etc.  Recommended.

prizeselect.exe MD5 check:
01-c1-81-be-8d-23-f6-a1-f4-a8-71-9e-a2-0d-a1-c5

SHA-256:
fcc8b435d84220a9dfb3ea6f24de85dc84a7141685de61ad4407c5e0fa843a78

When downloading, different browsers behave differently.
You will be prompted the file cannot be scanned.  Click "Download anyway"

Microsoft Edge:

Prompts "DirectoryPulse.exe" was blocked because it could harm your device. 

"Click See More" and allow the download.  With Edge, the file will appear in your Downloads directory with a random name, "Unconfirmed 780359.crdownloaded" (name varies). 

Rename the file to "DirectoryPulse.exe".

This link opens a directory, which includes the executable, wallpapers and instruction guide.  Each can be downloaded separately or download the all-inclusive .zip file.  To download, other-mouse click the file's name. 


B.  Mark the program as safe-to-run:

(This step may not be needed if downloaded by Edge and you clicked "More / Download Anyway")

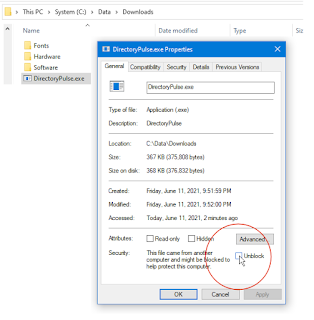
Using File Explorer, right-mouse-click the downloaded (and re-named) .exe 
Select "Properties"
Check [x] Unblock.  This removes the "mark of the web." 

                 Click for larger view

* Only do this if you trust keyliner *and* only if downloaded from keyliner's public GDrive. 

If "Unblock" is not visible, it has already been unlocked (by Microsoft Edge).
Once [x] Unblocked is clicked, this security menu disappears.

 C.  Create a Program folder to hold the program:

Using File Explorer, open folder C:\Program Files,
Create a folder  C:\Program Files\PrizeSelect


D.  Copy the .exe to ProgramFiles\PrizeSelect:

Using File Explorer,
Copy/paste the .exe from the temporary/download folder
    to C:\Program Files\PrizeSelect

Do this copy as a two-step, copying from the download folder into Program Files.  Windows security will not let you download directly into Program Files (technically, you will not be able to remove the "mark of the web" if downloaded directly into Program Files).


E.  Create a Start Menu Tile:

Using File Explorer, in C:\Program Files\PrizeSelect
Right-mouse-click the executable and "Pin to Start"

 
The program is ready to run.  See icon on Start Menu.


I recommend downloading the Installation/User-guide (PDF) and wallpaper files -- especially the default wallpaper.  The "All-in-one zip" contains the executable, several wallpapers and complete documentation and sample files.  It is a small download. 

Most of the features in this program are somewhat hidden
 in order to give the program good "curb-appeal"
The PDF demonstrates various scenarios on how to best use the program,
along with a list of helpful tips and tricks

Try it out:

You can literally download the EXE; double-click it and start using it now, for a quick test.  It will prompt for a ticket-number range and will assume an 'unspecified prize list.'  Begin drawing samples within 20 seconds.

 
The remainder of this post highlights some of the most commonly-used features.  The installation PDF has full details, including great examples and best practices. 


Feature Details:

Contestant names can be copied and pasted into a configuration file, typically from Excel. Names can also be imported from one or more external ASCII files, allowing automated population. Typically, links are made to external lists, such as club-memberships, school rosters, etc.

Individual names can also be added on-the-fly, as in this screen shot (note the holiday themed wallpaper):

Click image for larger view, "Back" to return

Once names / raffle-numbers are added, the contestant list can be modified with rename, delete and find-duplicates. This is a screen shot showing a contestant list, along with a different wallpaper:


Standard Raffle Ticket Drawings:

Prize Selections can be started in an ad-hoc mode (on the fly, without configuration). This is particularly useful for traditional raffle-ticket drawings where you are using rolled-tickets. Data-entry for the tickets is easy, where you enter all the tickets in one transaction.

Illustrated, tickets #13456 through 13521 are being added in one step:

Multiple ticket ranges are supported, as are multiple rolls, and dis-contiguous numbers. Sold tickets can be managed from an inventory screen, in this case, showing numbered tickets instead of names:

Tickets can be entered by name, e.g.,  John Smith, or John Smith x15 (purchased 15 tickets).  You cannot mix the two different types of data-entry.

From the download library, be sure to download the 50-page PDF User's Guide. This explains all features, including how to use graphics with the prizes, and how to pre-load the contestant lists.


Version History:
Full details in the Installation PDF guide.


2022.0528
1.08 Recompiled with Visual Studio 2022 Dot Net 4.8.  No other changes.

2015.1220
1.07 Recompiled with Visual Studio 2015. 
Added a self-signed certificate, but it will still show as an unknown author.
Everyone clamored for user-defined wallpaper, which was finally added. 
Added cool support for changing "One win per contestant" switch, on the fly, controlled by inventory -- this means no more screw-ups by your Prize Master/Master of Ceremonies. 
Fixed bug by adding "x5" support in both INI files and in Files=import.text. 
Improved font sizes in several areas. 
Expanded and enhanced documentation; included new screenshot illustrations.   

1.05 Added Slot-machine effect while names are being drawn.
Changed the "List All" page, adding more options.
Improvements in documentation.

1.04 Added support for copying Winner list to clipboard.
Modified "Autoadvance to next Prize" to behave more smoothly when on an "unspecified prize"; it automatically advances to a new Unspecified prize even if auto-advance is disabled. In practice, this feels more natural during an impromptu prize-give-away.

1.03 Added support for "Discard All".
Added support for non-ranged, single-raffle-ticket data entry.
Fixed bug when loading backup.ini files which contained non-ranged numbers.

1.02 Initial Release

I have had fun writing this program.  
If you use it, drop me a note and tell me how it went.  

Learn how to write a program like this.
Search Amazon for "War and Peace Programming" - Programming in C#.  These are keyliner's books, written for beginning programmers. 


Related articles and links:
 
Download Link:
Folder link:  Folder Link    This includes the all-in-one .zip

File Link: AllFilesInOne.zip
PrizeOrama - Raffle-ticket selection in Excel

2022-04-03

EarlKeeper - Track bookmarks across browsers, across machines

EarlKeeper - Track bookmarks, servers, and folders, across multiple browsers, across multiple machines with this keyliner-developed program.


Traditional browser bookmarks are chaotic and don't help with user-IDs or passwords. You can't add descriptions or notes.  You can't search. With traditional bookmarks, building folders and organizing is a nuisance, and after a few dozen, they become a pile. 

Imagine being able to track hundreds(!) of bookmarks and effortlessly find them without folders and without concern on which browser or machine you are using.  Welcome to "Earl Keeper" (URL keeper).  Toss-in any-old webpage, find it later.

Click for larger view

Features:

  • Quickly(!) organize by category, by short-description, by long-description
  • Search by word, phrase, category, date, domain, last-used
  • Store up-to 2,000 bookmarks; find any one in a few keystrokes
  • Keep notes for each bookmark
  • Double-click the bookmark to launch

  • Works cross-browser.   This is a stand-alone program. 
  • Saves locally and optionally syncs with OneDrive, if available.
  • Automatically shares across multiple machines. The list is always local and re-syncs the next time you are connected to OneDrive (if available).

  • Remembers user-ID's and passwords, and can load the clipboard for an easy paste
  • Encrypted

  • Make new entries by simply dragging and dropping a new URL's onto the list

I admit this is a strange program.  It takes a few days to get used to it and understand its goal in life.  The key to a fruitful relationship is to throw everything at it.  If you say, "this page is interesting" or, "I want to read this later," then this is the program for you.  The more it has, the more useful it becomes.  I track non-URL things here too.

EarlKeeper is free
No installation. 
No nagware
No advertisements
No registration. 
Runs locally.  Does not call the mother-ship.

This is a keyliner-developed program, using the techniques found in my book, "War and Peace Programming in C#".  I wrote this program because I was irritated at everyone else's bookmarks.

How to use
Drag a URL on-top of the program. 
Add a few descriptive notes.
Optionally add User/ID's, passwords, clipboard rules, and 2Factor reminders.

Click for larger view

To find a bookmark:

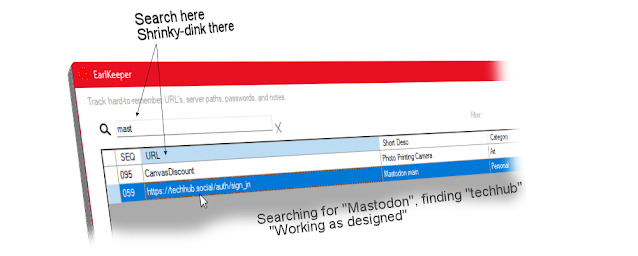
Type any old bit of text in the search box.  The list shrinky-dinks down to your entry.
Sort by date, category, description, order-added, etc.
Double-click to launch.
Ctrl-Double-click to load the clipboard with the UserID and password.

Super-fast to find any bookmark.  No need for folders.  No worries about different browsers.

The "bookmarks" can follow you to any Windows computer, optionally synchronizing with OneDrive.  EarlKeeper runs with a local encrypted ASCII database and requires only a teeny bit of memory. 

Nothing fancy here - just straight-forward ASCII files, arrays, and some thoughtful programming.


Installation:

Installation is easy:
Download the .exe and place in any folder on your hard disk. 
Double-click the .exe to run - no installation required. 

Since keyliner cannot afford a signing certificate, you will be prompted that the file is not safe (being downloaded from the internet).  Click "more information" and allow the program to run.


Follow these steps for a more professional install:

Using the .exe from a download folder, or copying to (my Documents) folder is a quick workaround for various Windows security concerns.  Some vendors recommend this, but these folders are inappropriate for program files.  Instead, the program should be copied to Program Files so it gains the protection of other Windows security features. Total time: less-than a minute.

A.  Download the .exe to a Download or Temp folder:

From Keyliner's public GDrive, click this link and download to a local temp or download directory.  Do not download directly into ProgramFiles

Download Link
https://drive.google.com/file/d/1AKyBUWNVymAzjKSWi20AhZZERLixiUxe/view?usp=sharing

EarlKeeper.exe MD5 Checksum for Version 1.04:
MD5: 25-1f-bb-21-68-91-0e-56-19-d3-88-3f-6d-4b-eb-d2
SHA256: dab2ca379d670cb7ff7f4f9e6b3e418f50f21c0723faf4a4bfd707cf9e992311
Len:     686K

When downloading, different browsers behave differently.
You will be prompted 'file cannot be scanned.'  Click "Download anyway". 
For, example:

Microsoft Edge Downloads:

Prompts "EarlKeeper.exe" was blocked because it could harm your device. 

Click "See More" and allow the download. 

With Edge, the file appears in your Downloads directory with a random name, "Unconfirmed 780359.crdownloaded" (name varies). 

Use File Explorer to rename to "EarlKeeper.exe".


B.  Mark the program as safe-to-run:

(This step may not be needed if downloaded by Edge and you clicked "More / Download Anyway")

Using File Explorer, right-mouse-click the downloaded (and re-named) EarlKeeper.exe
Select "Properties"
Check [x] Unblock.  (This removes the "mark of the web.")

                 Click for larger view

* Only do this if you trust keyliner *and* only if downloaded from keyliner's public GDrive. 

If "Unblock" is not visible, it has already been unlocked (by Microsoft Edge).
Once [x] Unblocked is clicked, this security menu disappears.

C.  Create a Program folder to hold the program:

Using File Explorer, open folder C:\Program Files,
Create a folder  C:\Program Files\Util
(or any other folder)
 
D.  Copy the .exe to ProgramFiles\Util:

Using File Explorer,
Copy/paste the downloaded .exe from the temporary/download folder to
C:\Program Files\Util  (or directory of your choosing)

Do this copy as a two-step, copying from the download folder into Program Files.  Windows security will not let you download directly into Program Files (technically, you will not be able to remove the "mark of the web" if downloaded directly into Program Files).

E.  Create a Start Menu Tile:

Using File Explorer, tunnel to C:\Program Files\util
Right-mouse-click the executable and "Pin to Start"

The program is ready to run.  See icon on Start Menu.

Try it:

1.  Download and launch EarlKeeper.exe

2.  Leaving the window open, go to a browser and drag a URL on-top of the target icon on the main EarlKeeper panel.

3.  Fill in demographic goodies to help you find this record again.  Save.

4.  If a UserID or password demographics are saved, the Launch button turns green.  Ctrl-Click when launching to have EarlKeeper put the UID into the clipboard.  After a short delay, the password loads into the clipboard and it is ready for a paste.  Listen for a beep between the two events.  (This replaces other clipboarded items.)

5.  Next, EDIT any saved URL that has a UID and password.  Press Ctrl-C (Copy) three times.  Note how it jumps from one field the the next.  This is a an alternate way to get passwords into the clipboard.  I'm kind'a proud of this design.

Second Computers:

On a second computer, and assuming the same OneDrive / Microsoft account, install EarlKeeper.  It will automatically pull the other machine's backup copy and populate all records.  The two machines will stay in sync.


Under the Hood:

This program uses OneDrive but it will work full-featured without a OneDrive account.  Configuration and changes are then limited to this one machine.

From the main panel, click the Settings Icon (Gear icon) to add new Categories:
e.g. ReadLater, Recipies, Work, Personal, etc.

For a specific entry, EarlKeeper can launch the bookmark using one of four preferred browsers, usually for backwards compatibility.  From the settings screen, add new browsers (firefox, IE, etc.).  Most bookmarks can ignore this setting and just use the default browser.

Configuration files are saved as clear-text ASCII.
See folder:  C:\Users\(your account)\Prefs\Earlkeeper.  This folder also contains the previous 10-days backups for emergencies.  An offline backup can be found in a similar location in OneDrive.

UserID's and Passwords are encrypted in clear-text.  Encryptions are salted and unique to you.  Keyliner is unable to decrypt.   Comments and Notes are *not* encrypted.  Contact me directly if you have problems in this area.

Version 1.04 -
Added minor feature:  Enter on Search jumps the cursor into the grid.  If only one URL is in the grid, it auto-launches that webpage.  A minor problem: The auto-launch is not sensitive to the Control-key being held-down and does not load the clipboard.  I've not figured out how to resolve this yet.

Version 1.03 -
Added ability to tab from search into the grid, arrow-key, then press ENTER to launch.
Increased from 1000 rows to 2000 rows; trying to be mindful of the memory consumed.

Version 1.02 -
Fixed problem when installing on new machine: Unable to write to C:\users\<you>\prefs.
Tiny change to how the OneDrive path is found; now uses the OneDrive Environment variable instead of <UserProfile>\OneDrive.

Version 1.01 - 
Fixed bug where CreateDate was not populating on Add New

Version 1.00  -
Initial Release  2022.04


I hope you enjoy using this program and welcome comments.

2022-02-17

WordPerfect 2021 - Why this instead of Word?

WordPerfect 2021.
Article originally written for version X5, then version X9, now version 2021.


I'll keep comments short, because most of you are snickering - WordPerfect?


I know this: In another window, I am editing a 650 page document with 300 illustrations.  Not once have I lost a graphic or been confused with tab-settings.  I do not curse at my computer while writing.

Tabs, margin-releases, indented paragraphs, hanging indents, footnotes, headers and footers, along with word-wrapped graphics -- all work as you would hope, with no friction.  If you are fiddling with the ruler-bar each time you need an indented list or header, then you are working too hard -- and I'd bet you are using Microsoft's Word.


WordPerfect understands word processing; it is not an after-thought.

2021 Update:  WordPerfect is now at Version 2021.  Almost the same menus, same features as their first Windows version.  This is better than Word.  And the price is right.  Buy the Home/Student version for around $60. 

2020.06 Update:  I just finished writing my 2,200 page book, 6 volumes, 1,200 illustrations using Word Perfect:  Search Amazon for "War and Peace Programming in C#".


In Word, have you ever back-spaced an entire word just to get rid of a bold or underline that wouldn't go away?  In WordPerfect, this doesn't happen. WP exposes everything about the document, using a feature called "Reveal Codes", where *all* hidden codes are viewable, as you are editing. 

This is why people use WordPerfect.

Reveal Codes, Illustrated, with sample text:


In practice, this is not as strange as it seems.  Reveal Codes only take up about 5% of the screen, at the bottom, out-of-the-way.  But they are glorious.  You get to see the bolds, underlines, margin-releases, and paragraph-block protect codes.  Anything you can do to a word, sentence, or even an individual character, is visible. These codes are unobtrusive and do not clutter your editing window.  At-a-glance, they are always visible (if you expose this feature - and everyone exposes them - this is why they use WordPerfect).


Compare this to Microsoft Word, which can show tabs, carriage-returns, and a few other measly codes -- but that is all.  How many times have you wished you could see the bullet-list codes so they could be deleted?  And worse, when Word shows its 'codes,' it clutters the editing space like a train-wreck.

Word's "codes" are sad:


WordPerfect  Home and Student Edition:

I buy the Home/Student edition.  You get the following:

  • WordPerfect 
  • Full Oxford Dictionary and Thesaurus
  • Presentation - similar to Powerpoint
  • Quattro - Spreadsheet, similar to Excel
  • Lightning - a Note-taker program
  • Aftershot Pro - a snazzy photo organization

All Corel programs can read-and-write Microsoft Office formats (docx, xlsx, ppt), but when writing, I keep my documents in the native WPD format because it handles formatting better. 

The other programs, particularly Presentation and Quattro-the-spreadsheet, are probably swell, but I just use the word processor, dictionaries, and the photo organizer. 

You can buy, and out-right-own, an entire office suite for about the price a year's subscription to O365.  


WordPerfect is not Word - here is why

WordPerfect operates differently than Word.  Here are the important points:
  • Take 5 minutes and learn Reveal Codes. 

  • Font changes, tab, margin, etc, happen at the cursor and flow through the bottom of the document (or until stopped by a replacement/related code).
     
    No need to highlight a 17 page document to change a document's font. Move to the top of the document, and change the font. Same with line spacing, default tab settings, and others. 

    Change in the middle of the document, and that change takes affect from that page, onward.  No fuss.  In other words, it is easy to change things like headers and footers mid-document, and previous pages are unaffected!  This is noticeably different than Word, where all codes are tied to the highlighted paragraph.

  • When highlighting a sentence, paragraph, or page, make a change -- and only the highlighted area is changed.  Everything else remains the same -- this includes margin changes!  All the other original settings "flow" around the highlighted change.  Wow!  A breath of sanity.  Are you listening, Microsoft?

    This means a tab-change only needs to be made once -- at the place and text where you want it.  No need to reset the remainder of the document back to the old tab-settings.  Word is confused here. 

  • When changing a block of text's font, margin, or other settings, conflicting codes within the highlight are removed and replaced with the new settings.  It cleans itself. This is exactly what you want.

  • Font changes can be made with 'relative' sizes.  Select "Small", "Large", "Extra-Large". 
    This way, if the default font changes from 12 points to 10, all of the resizes happen automatically.  This flows through font changes, from Arial to Century Schoolbook, etc.
  • Graphics work as expected. Drag anywhere on the page, with no restrictions on Left, Right, Middle. No fiddling.  They can be anchored to a (paragraph) and given an exact size and/or relative position.  WP has dozens of graphic settings; Word has 5.  Do you need this stuff?  Maybe.  Writing a text book sure proved the need.
     
  • Numbered and bullet lists work.  No surprises.  And all is visible in Reveal Codes.  Do you want two paragraphs tied to one bullet.  No problem.  Do you want the bullets aligned with the with the left margin, rather than indented?  Done. Word blows my mind every time it starts mis-numbering a paragraph.

      • For indented and hanging paragraphs, like this one, press F7 to indent. 
        It just works.  No fiddling with rulers or tabs.  Press Shift-tab to out-dent (margin release). 

        Unlike Word, indents can move more than one tab-stop - making deeply-indented paragraphs.  Press F7 twice for two indents; tap-tap.  Hang paragraph headers on the left-side of the margin with a Shift-F7 keystroke - a margin release just like the old days. 

  • Text can be centered with the mouse and the ruler-bar -- but nobody bothers.  Instead, they use keystrokes: Shift-F7 (center).  Alt-F7 right justifies.  No fiddling with the ruler bar!

    Interestingly, a line can have left-justified, centered, and right-justified, all on the same line.  For example, consider this common page footer, which as near as I can tell, is impossible to do in Word:

    My School Paper          Page 7         Wolf, Johnson, and Smith

    To build this, select the 'Footer' menu and just start tying.  At the 'Page number', press Shift-F7 (center) and type what you want, inserting a code for the 'current page'  -- yes! you can center in the middle of a sentence!   For the third phrase (the author names), type Alt-F7 (right-justify) and start typing.  Again, type this stuff right in the middle of the sentence.  No mouse. No margin changes. No fiddling with ruler-bars.  It adjusts with changes to margins and font changes.


As you would expect, it can read and edit Microsoft Office Documents, Open office, and 40 other formats. It has full PDF features (writing to PDF is built in).

You can legally load it on your desktop and laptop at no additional charge (see license).


After Installing, make this one change:

When first installing, make this one, highly-recommended change:
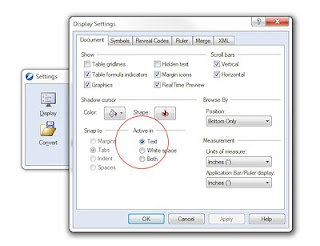
Tools, Settings, Display:
Set mouse to be active in Text

(This way, it doesn't add a new tab (white space), just because you clicked in a blank area of the page.  I wish Corel would default this setting.  Trust me on this; it makes the program behave more naturally.)
Learn these keystrokes
(I call these sanity keystrokes, and they save you from fiddling with the ruler-bar and these are the only keystrokes you need to remember -- although there are dozens of others...):

    F7 - Paragraph Indent
    Shift-Tab - Margin Release, Paragraph Outdent
    Shift-F7 - Center
    Alt-F7 - Right-justify
    F9 - Font menu

I had so much fun writing my programming books, I wrote a book about using WordPerfect to write books.   Search Amazon for "Adventures with WordPerfect"


Final Thoughts:

If your new PC came with an expired trial version of Microsoft Office, consider WordPerfect Office.  I recommend using the Home/Student edition as you likely don't need the Standard, Professional, or Legal versions.

You will get a capable spreadsheet (not quite Excel, but not bad), and a fabulous word processor, along with other software and training materials.

30-day trial, downloadable from Corel.com.

Write one term paper, or one long document with footnotes, graphics and font changes, and you will be hooked. Things like printing envelopes and mail-merges work easily and intuitively. 

I literally wrote a 2,200-page book, with 1,300 embedded illustrations, automatic table-of-contents, and full indexing.  I spent most of my time writing.  Very little formatting.


Related Articles:
WordPerfect - Hanging Indents / Paragraph Headers
WordPerfect - Block Protect Text Across Page Breaks
WordPerfect - Using WP for School Papers - Page Numbering ** go here

2022: Article updated to include references to newer versions