See these related articles:
Windows 7 Explorer Settings
Windows 7 - Stop UAC Nags while editing Icons
Cleaning Startup Programs
Windows XP and Vista users should jump to this article: Streamline Windows XP / Vista Start Menu.
Contents:
- Simplify the Side Menu
- Recommended Explorer Changes
- Cleaning up, tidy up Start Menus
- Create a UTIL folder
- Deleting Unneeded Folders
- "Above the Line" Pin Permanent icons
- Pin Documents to the Start Menu
1. Simplify the Side-menu:
Simplify the Start-button's right-side sub-menu, by removing those items you do not need. For example, I save all data, music, photos, in C:\Data (rather than in my profile's "MyDocuments" folder -- this way other users on the same machine can access the files). Because of this, I do not need the My Documents, My Video, My Pictures, etc. You may need some folders, but not others.
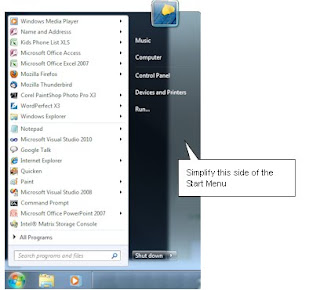
a. Click Start, Control Panel, "Task Bar and Start Menu"
In the Start Menu tab, click "Customize"
In the vertical list, consider (unchecking/aka "Don't Display this item") the following items.
Pick and choose the ones you want to hide. For example, on my systems, all data is stored in C:\Data (not in MY Documents). Because of this, I hide almost all shortcut menus. See the bottom of this article for more discussions on C:\Data.
= Documents (if you use C:\Data) - Don't display this item
= Favorites - Don't display this item
= Music - Don't display this item
= Personal Folder - Don't display this item
= Pictures - Don't display this item
= Videos / Recorded TV - Don't display this item
In each case, pick and choose the ones you want to remove.
Click OK, OK when done.
Click on the Start Menu to see the results.
2. Recommended Windows Explorer Changes
Click Start, Control Panel, "Task Bar and Start Menu"
In the Start Menu tab, click "Customize" (same menu as above or Other-mouse-click Start Menu, Choose Properties, [Start Menu], Customize)
These changes are recommended and make the following steps easier:
where [ ] means uncheck and [X] means check:
- [ ] "Help" (Uncheck; declutters the Start Menu)
- [ ] "Default Programs" (Uncheck)
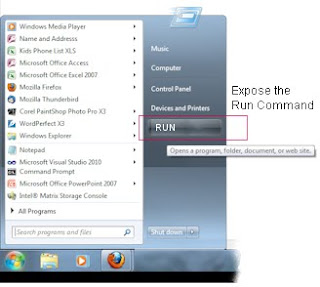
- [X] "Run" (Expose the Run command
- [ ] "Highlight Newly Installed Programs" (Uncheck)
3. Clean up and Organize the Start Menu:
Simplify your life and consolidate or delete unneeded programs and groups from the Start Menu. The illustration below shows a relatively cluttered Start Menu; yours is likely far worse. Notice it is long enough to require a scroll-bar.
4. Begin the Cleanup
a. Open Windows Explorer. Tunnel to this path (these items are visible because of the Explorer changes made previously):
C:\ProgramData\Microsoft\Windows\Start Menu
b. Delete icon "Default Programs" (you will never use it)
c. Delete icon "Windows Update" (it is in the Control Panel)
d. Leave "desktop.ini"
5. Build Utility Folders
Create a new UTILITY folder by following these steps
a. Using Windows Explorer, tunnel to (same location as above)
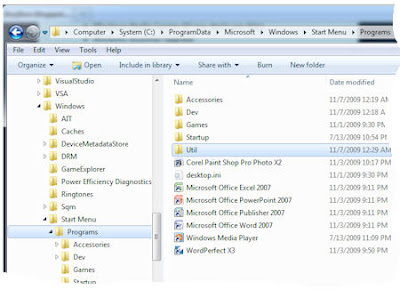
C:\ProgramData\Microsoft\Windows\Start Menu\Programs
b. In the "Programs" folder (detail side), create a new "Util" (Utility) sub-folder by 'other-mouse-clicking" in the detail-side, choose "New Folder"
Name: "Util"
This is where you will put seldom-needed utilities and system tools. While in the area, notice the 'Programs\Accessories' Folder.
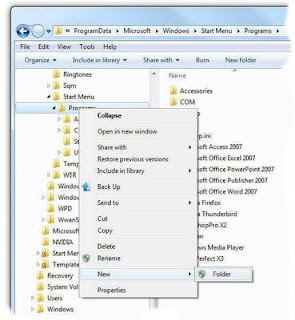
c. Using Windows Explorer, *Cut and Paste* the following common, but seldom-if-ever-clicked utilities to the UTIL folder. From the Windows Explorer detail-side, highlight these program icons and cut-and-paste them into the UTIL folder (if present):
- Adobe (Acrobat) Reader
- Windows Anytime Upgrade
- Microsoft Security Essentials
- Any other Virus software
- Microsoft Silverlight
Similarly, highlight, Cut and Paste these icons, placing them into the Accessories folder:
- Windows DVD Maker
- Windows Fax and Scan
- Windows Media Center
- XPS Viewer
- PowerPoint Viewer
- QuickTime Viewer
My rule is this: If it is a geeky utility, one that your spouse our children would never want to see, put it in the UTIL folder. Other programs, such as Acrobat, PPT Viewers, etc, which are needed, but never directly clicked, put them in the ACCESSORIES folder. I consider Accessories "end-user" tools. The goal is to tuck them out of the way.
6. Move other (vendor) folders...:
With an eye towards other folders in the Programs group, ask yourself if they are really needed. While still in the "Programs" folder, locate the following subfolders and icons. If they seem useless or useful-but-never-clicked, consider moving them to Util or Accessories folders.
Examples to move into UTIL:
- Administrative Tools
- IIS 7.0 Extensions
- Intel Storage Matrix Manager
- Microsoft Mouse
- Microsoft Security Essentials
- Microsoft Silverlight
- Maintenance
- Nvidia Corporation
- Tablet PC
- Dell Support Center
- Any Backup Programs you may have purchased
- Dell Webcam Manager
- Desktop Gadget Gallery
- Creative Webcam
- Adobe Acrobat Reader (icon or folders)
- Roxio
- Windows DVD Maker (icon)
- Windows Fax and Scan (icon)
- Windows Media / Media Center (if you don't use this)
- Windows Anytime Upgrade
Reasoning: You will never click the Acrobat viewer to open a PDF; instead, you will always double-click the PDF; the viewer opens automatically. Tuck these other seldom-used programs in a location that is out-of-the-way. Or, better yet, delete them; see below.
7. Get Rid of Unneeded Folders:
Folders, such as "Microsoft Office" or "Corel Paint Shop Pro Photo X2" do nothing but waste your time, making you click through a useless folder. The folders are often little more than an advertisement. What you really want is the program-application icon that lives inside.
Consider these example folders, such as "Corel Paint Shop Pro", "Microsoft Office", "WordPerfect Office". Once the single-executable icon within these folders is moved to a better location, the entire folder can be deleted -- removing another folder cluttering the Start Menu:
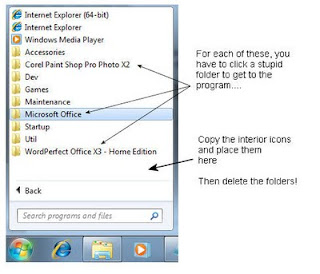
Deleting icons does not hurt the underlying features.
Steps:
a. Using Windows Explorer, tunnel to the "Programs" folder (same as before).
C:\ProgramData\Microsoft\Windows\Start Menu\Programs
b. Open Folder "Microsoft Office" (or any other application folder of interest)
c. Copy only the icons you use (e.g. "Paint Shop Pro" or "Microsoft Excel") and paste them one folder above, into the "Programs" folder. Don't bother copying Help Icons, Registration, or others that you have never clicked.
These icons will appear in the root of the ALL PROGRAMS menu. (See below for how to "pin" a copy on the Start Menu itself)
d. Test by clicking Start, All Programs. You will see these icons at the root of the folder.
e. Delete, yes delete, the original holding-folders. For example, delete the entire Microsoft Office Folder, WordPerfect Office, etc. -- Once you have saved the icons you care about, do not be afraid to delete those useless folder structures.
f. Consider moving some icons from the Accessories folder to the Programs folder, making them easier to find and more accessible:
- Calculator
- Paint
- Snipping Tools
- Sticky Notes
Another example of a corporate advertising folder: Acronis True Image Backup - the Shame
Here is the Acronis True Image Backup StartMenu folder-structure. Notice how they insulted you twice by tucking their most needed icon two-layers deep. Inside is only one icon that is of interest -- the main program icon. The rest of the icons are available from within the program (e.g. Help, Register, etc.).
Copy or cut the icon and paste it into the Programs folder (or Util). Delete the extraneous folders and all of the icons within:
You will find things like Help, Websites, Registration Links, Uninstall icons.
Be merciless and delete this crap.
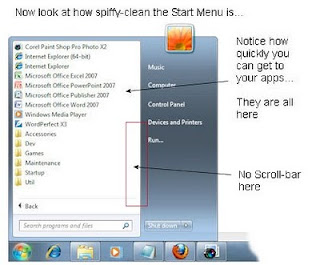
Here is my machine after the cleanup with a much shorter "All Programs" list. Notice there is no vertical scroll bar. Click illustration for a larger view; click Back to return.
Deleting useless folders without fear. Delete things like Help, Uninstall, etc. Most of these functions are available from within the application or a control panel; there is no need to hog space in the menu system. Consolidate those icons you want to keep in Util or Accessories.
Here is Windows Explorer view of the same cleanup:
8. Permanent Icons: Pin
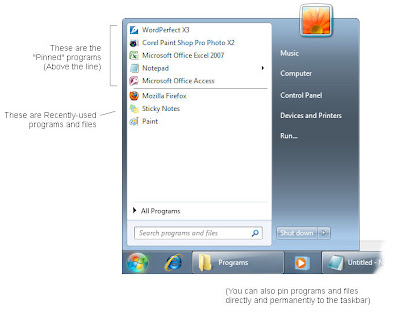
Continue by taking your most common, favorite applications and adding them to the first Start menu. With Windows 7, adding a program or icon permanently on the initial Start Menu is easy with a "Pin".
 Icons can be added "above the line" in the Start Menu -- giving a quick link to your most commonly-used programs. This is faster than clicking the Start Menu, Programs. With this, all you need to do is click Start.
Benefits
- Fixed, non-changing list
- One click from the Start Menu
- Place your most needed programs within easy reach
- No need to click "All Programs"
In older versions of Windows, these icons would have been placed manually in the Start Menu, and this was commonly called "above the line." In Windows 7, this feature has been automated with the PIN menus. In the illustration, see how WordPerfect, PaintshopPro, Excel, Notepad and Access are all clearly visible in the Start Menu:
 To add a program to the Start Menu, do the following:
a. Locate any program or icon on the Desktop or in an existing Start Menu. For example, WordPerfect or Microsoft Excel.
b. 'Other-Mouse-Click' and choose "Pin to the Start Menu"
c. To test, click Start.
Another illustration showing the same idea:
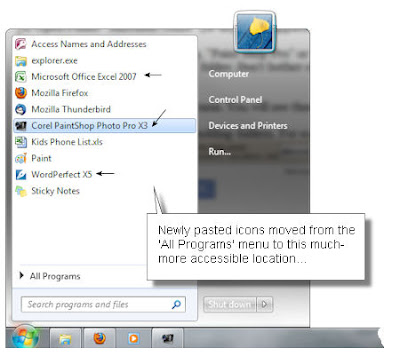
Note the new program(s) is listed at the top. You do not need to click "All Programs." The most commonly-used applications are one-click away from the Start Menu. Only place your most common applications in this list to avoid clutter.
9. Roaming User Icons (optional discussion)
Some manually-created (desktop) icons are not visible to other user-accounts, or when you look in the "Programs" folder, you don't see the icons there, but they are visible in the Start Menu.
These steps are useful when you create "document and data icons" and wonder where they went.
Windows keeps track of two sets of Start Menu icons: One for the 'All User/machine' and a second for the 'current user.' The Start Menu blends the two into one list.
In general, I recommend moving icons from the Current (Roaming) user to the All User's (machine) list; this way they are visible to other users on the same machine.
To Move the Icons from the Roaming Start Menu to the Machine Start Menu:
a. Tunnel Windows Explorer to
Users\(your userid)
(Any icons you find in here are only visible to your login-id and many of these icons should be stored with the others built earlier.)
b. Locate, cut and paste these recommended icons:
Paste into (it helps to open an second Explorer window)
C:\ProgramData\Microsoft\Windows\Start Menu\Programs
- "Command Prompt" to Util
- "Notepad" to Accessories
- "Narrator" to Accessories
- "Magnifier" to Accessories
- Accessories (the entire folder)
- Administrative Tools
- Games
- Maintenance
- You must leave "Startup" and "desktop.ini"
10. Cleanup the Default Users Folder (optional)
Now that these icons have moved to the (All Users / Machine Start Menu), stop this pollution from bothering any other new User Account by making these strictly-optional changes:
a. Tunnel to
Users\default\AppData\Roaming\Microsoft\Windows\Start Menu\Programs
b. Delete folder "Accessories"
c. Delete folder "Maintenance"
d. Leave folder "Programs"
e. Leave folder "Startup"
f. Within folder "Startup", you may find programs, such as Dell Dock Run. Delete it if you don't use this type of feature.
With these changes, all newly-created user accounts will be pre-cleaned as they are created.
11. Favorite Document Icons in the Start Menu
I have certain documents that I always need to open and they would be handy in the Start Menu. In other words, by clicking the document in the Start Menu, it launches the application and opens the specific document.
Windows 7 is not as graceful in building these types of icons as I would wish (it was easier in XP and Vista). This step is optional and somewhat complicated. Follow these steps.
a. Using Windows Explorer, locate your document name (an access database, spreadsheet or other document).
b. Highlight the document name.
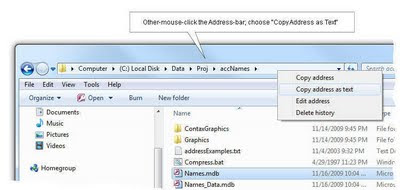
c. In the Explorer's address bar, other-mouse-click (illustrated) and choose "Copy Address as Text". Memorize the document name (e.g. Names.mdb); it is not copied as part of the address.
d. Move to the Windows Desktop, other-mouse-click, choosing "New, Shortcut"
e. Click Browse.
Locate the underlying application (e.g. Microsoft Access, Microsoft Excel, WordPerfect, etc.). You are looking for the actual EXE name. For MS Office, tunnel to "C:\Program Files (x86)\Microsoft Office\Office12\MSAccess.EXE" (Excel.exe, etc.)
f. While the dialog is still displayed,
- type a space and a quote (quote is required)
- Paste the previously-copied path name by pressing Ctrl-V
- Type a closing backslash, followed by the document's name, which you will have to type from memory; then close the quote (illustration shows an Excel sheet):
e.g. .."C:\Program Files (x86)\Microsoft Office\Office12\MSAccess.EXE" "C:\Data\Proj\Names.mdb"
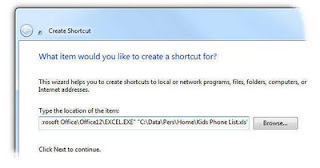
The resulting icon will be on the desktop.
g. Cut and paste the icon, placing it in
C:\Program Data\Microsoft\Windows\Start Menu\Programs
h. Rename the icon from "...copy" to any name of your choosing (e.g. "Name and Address List").
i. Optionally, "Pin" the new icon to the Start Menu. Once Pinned, you can delete the "Programs" icon, if desired; the Pinned copy will remain.
* To test: click the Start Menu (and or All Programs) to see the new icon.
12.Using a C:\Data Folder
This part is an admittedly advanced topic and is optional.
Why C:\Data?
On my computers, I always store all data in a folder called "C:\Data" -- this includes all pictures, music, documents, spreadsheets, macros and even program preferences. Basically, if it is something I created, downloaded, or customized, it lives in the Data folder.
As I upgrade from computer-to-new-computer, I simply copy the C:\data folder -- and all data is moved to the new machine. If multiple users have accounts on the same computer, their data also lives in this same folder. This way family members can get to the photos, music, etc. Of course, this makes backups easier too.
This is the final cleanup from Step1, where the Side-Menus were simplified. In that step you optionally hid "My Pictures", "My Music", etc. Here is where you build new locations for those types of data.
Only do this step if you have decided to not use C:\Documents and Settings (aka C:\Users\Your user-id\My Documents) to store your data. If so, continue with these steps.
Building the Data Folder:
a. Open Windows Explorer, tunnel to (or make) a folder called C:\Data.
b. Within C:\Data, create these sub-folders:
- Download
- DB (database)
- Graphics
- Music
- Personal
- Photos
- Prefs
- Presentations
- Projects
- Spreadsheets
- WP (word processing)
- C:\Data\WP\Macros
Change Program defaults:
This is a bit tedious. Launch each of your applications, such as Microsoft Word, WordPerfect, your photo-editors, etc. Within each program, locate the setting or preference that controls the "default data directory". Change it to an appropriate C:\data folder.
For example, setting a default data directory for Microsoft Word (2007):
- Launch Microsoft Word
- Click File (orb), click button "Word Options"
- Choose the "SAVE menu
- Change "Default file location"
from C:\Users\yourname\Documents
to C:\Data\WP - Within "Advanced", scroll to the bottom of the list and click the "File Locations" button
- Change Clipart Pictures to "C:\Data\Graphics"
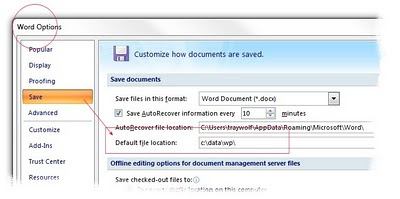 To test, exit and re-open Word. File-Open, should be C:\Data\WP.
Change other Microsoft Office Products:
Similarly, change other Microsoft Office Products. Each will have to be touched one-time. In some programs, you may need to create a dummy-document before you can open the Options menus (e.g. MS Access, PPT).
Change Windows Media Player's Default Directory:
This is a great example of a program that should not store its data in the user's roaming profile.
- Launch Media Player
- Click top-menu-bar "Organize"
- Click Layout, check "Show Menu Bar"
- In top menu Tools, Options, "Rip Music", change Rip Music location to C:\Data\Music
Change Word Perfect's Default Data Directory:
- Launch WordPerfect, Tools, Settings, Document
- Set Default Document folder to C:\Data\WP
- Set Graphics: Default Graphics Folder: C:\Data\Graphics
- Set Default Spreadsheet Folder: C:\Data\Wksheets
- Set Database: C:\Data\DB
- Set Default Macro Folder: C:\Data\WP\Macros
Change Corel Paintshop Pro's Default Data Directory:
- File, preferences, File Locations: C:\data\Graphics (or Photos)
Change ITUNES default Directory:
- Launch Itunes
- Select menu Edit, Preferences, Advanced tab
- Change the itunes media folder location
- (Copy your previous library's location to this new folder)
In other words, where-ever possible, tell each application where the Data folder is. Once this is done, you can create new user accounts, fix corrupted ones, etc., without loosing access to your data. The folders are also easier to share.
The drawback to this design: the documents are not secured from other users on the system. However, without physical security, there is no security and your documents were not really safe anyway.
This completes this tutorial on Start Menu Cleanup
Related articles:
Windows 7 Explorer Settings
Windows Folder Locations
Windows 7 Initial Look
Dell XPS M1530 64-bit Drivers
Cleaning up Start Menu Programs (Speeding up a boot)
Slow PS/2 Keyboards and Windows 7


