2009-12-31

BullDoze - File Cleanup Utility

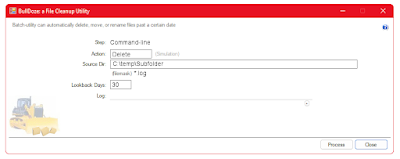
Download: File-delete utility for deleting old log files. The "BullDoze" utility can automatically delete, move or rename files older than xx days.

Corporate servers often have processes that generate temporary files and those files sometimes need periodic deleting. Classic examples include
  • Fax Server sent-fax folders
  • Medical Image Gateways and other image processing servers
  • Sharepoint Log files in the bin\12\logs folder
  • Temp directories, etc.

The issue is this: Deleting files is easy. It is harder to delete files older than (30) days and logging what was deleted is even more troublesome.  Bulldoze does all of this, and it runs unattended.

Free download.
No Adware, no spying, no registration, no email required. 
Does not call the mother ship; does not need an internet connection.
Just download and run.
Click for larger view


BullDoze Features

BullDoze.exe is a compiled program that has the following features:

  • It can Delete, Rename, Move, or MoveRename files
  • Triggers on a file-age; files older than xx-days
  • Can identify and delete millions of files
  • Optionally, aged files can be moved to a different (backup) directory

  • Command-line-driven
  • Auto-starts, runs, then auto-closes
  • The process can be run any number of times, against multiple directories

  • Full Logging is supported. Each process can log independently or all logs can be combined.
  • Schedule-able with Windows Scheduler or other
  • No installation required; No registry entries
     

Installation:

To install this program, download the .exe and place in any folder on your hard disk. 
Double-click the .exe to run - no installation required. 

Since keyliner cannot afford a signing certificate, you will be prompted that the file is not safe (being downloaded from the internet).  Click "more information" and allow the program to run.


Follow these steps for a more professional installation:

Copying the .exe from a download folder to a folder in your "Documents" folder is a quick work-around for other Windows security issues, but is an inappropriate place to put software.  Instead, it should be copied to Program Files so it gains the protection of other Windows security features. 

A.  Create a Program folder to hold the program:

Using File Explorer, open folder C:\Program Files

Create a folder  C:\Program Files\Util

B.  Download the .exe to a Download or Temp folder:

From Keyliner's public GDrive, click this link and download to a local temp or download directory.  Do not download directly into ProgramFiles


 keyliner's public GDrive Download Link:
BullDoze on Keyliner GDrive.


MD5:  67-67-89-3e-8b-39-5f-d5-d7-07-f5-57-a9-9b-6f-69

SHA-256:
7645f44e8c9ff2d424ed1aa1337fe5fca145e71f7d8594b77d5705b1feb85a8a


When downloading, different browsers behave differently.
You will be prompted the file cannot be scanned.  Click "Download anyway"

Microsoft Edge:

Prompts "BullDoze.exe" was blocked because it could harm your device. 

"Click See More" and allow the download.  With Edge, the file will appear in your Downloads directory with a random name, "Unconfirmed 780359.crdownloaded" (name varies). 

Rename the file to "BullDoze.exe".


C.  Mark the program as safe-to-run:

(This step may not be needed if downloaded by Edge and you clicked "More / Download Anyway")

Using File Explorer, right-mouse-click the downloaded (and re-named) .exe
Select "Properties"
Check [x] Unblock.  This removes the "mark of the web." 
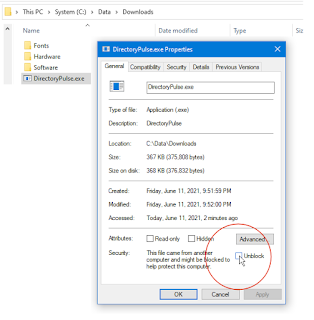
                 Click for larger view

* Only do this if you trust keyliner *and* only if downloaded from keyliner's public GDrive. 

If "Unblock" is not visible, it has already been unlocked (by Microsoft Edge).
Once [x] Unblocked is clicked, this security menu disappears.
You may be prompted for security UAC/Windows credentials. 

 
D.  Copy the .exe to ProgramFiles\Util:

Using File Explorer,
Copy/paste the .exe from the temporary/download folder
    to C:\Program Files\Util

Do this copy as a two-step, copying from the download folder into Program Files.  Windows security will not let you download directly into Program Files (technically, you will not be able to remove the "mark of the web" if downloaded directly into Program Files).


E.  Create a Start Menu Tile:

Using File Explorer, in C:\Program Files\Util
Right-mouse-click the executable and "Pin to Start"

The program is ready to run.  See icon on Start Menu.


Generally, BullDozer.exe is copied to a UTIL directory, or it can be placed directly in the directory you wish to cleanup (it never deletes itself or its own control files).


Command Line Parameters

BullDoze must be launched using command-line parameters and is not meant to be run interactively.

The reason this is a command-line-driven application and for safety, once launched, you cannot enter or change parameters on the screen. This program is capable of deleting large swaths of disk, and for this reason, it must be launched deliberately.

It can be run with all parameters typed on single command, or it can call an INI file, which can contain one or more separate command-steps.


Example Command Line:
BullDoze.exe Action=Delete SourceDir="C:\Temp" Files="*.*" Days=90 LogResults=Y

where all files older than 90 days, any extension, will be deleted from C:\Temp. Results are recorded in the current directory in file "BullDoze.log". This is typed as a one-line command and can be placed in a batch file or in Windows Scheduler.

Optional parameters are in italics:

Action=DELETE, RENAME, MOVE, MOVERENAME
SourceDir="directory\path"
Files="*.*"
Days=nn | Days=-1 to delete all files unconditionally
LogResults=y/N | LogResults="C:\path\filename.log"
AppendLog=y/N
DestinationDir="directory\path" (if using MOVES)
Overwrite=y/N (Allow overwrites on Moves/Renames)

Comments:

  • All parameters are keyword=value pairs. e.g. Action=DELETE
  • Parameters are not case-sensitive
  • Embedded spaces are not allowed unless enclosed in quotes. e.g. SourceDir="C:\Test folder\directory"
  • Do not use spaces as in (Action = Delete)
  • Source and Dest directories can be \\server\path names
  • Client must be pre-authenticated to remote servers
  • Bulldoze runs as the current user; use Windows Scheduler to run with different credentials


Command-Line via INI file

Bulldoze.exe C:\data\myBullDoze.ini

Instead of a long command line, which is limited to just one delete transaction, an INI file can have two or more separate delete steps, and each step is given a cosmetic name.  Here is a sample INI file:

;BullDoze Command INI file

[General]
AppendLog           = N
LogResults          = C:\temp\testLog.log   ;Y/N or a filename
StartupTimerCount   = 4                     ;Delay in seconds before
                                                  launch; 0 to disable
VerboseLogs         = Y
SimulateSteps       = Y
Diagnostics         = N


[CommandLine-like Example]                  ;cosmetic step name
Action              = DEL
SourceDir           = C:\data\test
RecurseSubDirs      = N
DeleteDirs          = N
Filemask            = *.*   ;(Filemask *.* assumed if blank)
Days                = 14
DestinationDir      =
Overwrite           =

[SimpleFileDelete, Do not traverse Subdirs]   ;cosmetic step name
Action              = Disable
SourceDir           = C:\data\Test
RecurseSubDirs      = N
DeleteDirs          = N
Filemask            = *.dork
Days                = 15
DestinationDir      =
Overwrite           =


Typical Use:

From a server, open the Control Panel, Scheduler
Add a new task, calling BullDoze.exe.

While building the schedule, click Advanced properties, and add the parameters.
Let Windows Scheduler run the program once per day. Details on this step needed; sorry.


Parameters:

Action=Delete
In-use, write-protected, insufficient-rights, files are not deleted. Failures are recorded in the (optional) LOG file and will not cause the program to fail.

Action=Move
Requires a DestinationDir.
If the file already exists in Destination, it will not overwrite unless "OverWrite=Y" is explicitly stated.

Action=Rename
Renames the file, leaving it in the current directory.
Renames are OriginalFileName_yyyymmdd_hhMMss.ext
If file has already been renamed within the same day, it will not attempt a second rename unless OverWrite=Y.
Rename with date-time stamp is the only option supported at this time.
Failed Renames are logged.

Action=MoveRename
Moves the file to the DestinationDir and renames, following the same rules, described above.

SourceDir=
Path must pre-exist
Path can be in the form "C:\path\path" or "\\server\share\path"
Quotes should be used on all paths; required if embedded spaces
If server path, client must be pre-authenticated prior to running BullDoze. This will be a future enhancement.
Do not use file-masks in the SourceDir (see Files=)
Generally, the SourceDir is on the same machine as the program.

Files=*.*
Standard DOS file masks are supported.
Examples: *.* All files eligible
*.LOG only (delete) Log files
2009_*.LOG, etc.

DestinationDir=
Required if MOVE or MoveRename

Days=nn
Specifies the age the file must be, in days, before the action is taken.
e.g. Days=30
Use Days=-1 (no spaces) to delete all files, regardless of age.
Days=0 is illegal.

LogResults=y|N
If not specified, results are not Logged.
If LogResults=Y, a default log file (BullDoze.Log) is created in the current DOS directory.
If LogResults="C:\Filename.exe", "Y" is assumed and this log-name is used.
Log files can be stored in the SourceDirectory and are not deleted.
Log Files are a standard ASCII text file, viewable with Notepad.
Subsequent runs overwrite the log file, replacing the older copy, unless AppendLog=Y.

AppendLog=y|N
If AppendLog=Y, log entries append, newest last. Caution, log files can get large. This utility will not manage its size and it can grow very large. Use with caution.

OverWrite=y|N
During a Move or Rename, if the destination file already exists, it will be overwritten if this switch is set to Y. Otherwise, the file fails and is logged. Generally, all MOVES and RENAMES should allow overwrites.


Update:
I just used this program to delete 1.8M files (yes, that is in Millions) from a Rightfax server.  It worked swell, although I could see a minor problem in the display, where it did not report "deleting" until several minutes into the process.  This is a cosmetic issue.


Version 1.01  - 2022.05 Re-compiled using Visual Studio 2022 and dotNet 4.8
Version 1.00 - 2019.12  Initial Release

Suggestions are welcome. I'd like to know if you use the program, drop me a note here on this blog.

Keywords:
auto-delete
automatically delete old files
cleanup old files
bulldozer file-delete

2009-12-28

Windows 7 and Vista Network Problems

Windows 7, Windows 8 and Vista laptops may have problems with "Unidentified Networks" and broken network connections. This article discusses the solution, mainly by disabling IPV6.  This works on all Windows 8, 7 and Vista computers and is likely due to a conflict with older routers.  This article also describes a fix for the Teredo Tunneling Pseudo Interface and the Microsoft ISATAP Adapter.

"The network crashed"
"Laptops crash the network"
"The laptop kicks off the other users"
"My new Windows 7 (Windows 8) computer crashes the wireless network"

This article permanently fixes the problem.

Symptoms:
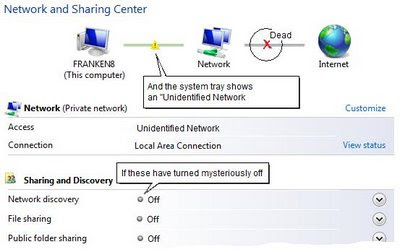
  • Windows 8 / 7 / Vista report an "Unidentified Network" error.
  • Task-tray icon shows "Access: Local" only; no Internet
  • Network Discovery and File Sharing may mysteriously turn off.
     
  • You may loose both your intranet and Internet network connections.
  • Other wired desktop computers in the same network may temporarily loose their network connections.
  • The entire home network may "crash" when a laptop connects to the Wireless.

  • The laptop has an Intel 3945ABG Wireless Network adapter or related cousins; or a Atheros AR5007 Wifi Adapter (Readers suggest other network cards are also a problem -- indicating this is really a problem with the Router). 
  • Likely, this is an older wireless router.
In Vista and Windows 7, the Network control panel will look similar to this; Windows 8 will show "Not Connected" and will imply no network connections are available:


Interesting Update: 2012.05:
This is an issue with older Linksys routers, such as the WRT110.

Today, I retired that router and replaced it with a keyliner reviewed: Linksys EA2700.  The new router behaves properly when PCs have a mixture of IPV4 and IPV6.  These steps listed here allow you to keep using an older router with newer operating systems. 


The following steps can be applied in any order.  
I recommend applying these changes to all wired and wireless Windows 8, Windows 7 and Vista computers on the local network.

Do not use these steps for Windows XP machines, which may also reside on the same network.


1. Disable the DHCP Broadcast Flag

Note: The first two steps above could be considered somewhat optional.
Steps 3 through 8 actually "fix" this problem.

Edit the Registry and modify a DHCP Broadcast flag setting.

This does not disable the feature but it does change the order DHCP addresses are discovered. As dangerous as this sounds, it is benign, only changing how DHCP is searched. These instructions assume you know how to edit the registry; if not, please talk with a knowledgeable friend.

a. Start, Run "Regedit" and tunnel to this HKLM key
See this article for instructions on exposing the RUN command or type WindowsKey-R.


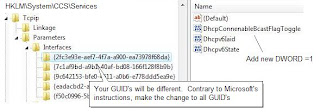
HKey_Local_Machine\System\CurrentControlSet\ Services\TCPIP\Parameters\Interfaces

b. In the key you may find multiple {GUID}'s -- especially if you are working on a laptop.

Within each populated {GUID} key:

- select Edit, New,
- Click DWORD-32 Value
- Create/name "DhcpConnEnableBcastFlagToggle"
- Press Enter

c. Double-click the newly-added value, Set value to (Hex) 1 (one).


d. Make similar changes to the other GUID's.

Leave Regedit open for the next step.

For reference: See Microsoft article: http://support.microsoft.com/kb/928233/en-us for details. Note they are vague by saying "click the GUID that corresponds with your network adapter." They do not explain how to tell which GUID belongs to your wireless. It is safe to make this modification for all network adapters.


2. Disable TCPIP6

Windows 8/7/Vista supports the new IPV6 IP Addressing scheme, which is great, except the entire world still uses the older IPV4 standard. There appears to be conflicts between this new protocol and most home routers. Here is how you can safely disable it. Note: In order to properly disable the protocol, you need to make changes in the Control Panel *and* in the registry.

Still in Regedit, continue with these steps:

a. Tunnel to

HKLM\System\CurrentControlSet\
Services\TCPIP6\Parameters


* Note: this is not the previously-edited TCPIP key -- this is one folder down *


b. Create a new DWORD-32 value:

Name: "DisabledComponents"

Set the value equal to (hex) "ffffffff"
(8-f's in a row. Decimal 4294967295)

This change is only required one time in the registry, regardless of the number of network adapters. Detailed reference on IPv6, see this Microsoft article: http://www.microsoft.com/technet/network/ipv6/ipv6faq.mspx.

Microsoft has a warning when disabling this protocol: If you disable IPv6, you will not be able to use Windows Meeting Space or Windows Home Gruoups. However, regular peer-to-peer networking works. My opinion: if you don't use Home Groups, this is still a good fix to apply (2010.01.29 - trw)


3. Cleanup old Network Connections:

There are two keys to look for:

a. While still in Regedit, tunnel to:

HKLM\Software\Microsoft\Windows NT\Current Version
\NetworkList\Profiles


b. Click on each numeric {GUID} key and note the internal names (e.g. HomeNetwork, My School, etc.).

c. When you find the network that is failing (at your house), press Delete and delete the entire numeric {guid} key. If in doubt about which entries to delete, delete all of the GUID's -- this is what I do.

d. Tunnel to this next key (directly below):

HKLM\Software\Microsoft\Windows NT\Current Version
\NetworkList\Signatures\Unmanaged


e. In the Unmanaged key, find two similarly-named network {GUID}'s.   Delete (both) key-folders.

For example, my computer has two unmanaged folders:
01013000f000f008....D6D7
01013000f000f008....C7F6

The deleted folders (GUID keys) rebuild in a moment.

f. Close Regedit


4. Disable IPV6 on the Cards

a. in Control Panel, "Network and Sharing Center,"
(or See this article for instructions on exposing the Network Desktop icon and choose Network Neighborhood, "properties).


b. On the Control Panel's left-menu


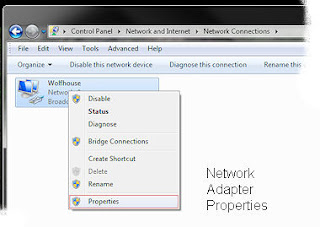
Windows 7 users: Click on left, "Change adapter settings" (or type: Start Run, "ncpa.cpl")
Vista users: Click on left, "Manage Network Connections"


c. From the displayed adapter list, other-mouse-click your (wireless and or wired) Network Adapter, select "Properties".

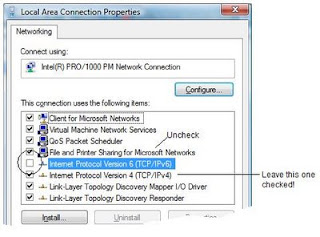
d. Uncheck [ ] "Internet Protocol Version 6 (TCP/IPv6)"
(leave [x] IPV4 checked.)


When you uncheck the current, active IPV6, and click OK, Windows 7 and Vista will prompt to re-select "home/work/public". Choose the appropriate type of network connection; for most, select "Home."

Windows 7 and Vista will next prompt "Share with other home computers running Windows 7".
Click Cancel.

e. Do the same for *all* other Network adapters, unchecking [ ] IPV6 -- even if they are not connected or you are not using them.  Uncheck for Bluetooth and other copies of the existing wireless that might exist. Also uncheck IPV6 on the Wired connection.


5. Reboot for these changes to take effect.

You must reboot before proceeding to the next step. Upon reboot, the PC may prompt to re-establish the wireless internet connection. Choose "Home Network" or "Work Network", as appropriate.


6.
Teredo Tunneling or ISATAP

Once rebooted, continue with this step.

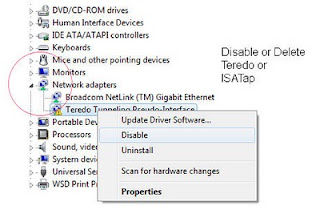
If you are using an Intel Wireless driver or an Atheros adapter (possibly other brands), open the Control Panel, "Device Manager," and scroll to the Network Adapter section.

You will likely see a failed "Teredo Tunneling" yellow-bang icon.
  • "Teredo Tunneling Pseudo-Interface
    (yellow-bang and 'This device cannot start. (Code 10)').
or
  • Microsoft ISATAP Adapter (yellow-bang on multiple items 'This device cannot start (Code 10)'
These are protocols allowing IPV6 traffic to tunnel over IPV4 routers. Because IPV6 has been disabled, these protocols should also be turned off:

a. In Control Panel, Device Manager, "Network Adapters",

other-mouse-click "Teredo Tunnelling Pseudo Interface" or the failed ISATAP adapters
Choose "Disable" (or optionally press the keyboard's Delete key)

This assumes you have disabled IPV6 in the steps above.


7.  Repeat these steps on all Windows 7, 8 and Vista machines in the network.


8. Set Power Settings keeping the network adapter at full power

Optional:  If you are working on a laptop computer, consider these steps because some laptops do not recover from power-save mode on their wireless adapters. If you have reasonably modern equipment, skip this step:

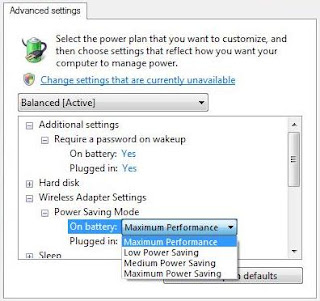
a. Click the System Tray Battery Icon (or Control Panel, "Power")
Choose "More Power Options"

b. Under "Balanced",
Click "Change Plan Settings"
Click "Change Advanced Power Settings"

d. Tunnel to "Wireless Adapter Settings, Power Saving Mode"

e. Change "On Battery" to "Maximum Performance"
Click OK to save

f. Repeat these steps for the "Power Saver" profile.


See Microsoft Article http://support.microsoft.com/kb/928152 for details on this issue. Obviously, this affects battery life.


Other things that can cause network failures:
These steps are optional or may not apply to your computer.

9. McAfee Security Suite.

Check to see if you have an expired McAfee Security suite. If so, un-install all McAfee products. When it expires, it reportedly disables the firewall and this can also appear as a failed network connection. My opinion: Uninstall it even if it is not expired and install Microsoft's Virus scanner. See this keyliner article: MSE.


10. Installed iTunes, Safari, Adobe CS3, or GizmoPhone

Look in Control Panel, Administrative Tools, "Services" and look for a
Bonjour DNS Responder Service
##Id_String2.6844F930_1628_4223_B5CC_5BB94B87 9762 ##

If found, mark the service as "Disabled" and reboot. (This is from a Windows7Forums.com thread). I have admittedly not seen this myself and would appreciate more precise steps.

11. Update your wireless drivers to the latest version

Optional:  There are known bugs with IPV6 processing on Intel network adapters and it is always a good idea to upgrade to the latest versions. Unfortunately, those of us who upgraded to Windows 8/7, may not find appropriate x64 drivers. Resolving this will take research and the details are not discussed here.

If the control panel shows a default Microsoft Network drivers; these should be upgraded to the vendor's real drivers.
Contact your OEM vendor or check your shipping manifest for the correct network card. For laptops, the Wired and Wireless will use different drivers; usually an Intel driver. See this Intel link for an index of all versions: Link


Note: Microsoft Update periodically updates drivers, but I still recommend using the vendor's (usually Intel) latest versions.

12. Upgrade your Router's Firmware

Optional:  I recommend upgrading your home router's BIOS / Firmware to the latest version - admittedly this is a technical step. If you are comfortable with this type of work, see this Keyliner article: Upgrade Linksys WRT110 Firmware or check the Vendor's site for details. Skip this step if you are not technically inclined.

If you decide to upgrade the firmware, you can do this after all the other steps in this article. Linksys routers have had some bug fixes in this area and I've moved this higher in the list. If the local network continues to crash after performing the remainder of these steps, update the router's firmware.

Unconfirmed: Newer routers may not exhibit these network problems.


Last-Ditch Efforts if all else fails

The steps above solved the Windows 7 / Vista "Unidentified Network" problem for dozens of  computers that I have worked on -- but I did find one laptop where these steps failed. Here are additional things you might consider. These last-ditch steps are roughly described and are meant for technical users.

Last Ditch - 1. Confirm the NIC's MAC address:

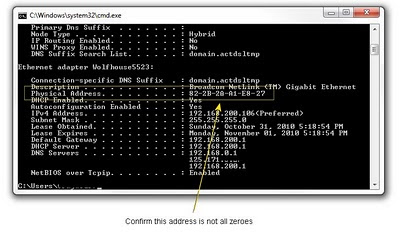
* From a DOS prompt, run this command:

ipconfig /all

* In the displayed list, locate your adapter (laptops will show two adapters; look for the Wired or Wireless one you are using). Confirm the Ethernet's "Physical Address" (the MAC address) has a legitimate value.

Address look similar to this: 84-2C-2A-A1-22-8F (varies - anything but zeroes)


* If you have all zeroes 00-00-00-00-00-00 (00:00:00:00:00), then something is amiss.

Consider doing one, but not both of the following. If you have a legitimate MAC address, skip to "Last-Ditch 2":

Contact your OEM and download the latest Windows 7 (or at least Vista) driver and have it stored locally. Then, in Control Panel, Device Manager, "Network Adapaters", delete the offending network card. Reboot and re-install the driver - saying "Have disk." Confirm this fixes the problem and confirm the card was assigned a valid MAC address.

Or do this option: In Control Panel, Device Manager, Network card: Other-mouse-click the offending adapter, "Properties", "Advanced." In the Network Address property, type/invent a new MAC address (00-00-00-00-00-00 (6 pairs of numbers, no dashes or colons)) - using random numbers and letters A-F. (Note: when editing this property, it is normal for this field to report "not present" - which means it would prefer to automatically get a MAC address). Reboot to test.

On this particular laptop, I noted it connects to other WPA-Personal networks without a problem. One suggestion, which I did not try, was to change its MAC address to another random address -- even though this machine's original address was valid.


Last-Ditch 2: Change your encryption

If the IPCONFIG /ALL command shows a valid MAC address, consider this poor solution, which was recommended by Linksys support. On one particular laptop, this poor-excuse-for-a-real-technical-solution worked. While this "solved" the problem, it introduced others:

I'd bet you are using the recommended "WPA-Personal" TKIP encryption on the Router and the router is possibly so old that it does not properly support WPA-Personal TKIP encryption.

Linksys recommended re-configuring the router to use the older WEP (40-byte encryption standard). In this particular case, it solved the network disconnect problem -- but WEP is an older, slower, and hackable encryption that is no longer recommended. Plus, this forces you to re-configure all other computers, Nooks, Kindles, iphones, and other devices in the network to match this connection.

Before I did this solution, I'd try changing the MAC address. If you reach this state in your problem, write with your experiences.

Conclusions

Admittedly, disabling power save features and other registry changes are not elegant solutions, but these changes solved my networking problems on a half-dozen computers. The real solution is to have all the computers on the network with full support for IPV6 and most of us will have to buy newer routers that properly support IPV6. Additionally, the ISP's need to support IPV6 - and my understanding is most do not.

Finally, tunneling through the Toredo interface seems like a poor solution and it probably entails its own set of bugs. Deleting IPV6 and Toredo seems to be the most stable solution, for now.

Your comments and experiences on this are welcome. Please leave unregistered, anonymous comments below.

These steps will not solve the problem where a laptop is on one wireless network, goes to sleep and wakes on another (I am still looking for a solution to this) - to date, the best solution is to reboot the computer.

Related Links:
This is an interesting article on why Windows 7 should enable IPV6: Why IPV6 is worth the Bother. However, even with this article, I did not bother. The author points out that Windows 7 incorrectly implemented IPV6 and this command will help resolve the problem: netsh interface ipv6 set global randomizeidentifiers=disabled -- but even with this, most of us still have other hardware issues to contend with -- we need newer routers.


Related articles:
Review: Linksys EA2700 
Vista Spiffs
Optimizing the Swap File
Vista UAC Nags
Upgrade Linksys Firmware

Linksys EA2700 Smart Wi-Fi Router App enabled N600 with Gigabit

2009-12-06

Windows 7 - Show MyComputer Desktop Icons

Howto: In Windows 7, use these steps to put the Computer and Network (MyComputer, MyNetwork) icons on the desktop.

Use these steps to expose / display the Desktop icons for "Computer" and "Network"

Steps:

1. Start, Control Panel, "Personalization"
2. Click "Change Desktop Icons" on the left side Quick Launch
3. Check [x] Computer and [x] Network; click OK


Note: This preference is stored with your profile and does not migrate when another user logs into the computer.

Related articles:
Streamline Windows 7 Start Menus
Exposing the RUN command
Cleanup Startup Programs (for faster boots, faster computers)
Windows 7 Initial Look (how to best install)
Fixing Slow Computers