
Acronis full system backups to an external USB drive were horrible -- 8 hours to backup 100G. Similarly, other large file copies were slow (see the glorious DirectoryPulse Backup program). Backups should only take about 20 minutes. This is not a problem with the backup.

Follow these steps - which must be done for each plugged-in
USB Device where you want improved speed. The drawback is you can't unplug the drive at will; you must use the system tray menu to eject the drive,
described below.
Even with these steps, I have failed with some types of USB drives. For external "spinny" drives (real hard drives), these steps have worked, but for some USB thumb drives, the results have not always worked. I am unclear why this is.
Multi-Step Solution:
In Device Manager, change the drive's USB Policy to "Better Performance" and turn off a Write Cache switch.
Press the Windows-R key ("Run")
Type "devmgmt.msc" (no quotes, do not yet press Enter)
Press Ctrl-Shift-Enter to open with elevated permissions (administrative mode)

(Starting in Windows 10/11, Microsoft made this so hard to run in administrative mode!)
2. Plug-in the USB drive and allow it to mount normally.
3. In Device Manager, expand the "Disk Drive" section,
In the details, locate the plugged-in USB drive.
For example, my drive is an external Seagate 5G disk, labeled "Seagate BUP". A second drive I own was labeled "General UDisk USB Device", etc.
Make these changes:
a. Other-mouse-click (right mouse) the drive, Properties
b. Click the [Policies] tab
c. Choose "[x] Better Performance"
Choose "[x] Enable Write caching on the device"
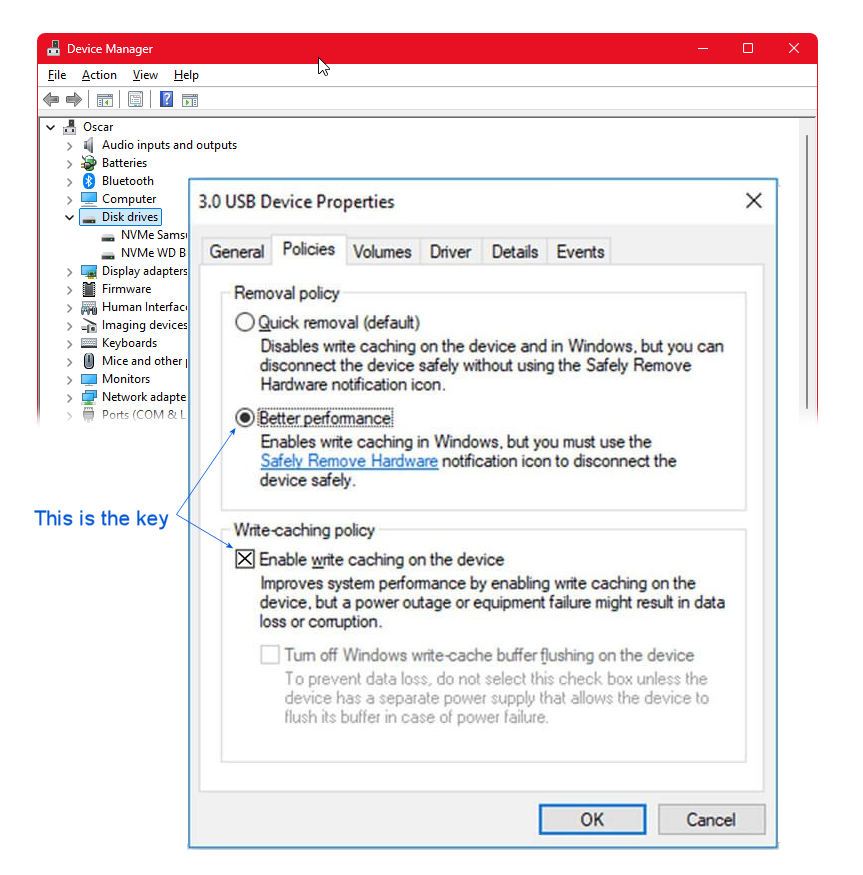
In Windows 11, some devices appear this way:
 |
| Click for larger view |
! Some devices do not have the [x] "Enable Write Cache" switch and I am
unclear why -- without that switch, the drive will not be able to run
any faster and this article will not be helpful.
Leave device manager open.
Power Changes:
4. Make this additional recommended change:
In device manager, expand "Universal Serial Bus Controllers"
Locate "Generic SuperSpeed USB Hub"
In the [Power Management] tab,
Uncheck [ ] Allow the computer to turn off this device to save power
(this keeps the drive from going to sleep during long-run backups and file-copies)
Click OK and close the control panel
5. Eject the disk and re-insert:
In the System Tray (Windows 7 illustrated), click the arrow to expand hidden icons;
Choose the USB icon ("Safely Remove Hardware and Eject Media);
"Eject the disk"
Unplug the USB cable.
Re-plug-in the disk for the changes to take effect.

6. Reformat the drive to remove "exFat" partition
Many external
USB disk drives come pre-formatted using an "exFat" partition -- which
makes the drive compatible with Apple computers. Revert the
drive to an "NTFS" partition in order to improve the speed.
Important: Confirm the drive-letter of your USB (aka Drive D:, E:)
a. Press Windows-R (Run) and launch a DOS Command Prompt
b. Type "cmd" (no quotes, do not yet press Enter)
c. Press Ctrl-Shift-Enter to run as Administrator (run with elevated permissions)
d. Type this command:
format e: /v:backupDisk /fs:ntfs /q
where the volume label, "backupDisk" is a cosmetic name and the file-system is NTFS. "/q" is a quick format.
e. Press Enter to format.
Formerly, this article recommended formatting the disk using non-quick (remove the /q switch) format. Experimentation showed no difference in the drive's speed. "Slow formatting was abandoned for a more practical reason. A 1 terabyte disk took nearly 24 hours to format. A 5 terabyte drive took better than 4 days.
Results:
USB Disk operations will be roughly a zillion times faster. The new backup took 23 minutes, which was a slight improvement over the original 8 hours. Everything, including standard file-copies to this drive, was improved.
Microsoft made a conservative default setting, which allows you to pull drives without fiddling around with software. But if you make these changes, you will have to exercise restraint when pulling a drive; you will have to use the System Tray menu to eject the disk.
Drawbacks:

If
you like to jerk the USB drive out when you are done with your file-copy, you may be in
trouble. With this change, you must click the system-tray icon and
eject the disk in a controlled manner. Out of habit, you should be doing
this anyway -- just to be safe.
Cameras seem to
corrupt their memory cards more-often-than-not and it is probably best to
leave the USB settings for this device unchanged, mostly because people tend to unplug cameras and run away; everyone is always in a rush..
If
you purchase a new USB drive, make these same changes.
Set one time per-device, regardless of which USB port it is plugged
into.
This holds true with thumb drives, cameras and
all other external writable drives. I have not researched, but there is
probably a global policy which can set this for all devices.
Hard Disk Cache
The local Hard Disk
has a similar setting, which I also enable on my own computers.
*Only recommended on
battery-powered laptops or on desktops with UPS protection.
A. In
Control Panel, Device Manager (run as Administrator), "Disk Drives"
Locate the hard disk (may be labeled as "ATA Device")
B. Select Properties, [Policies] tab,
[x] Enable Write Caching on the Device
[x] Turn off Windows Write-cache buffer flushing on this device (e.g. - check the box -- a double-negative)*
Related Articles:
Disk Imaging Cleanup Steps - Make your backups faster - All versions of Windows
Windows 11 Tuning
Windows Deleting unused apps
Windows 7 Explorer Changes
Streamline Windows 7 Start Menus


