2009-12-31

BullDoze - File Cleanup Utility

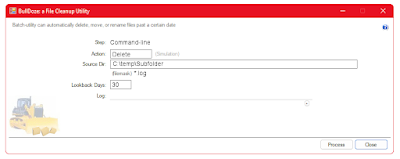
Download: File-delete utility for deleting old log files. The "BullDoze" utility can automatically delete, move or rename files older than xx days.

Corporate servers often have processes that generate temporary files and those files sometimes need periodic deleting. Classic examples include
  • Fax Server sent-fax folders
  • Medical Image Gateways and other image processing servers
  • Sharepoint Log files in the bin\12\logs folder
  • Temp directories, etc.

The issue is this: Deleting files is easy. It is harder to delete files older than (30) days and logging what was deleted is even more troublesome.  Bulldoze does all of this, and it runs unattended.

Free download.
No Adware, no spying, no registration, no email required. 
Does not call the mother ship; does not need an internet connection.
Just download and run.
Click for larger view


BullDoze Features

BullDoze.exe is a compiled program that has the following features:

  • It can Delete, Rename, Move, or MoveRename files
  • Triggers on a file-age; files older than xx-days
  • Can identify and delete millions of files
  • Optionally, aged files can be moved to a different (backup) directory

  • Command-line-driven
  • Auto-starts, runs, then auto-closes
  • The process can be run any number of times, against multiple directories

  • Full Logging is supported. Each process can log independently or all logs can be combined.
  • Schedule-able with Windows Scheduler or other
  • No installation required; No registry entries
     

Installation:

To install this program, download the .exe and place in any folder on your hard disk. 
Double-click the .exe to run - no installation required. 

Since keyliner cannot afford a signing certificate, you will be prompted that the file is not safe (being downloaded from the internet).  Click "more information" and allow the program to run.


Follow these steps for a more professional installation:

Copying the .exe from a download folder to a folder in your "Documents" folder is a quick work-around for other Windows security issues, but is an inappropriate place to put software.  Instead, it should be copied to Program Files so it gains the protection of other Windows security features. 

A.  Create a Program folder to hold the program:

Using File Explorer, open folder C:\Program Files

Create a folder  C:\Program Files\Util

B.  Download the .exe to a Download or Temp folder:

From Keyliner's public GDrive, click this link and download to a local temp or download directory.  Do not download directly into ProgramFiles


 keyliner's public GDrive Download Link:
BullDoze on Keyliner GDrive.


MD5:  67-67-89-3e-8b-39-5f-d5-d7-07-f5-57-a9-9b-6f-69

SHA-256:
7645f44e8c9ff2d424ed1aa1337fe5fca145e71f7d8594b77d5705b1feb85a8a


When downloading, different browsers behave differently.
You will be prompted the file cannot be scanned.  Click "Download anyway"

Microsoft Edge:

Prompts "BullDoze.exe" was blocked because it could harm your device. 

"Click See More" and allow the download.  With Edge, the file will appear in your Downloads directory with a random name, "Unconfirmed 780359.crdownloaded" (name varies). 

Rename the file to "BullDoze.exe".


C.  Mark the program as safe-to-run:

(This step may not be needed if downloaded by Edge and you clicked "More / Download Anyway")

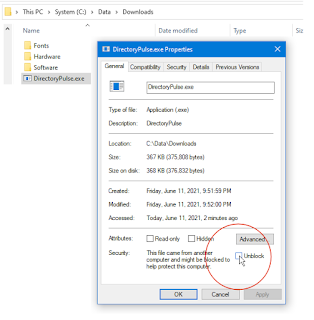
Using File Explorer, right-mouse-click the downloaded (and re-named) .exe
Select "Properties"
Check [x] Unblock.  This removes the "mark of the web." 
                 Click for larger view

* Only do this if you trust keyliner *and* only if downloaded from keyliner's public GDrive. 

If "Unblock" is not visible, it has already been unlocked (by Microsoft Edge).
Once [x] Unblocked is clicked, this security menu disappears.
You may be prompted for security UAC/Windows credentials. 

 
D.  Copy the .exe to ProgramFiles\Util:

Using File Explorer,
Copy/paste the .exe from the temporary/download folder
    to C:\Program Files\Util

Do this copy as a two-step, copying from the download folder into Program Files.  Windows security will not let you download directly into Program Files (technically, you will not be able to remove the "mark of the web" if downloaded directly into Program Files).


E.  Create a Start Menu Tile:

Using File Explorer, in C:\Program Files\Util
Right-mouse-click the executable and "Pin to Start"

The program is ready to run.  See icon on Start Menu.


Generally, BullDozer.exe is copied to a UTIL directory, or it can be placed directly in the directory you wish to cleanup (it never deletes itself or its own control files).


Command Line Parameters

BullDoze must be launched using command-line parameters and is not meant to be run interactively.

The reason this is a command-line-driven application and for safety, once launched, you cannot enter or change parameters on the screen. This program is capable of deleting large swaths of disk, and for this reason, it must be launched deliberately.

It can be run with all parameters typed on single command, or it can call an INI file, which can contain one or more separate command-steps.


Example Command Line:
BullDoze.exe Action=Delete SourceDir="C:\Temp" Files="*.*" Days=90 LogResults=Y

where all files older than 90 days, any extension, will be deleted from C:\Temp. Results are recorded in the current directory in file "BullDoze.log". This is typed as a one-line command and can be placed in a batch file or in Windows Scheduler.

Optional parameters are in italics:

Action=DELETE, RENAME, MOVE, MOVERENAME
SourceDir="directory\path"
Files="*.*"
Days=nn | Days=-1 to delete all files unconditionally
LogResults=y/N | LogResults="C:\path\filename.log"
AppendLog=y/N
DestinationDir="directory\path" (if using MOVES)
Overwrite=y/N (Allow overwrites on Moves/Renames)

Comments:

  • All parameters are keyword=value pairs. e.g. Action=DELETE
  • Parameters are not case-sensitive
  • Embedded spaces are not allowed unless enclosed in quotes. e.g. SourceDir="C:\Test folder\directory"
  • Do not use spaces as in (Action = Delete)
  • Source and Dest directories can be \\server\path names
  • Client must be pre-authenticated to remote servers
  • Bulldoze runs as the current user; use Windows Scheduler to run with different credentials


Command-Line via INI file

Bulldoze.exe C:\data\myBullDoze.ini

Instead of a long command line, which is limited to just one delete transaction, an INI file can have two or more separate delete steps, and each step is given a cosmetic name.  Here is a sample INI file:

;BullDoze Command INI file

[General]
AppendLog           = N
LogResults          = C:\temp\testLog.log   ;Y/N or a filename
StartupTimerCount   = 4                     ;Delay in seconds before
                                                  launch; 0 to disable
VerboseLogs         = Y
SimulateSteps       = Y
Diagnostics         = N


[CommandLine-like Example]                  ;cosmetic step name
Action              = DEL
SourceDir           = C:\data\test
RecurseSubDirs      = N
DeleteDirs          = N
Filemask            = *.*   ;(Filemask *.* assumed if blank)
Days                = 14
DestinationDir      =
Overwrite           =

[SimpleFileDelete, Do not traverse Subdirs]   ;cosmetic step name
Action              = Disable
SourceDir           = C:\data\Test
RecurseSubDirs      = N
DeleteDirs          = N
Filemask            = *.dork
Days                = 15
DestinationDir      =
Overwrite           =


Typical Use:

From a server, open the Control Panel, Scheduler
Add a new task, calling BullDoze.exe.

While building the schedule, click Advanced properties, and add the parameters.
Let Windows Scheduler run the program once per day. Details on this step needed; sorry.


Parameters:

Action=Delete
In-use, write-protected, insufficient-rights, files are not deleted. Failures are recorded in the (optional) LOG file and will not cause the program to fail.

Action=Move
Requires a DestinationDir.
If the file already exists in Destination, it will not overwrite unless "OverWrite=Y" is explicitly stated.

Action=Rename
Renames the file, leaving it in the current directory.
Renames are OriginalFileName_yyyymmdd_hhMMss.ext
If file has already been renamed within the same day, it will not attempt a second rename unless OverWrite=Y.
Rename with date-time stamp is the only option supported at this time.
Failed Renames are logged.

Action=MoveRename
Moves the file to the DestinationDir and renames, following the same rules, described above.

SourceDir=
Path must pre-exist
Path can be in the form "C:\path\path" or "\\server\share\path"
Quotes should be used on all paths; required if embedded spaces
If server path, client must be pre-authenticated prior to running BullDoze. This will be a future enhancement.
Do not use file-masks in the SourceDir (see Files=)
Generally, the SourceDir is on the same machine as the program.

Files=*.*
Standard DOS file masks are supported.
Examples: *.* All files eligible
*.LOG only (delete) Log files
2009_*.LOG, etc.

DestinationDir=
Required if MOVE or MoveRename

Days=nn
Specifies the age the file must be, in days, before the action is taken.
e.g. Days=30
Use Days=-1 (no spaces) to delete all files, regardless of age.
Days=0 is illegal.

LogResults=y|N
If not specified, results are not Logged.
If LogResults=Y, a default log file (BullDoze.Log) is created in the current DOS directory.
If LogResults="C:\Filename.exe", "Y" is assumed and this log-name is used.
Log files can be stored in the SourceDirectory and are not deleted.
Log Files are a standard ASCII text file, viewable with Notepad.
Subsequent runs overwrite the log file, replacing the older copy, unless AppendLog=Y.

AppendLog=y|N
If AppendLog=Y, log entries append, newest last. Caution, log files can get large. This utility will not manage its size and it can grow very large. Use with caution.

OverWrite=y|N
During a Move or Rename, if the destination file already exists, it will be overwritten if this switch is set to Y. Otherwise, the file fails and is logged. Generally, all MOVES and RENAMES should allow overwrites.


Update:
I just used this program to delete 1.8M files (yes, that is in Millions) from a Rightfax server.  It worked swell, although I could see a minor problem in the display, where it did not report "deleting" until several minutes into the process.  This is a cosmetic issue.


Version 1.01  - 2022.05 Re-compiled using Visual Studio 2022 and dotNet 4.8
Version 1.00 - 2019.12  Initial Release

Suggestions are welcome. I'd like to know if you use the program, drop me a note here on this blog.

Keywords:
auto-delete
automatically delete old files
cleanup old files
bulldozer file-delete

2009-12-28

Windows 7 and Vista Network Problems

Windows 7, Windows 8 and Vista laptops may have problems with "Unidentified Networks" and broken network connections. This article discusses the solution, mainly by disabling IPV6.  This works on all Windows 8, 7 and Vista computers and is likely due to a conflict with older routers.  This article also describes a fix for the Teredo Tunneling Pseudo Interface and the Microsoft ISATAP Adapter.

"The network crashed"
"Laptops crash the network"
"The laptop kicks off the other users"
"My new Windows 7 (Windows 8) computer crashes the wireless network"

This article permanently fixes the problem.

Symptoms:
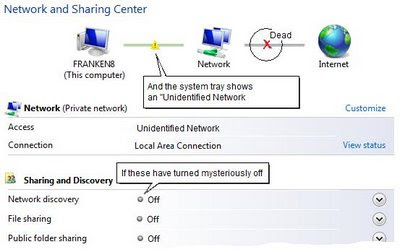
  • Windows 8 / 7 / Vista report an "Unidentified Network" error.
  • Task-tray icon shows "Access: Local" only; no Internet
  • Network Discovery and File Sharing may mysteriously turn off.
     
  • You may loose both your intranet and Internet network connections.
  • Other wired desktop computers in the same network may temporarily loose their network connections.
  • The entire home network may "crash" when a laptop connects to the Wireless.

  • The laptop has an Intel 3945ABG Wireless Network adapter or related cousins; or a Atheros AR5007 Wifi Adapter (Readers suggest other network cards are also a problem -- indicating this is really a problem with the Router). 
  • Likely, this is an older wireless router.
In Vista and Windows 7, the Network control panel will look similar to this; Windows 8 will show "Not Connected" and will imply no network connections are available:


Interesting Update: 2012.05:
This is an issue with older Linksys routers, such as the WRT110.

Today, I retired that router and replaced it with a keyliner reviewed: Linksys EA2700.  The new router behaves properly when PCs have a mixture of IPV4 and IPV6.  These steps listed here allow you to keep using an older router with newer operating systems. 


The following steps can be applied in any order.  
I recommend applying these changes to all wired and wireless Windows 8, Windows 7 and Vista computers on the local network.

Do not use these steps for Windows XP machines, which may also reside on the same network.


1. Disable the DHCP Broadcast Flag

Note: The first two steps above could be considered somewhat optional.
Steps 3 through 8 actually "fix" this problem.

Edit the Registry and modify a DHCP Broadcast flag setting.

This does not disable the feature but it does change the order DHCP addresses are discovered. As dangerous as this sounds, it is benign, only changing how DHCP is searched. These instructions assume you know how to edit the registry; if not, please talk with a knowledgeable friend.

a. Start, Run "Regedit" and tunnel to this HKLM key
See this article for instructions on exposing the RUN command or type WindowsKey-R.


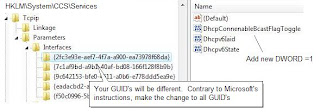
HKey_Local_Machine\System\CurrentControlSet\ Services\TCPIP\Parameters\Interfaces

b. In the key you may find multiple {GUID}'s -- especially if you are working on a laptop.

Within each populated {GUID} key:

- select Edit, New,
- Click DWORD-32 Value
- Create/name "DhcpConnEnableBcastFlagToggle"
- Press Enter

c. Double-click the newly-added value, Set value to (Hex) 1 (one).


d. Make similar changes to the other GUID's.

Leave Regedit open for the next step.

For reference: See Microsoft article: http://support.microsoft.com/kb/928233/en-us for details. Note they are vague by saying "click the GUID that corresponds with your network adapter." They do not explain how to tell which GUID belongs to your wireless. It is safe to make this modification for all network adapters.


2. Disable TCPIP6

Windows 8/7/Vista supports the new IPV6 IP Addressing scheme, which is great, except the entire world still uses the older IPV4 standard. There appears to be conflicts between this new protocol and most home routers. Here is how you can safely disable it. Note: In order to properly disable the protocol, you need to make changes in the Control Panel *and* in the registry.

Still in Regedit, continue with these steps:

a. Tunnel to

HKLM\System\CurrentControlSet\
Services\TCPIP6\Parameters


* Note: this is not the previously-edited TCPIP key -- this is one folder down *


b. Create a new DWORD-32 value:

Name: "DisabledComponents"

Set the value equal to (hex) "ffffffff"
(8-f's in a row. Decimal 4294967295)

This change is only required one time in the registry, regardless of the number of network adapters. Detailed reference on IPv6, see this Microsoft article: http://www.microsoft.com/technet/network/ipv6/ipv6faq.mspx.

Microsoft has a warning when disabling this protocol: If you disable IPv6, you will not be able to use Windows Meeting Space or Windows Home Gruoups. However, regular peer-to-peer networking works. My opinion: if you don't use Home Groups, this is still a good fix to apply (2010.01.29 - trw)


3. Cleanup old Network Connections:

There are two keys to look for:

a. While still in Regedit, tunnel to:

HKLM\Software\Microsoft\Windows NT\Current Version
\NetworkList\Profiles


b. Click on each numeric {GUID} key and note the internal names (e.g. HomeNetwork, My School, etc.).

c. When you find the network that is failing (at your house), press Delete and delete the entire numeric {guid} key. If in doubt about which entries to delete, delete all of the GUID's -- this is what I do.

d. Tunnel to this next key (directly below):

HKLM\Software\Microsoft\Windows NT\Current Version
\NetworkList\Signatures\Unmanaged


e. In the Unmanaged key, find two similarly-named network {GUID}'s.   Delete (both) key-folders.

For example, my computer has two unmanaged folders:
01013000f000f008....D6D7
01013000f000f008....C7F6

The deleted folders (GUID keys) rebuild in a moment.

f. Close Regedit


4. Disable IPV6 on the Cards

a. in Control Panel, "Network and Sharing Center,"
(or See this article for instructions on exposing the Network Desktop icon and choose Network Neighborhood, "properties).


b. On the Control Panel's left-menu


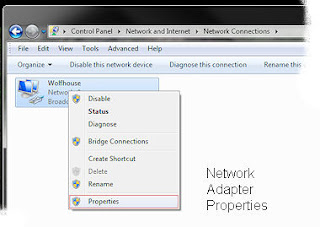
Windows 7 users: Click on left, "Change adapter settings" (or type: Start Run, "ncpa.cpl")
Vista users: Click on left, "Manage Network Connections"


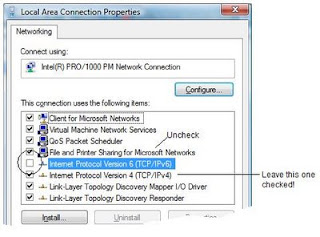
c. From the displayed adapter list, other-mouse-click your (wireless and or wired) Network Adapter, select "Properties".

d. Uncheck [ ] "Internet Protocol Version 6 (TCP/IPv6)"
(leave [x] IPV4 checked.)


When you uncheck the current, active IPV6, and click OK, Windows 7 and Vista will prompt to re-select "home/work/public". Choose the appropriate type of network connection; for most, select "Home."

Windows 7 and Vista will next prompt "Share with other home computers running Windows 7".
Click Cancel.

e. Do the same for *all* other Network adapters, unchecking [ ] IPV6 -- even if they are not connected or you are not using them.  Uncheck for Bluetooth and other copies of the existing wireless that might exist. Also uncheck IPV6 on the Wired connection.


5. Reboot for these changes to take effect.

You must reboot before proceeding to the next step. Upon reboot, the PC may prompt to re-establish the wireless internet connection. Choose "Home Network" or "Work Network", as appropriate.


6.
Teredo Tunneling or ISATAP

Once rebooted, continue with this step.

If you are using an Intel Wireless driver or an Atheros adapter (possibly other brands), open the Control Panel, "Device Manager," and scroll to the Network Adapter section.

You will likely see a failed "Teredo Tunneling" yellow-bang icon.
  • "Teredo Tunneling Pseudo-Interface
    (yellow-bang and 'This device cannot start. (Code 10)').
or
  • Microsoft ISATAP Adapter (yellow-bang on multiple items 'This device cannot start (Code 10)'
These are protocols allowing IPV6 traffic to tunnel over IPV4 routers. Because IPV6 has been disabled, these protocols should also be turned off:

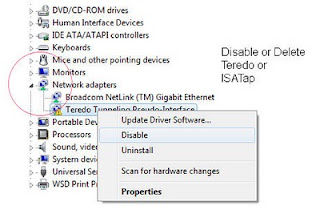
a. In Control Panel, Device Manager, "Network Adapters",

other-mouse-click "Teredo Tunnelling Pseudo Interface" or the failed ISATAP adapters
Choose "Disable" (or optionally press the keyboard's Delete key)

This assumes you have disabled IPV6 in the steps above.


7.  Repeat these steps on all Windows 7, 8 and Vista machines in the network.


8. Set Power Settings keeping the network adapter at full power

Optional:  If you are working on a laptop computer, consider these steps because some laptops do not recover from power-save mode on their wireless adapters. If you have reasonably modern equipment, skip this step:

a. Click the System Tray Battery Icon (or Control Panel, "Power")
Choose "More Power Options"

b. Under "Balanced",
Click "Change Plan Settings"
Click "Change Advanced Power Settings"

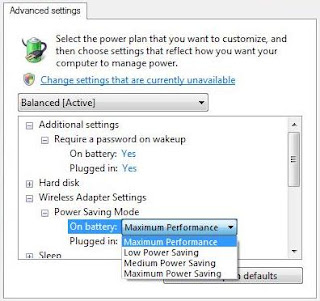
d. Tunnel to "Wireless Adapter Settings, Power Saving Mode"

e. Change "On Battery" to "Maximum Performance"
Click OK to save

f. Repeat these steps for the "Power Saver" profile.


See Microsoft Article http://support.microsoft.com/kb/928152 for details on this issue. Obviously, this affects battery life.


Other things that can cause network failures:
These steps are optional or may not apply to your computer.

9. McAfee Security Suite.

Check to see if you have an expired McAfee Security suite. If so, un-install all McAfee products. When it expires, it reportedly disables the firewall and this can also appear as a failed network connection. My opinion: Uninstall it even if it is not expired and install Microsoft's Virus scanner. See this keyliner article: MSE.


10. Installed iTunes, Safari, Adobe CS3, or GizmoPhone

Look in Control Panel, Administrative Tools, "Services" and look for a
Bonjour DNS Responder Service
##Id_String2.6844F930_1628_4223_B5CC_5BB94B87 9762 ##

If found, mark the service as "Disabled" and reboot. (This is from a Windows7Forums.com thread). I have admittedly not seen this myself and would appreciate more precise steps.

11. Update your wireless drivers to the latest version

Optional:  There are known bugs with IPV6 processing on Intel network adapters and it is always a good idea to upgrade to the latest versions. Unfortunately, those of us who upgraded to Windows 8/7, may not find appropriate x64 drivers. Resolving this will take research and the details are not discussed here.

If the control panel shows a default Microsoft Network drivers; these should be upgraded to the vendor's real drivers.
Contact your OEM vendor or check your shipping manifest for the correct network card. For laptops, the Wired and Wireless will use different drivers; usually an Intel driver. See this Intel link for an index of all versions: Link


Note: Microsoft Update periodically updates drivers, but I still recommend using the vendor's (usually Intel) latest versions.

12. Upgrade your Router's Firmware

Optional:  I recommend upgrading your home router's BIOS / Firmware to the latest version - admittedly this is a technical step. If you are comfortable with this type of work, see this Keyliner article: Upgrade Linksys WRT110 Firmware or check the Vendor's site for details. Skip this step if you are not technically inclined.

If you decide to upgrade the firmware, you can do this after all the other steps in this article. Linksys routers have had some bug fixes in this area and I've moved this higher in the list. If the local network continues to crash after performing the remainder of these steps, update the router's firmware.

Unconfirmed: Newer routers may not exhibit these network problems.


Last-Ditch Efforts if all else fails

The steps above solved the Windows 7 / Vista "Unidentified Network" problem for dozens of  computers that I have worked on -- but I did find one laptop where these steps failed. Here are additional things you might consider. These last-ditch steps are roughly described and are meant for technical users.

Last Ditch - 1. Confirm the NIC's MAC address:

* From a DOS prompt, run this command:

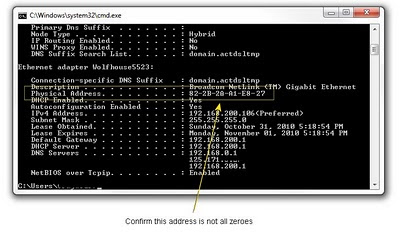
ipconfig /all

* In the displayed list, locate your adapter (laptops will show two adapters; look for the Wired or Wireless one you are using). Confirm the Ethernet's "Physical Address" (the MAC address) has a legitimate value.

Address look similar to this: 84-2C-2A-A1-22-8F (varies - anything but zeroes)


* If you have all zeroes 00-00-00-00-00-00 (00:00:00:00:00), then something is amiss.

Consider doing one, but not both of the following. If you have a legitimate MAC address, skip to "Last-Ditch 2":

Contact your OEM and download the latest Windows 7 (or at least Vista) driver and have it stored locally. Then, in Control Panel, Device Manager, "Network Adapaters", delete the offending network card. Reboot and re-install the driver - saying "Have disk." Confirm this fixes the problem and confirm the card was assigned a valid MAC address.

Or do this option: In Control Panel, Device Manager, Network card: Other-mouse-click the offending adapter, "Properties", "Advanced." In the Network Address property, type/invent a new MAC address (00-00-00-00-00-00 (6 pairs of numbers, no dashes or colons)) - using random numbers and letters A-F. (Note: when editing this property, it is normal for this field to report "not present" - which means it would prefer to automatically get a MAC address). Reboot to test.

On this particular laptop, I noted it connects to other WPA-Personal networks without a problem. One suggestion, which I did not try, was to change its MAC address to another random address -- even though this machine's original address was valid.


Last-Ditch 2: Change your encryption

If the IPCONFIG /ALL command shows a valid MAC address, consider this poor solution, which was recommended by Linksys support. On one particular laptop, this poor-excuse-for-a-real-technical-solution worked. While this "solved" the problem, it introduced others:

I'd bet you are using the recommended "WPA-Personal" TKIP encryption on the Router and the router is possibly so old that it does not properly support WPA-Personal TKIP encryption.

Linksys recommended re-configuring the router to use the older WEP (40-byte encryption standard). In this particular case, it solved the network disconnect problem -- but WEP is an older, slower, and hackable encryption that is no longer recommended. Plus, this forces you to re-configure all other computers, Nooks, Kindles, iphones, and other devices in the network to match this connection.

Before I did this solution, I'd try changing the MAC address. If you reach this state in your problem, write with your experiences.

Conclusions

Admittedly, disabling power save features and other registry changes are not elegant solutions, but these changes solved my networking problems on a half-dozen computers. The real solution is to have all the computers on the network with full support for IPV6 and most of us will have to buy newer routers that properly support IPV6. Additionally, the ISP's need to support IPV6 - and my understanding is most do not.

Finally, tunneling through the Toredo interface seems like a poor solution and it probably entails its own set of bugs. Deleting IPV6 and Toredo seems to be the most stable solution, for now.

Your comments and experiences on this are welcome. Please leave unregistered, anonymous comments below.

These steps will not solve the problem where a laptop is on one wireless network, goes to sleep and wakes on another (I am still looking for a solution to this) - to date, the best solution is to reboot the computer.

Related Links:
This is an interesting article on why Windows 7 should enable IPV6: Why IPV6 is worth the Bother. However, even with this article, I did not bother. The author points out that Windows 7 incorrectly implemented IPV6 and this command will help resolve the problem: netsh interface ipv6 set global randomizeidentifiers=disabled -- but even with this, most of us still have other hardware issues to contend with -- we need newer routers.


Related articles:
Review: Linksys EA2700 
Vista Spiffs
Optimizing the Swap File
Vista UAC Nags
Upgrade Linksys Firmware

Linksys EA2700 Smart Wi-Fi Router App enabled N600 with Gigabit

2009-12-06

Windows 7 - Show MyComputer Desktop Icons

Howto: In Windows 7, use these steps to put the Computer and Network (MyComputer, MyNetwork) icons on the desktop.

Use these steps to expose / display the Desktop icons for "Computer" and "Network"

Steps:

1. Start, Control Panel, "Personalization"
2. Click "Change Desktop Icons" on the left side Quick Launch
3. Check [x] Computer and [x] Network; click OK


Note: This preference is stored with your profile and does not migrate when another user logs into the computer.

Related articles:
Streamline Windows 7 Start Menus
Exposing the RUN command
Cleanup Startup Programs (for faster boots, faster computers)
Windows 7 Initial Look (how to best install)
Fixing Slow Computers

2009-11-18

Excel - Import Leading Zeroes

HowTo: Import numbers into Excel without stripping, truncating or loosing leading zeros. A classic example are zipcodes being imported from an external source. Codes, such as "08401" can import as "8401".

When Excel imports numbers, it assumes the "General" format for each column. Fields, such as part numbers, zipcodes, SSN, and other non-numeric numbers will have leading zeroes stripped because Excel thinks they are real numbers. Prevent this by forcing the import as TEXT.

In order to do this properly, you must run Excel's Import Wizard (steps 1 through 3). For this article, assume a simple tab-delimited data file with City names, State codes, and ZipCodes (file columns may not line up this pretty in your actual data file):


Launch Excel and start at a blank sheet

1. Select File,Open: Tunnel to your test data file. Be sure the file extension is .txt, .tab, or .csv in order to trigger the Import Wizard

2. On the 'Text Import Wizard', step 1 of 3, choose "Delimited"

3. On step 2 of 3, choose ([x] Tab)

4. Here is the key to the problem:

On step 3 of 3, click the first column, then Shift-Click the last column (highlighting all columns). Select Option "Text" and complete the import. (Most files should import all columns as text. Optionally, you could select only the ZipCode column.)


Results in Excel will look like this:


Related Keyliner Articles:

Excel UDF (User Defined Functions)
Using Excel for Raffle-Ticket Drawing: Prizeorama
Excel VLookup - a complete tutorial
Excel Coloring Alternate Rows
Excel Parsing City-State-Zip
Excel Importing Text with Leading Zeroes
VB - Return First Word, Last Word, Supertrim
Using VBA to Send Email
Using Excel to select Raffle Tickets - Prize-orama

2009-11-09

Microsoft Product Activation

Reference: U.S. Microsoft Product Activation phone support: 1.888.571.2048

Microsoft's Product Activation phone support number is impossible to find. All Microsoft pages refer you back to your computer (Control Panel, System) but that hardly works when the computer's Activation is awry. It took me several hours to find this number.

US Product Activation (Windows 7) voice number: 1.888.571.2048

When installing Windows 7, I recommend waiting to Activate your product for as long as possible. This way, if something blows up (while fiddling with obscure drivers, for example), you do not have to call Microsoft and beg for your license again.

2009-11-06

Windows 7 / 8 Exposing the RUN command

Howto: Reference article: How to Expose the Start Menu's Run command for Windows 8, 7 and Vista. This is an excerpt from this article: Streamline Windows Start Menus

Windows 7 / Vista - Expose the RUN Command:

The Run command is a handy way to launch programs like Notepad, mspaint, and other obscure programs, where you know the name, but not the icon. Often, typing Start, Run, "notepad" is faster than finding the icon. By default, the Run command is not visible on the Start Menu; here is how to expose it.

Click image for larger view; click "right-x" to return

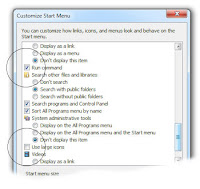
1. "Other-mouse-click" the Start-button, choose "Properties"
2. Click the "Start Menu" tab
3. Click button "Customize"
4. Check "Run Command"


Other Recommended Changes:
Check [x] Network
Uncheck [ ] Use Large Icons


Windows 8 - Expose the RUN command

1.  From the Start Page, "other-mouse-click" the background (or swipe from bottom).
Click "All Apps"


2.  From the Charm menu, search for "Run"


3.  "other-mouse-click" the Run tile, choose pin to task bar


Use these same steps to expose the Command Prompt icon or Notepad.

Related article with other cleanup steps:
Windows 7 Streamline Start Menu
Start Menu Cleanup (removing unneeded startup programs)

2009-09-08

Fixing Slow Computers

General thoughts on the causes of a slow computers; high CPU utilization. These steps fix most slow computer problems. Many solutions will direct you to other articles with more details (such as Virus cleaning).

If you have a slow computer, one that boots slowly, or runs slowly, here are some broad diagnostic steps you can take. For most computers, these steps will fix the problem. Linked articles show how to resolve various issues. These steps will work with both Windows XP and Vista.

See also this article on "Slow Keyboard Response in Windows 7"

Slow Boot Times:

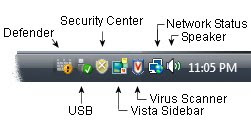
1. Look in the System Tray (Taskbar's lower right corner).

If there are a lot of icons (a subjective number, say more than 8 or 9 icons), then you probably have may have too many startup programs -- many of which are expendable.

I consider this a healthy System Tray:


See this article on how to remove unnecessary startup programs:
Cleaning Startup Programs

2. Look for hidden startup programs.

Although a cluttered System Tray is an obvious indication of a problem, there are probably three-times as many hidden startup programs.

Most computers have too many things running in the background. Things like printer driver updates, Adobe Acrobat updaters, Java schedulers and others all conspire to clog your computer with crap. The same article, "Cleaning Startup Programs" will diagnose theses issues and I typically get significant boot and run-time improvements.

Same article: Cleaning Startup Programs

Slow Run Times:

If, after booting, the computer still runs slowly -- where launching programs always has long hour-glasses and the computer just "feels sluggish," consider these steps.

1. Test the amount of RAM

Start the computer and launch your normal programs, such as word processors, browsers, spreadsheets, etc. As the programs load, look at the computer's hard-disk light (even laptops have a hard-disk activity light). If the hard-drive has a lot of activity -- say 15 or 20 seconds of solid drive-light, then you are probably out of physical memory (RAM). Consider upgrading the computer's memory.

2. Look at the total Memory:

To see how much RAM is installed in your computer:
  • Launch Windows Explorer
  • Locate "My Computer"
  • Other-mouse-click and choose Properties
  • Total RAM is listed
Recommended RAM

Windows XP:
Minimum Recommended 1G RAM
Ideal: 2G RAM
Maximum: 2GB RAM (additional memory is wasted with XP)
Tolerable: 768K (for browsing and light word processing tasks)
Insufficient: 512K (time to buy more)

Windows Vista:
Minimum: 1G RAM (for light browsing and word processing tasks)
Ideal: 2 to 4GB
Maximum: 4GB (assuming Vista 32-bit -- most common)

Windows 7:
Minimum Recommended: 2GB RAM
Ideal: 2 to 4GB
Barely Tolerable: 1GB (for light browsing and word processing tasks)

How to Upgrade:
Memory is relatively cheap. I like to buy from Crucial.com. The site will help you choose the correct RAM to purchase and how much to order. Before buying, open the computer's case and look at the current memory slots to see if any are available. You will also find full instructions on the site. Memory is easy to install and even inexperienced people can do the upgrades.


Do not panic if you are out of physical memory slots; order all new memory and discard the older, smaller chips. When buying memory, always buy in pairs. For example, if you need 2GB, buy 2 (1-GB) chips. If you would like 4GB, buy either 4 (1GB) chips or 2 (2GB) chips.


VIRUSES and SPYWARE

Viruses and Spyware account for many slow computers. Infected computers are so busy spying on your keystrokes and sending reports back to the mothership, that there is often little time for legitimate activities. Sleuthing takes considerable time.

3. Test CPU Utilization
(See also this related article with similar steps: CPU Utilization Diagnostics)
  • Close all running programs, including music players, spreadsheets, and others. (You can leave this browser window open but make sure you are not playing a video or something in another window).

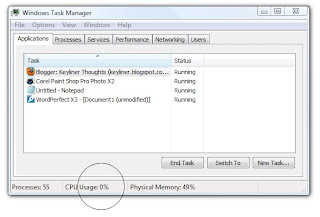
  • Other-mouse-click a blank area on the task bar and choose "Task Manager". At the bottom of the panel, note the CPU usage. CPU percentages of 1 to 3% are ideal.


Idled computers with CPU utilizations of 5% - 35% indicate something is suspect and it may or may not be serious. In this case, clearly a single browser-window should not tax a computer's resources. This can be caused by a number of different things, with more details below. For now, continue with the additional steps.

CPU utilizations of 50% or more means your machine is undoubtedly infected with viruses. Continue with the additional steps.

4. Disconnect and Test CPU Percentages

Although this is not a definitive test, disconnect the Network Cable or turn off the Wireless (Laptops have an Fn Key to disable wireless) and reboot, making sure you are not connected to the network as you reboot. If the high CPU values drop to lower numbers, then the machine is likely infected with viruses (many viruses go dormant if they can't see the Internet).

5. Assuming spyware and viruses, follow the steps in this article:
Win32/Cryptor Virus Removal.

Although it deals with a specific virus, the steps here are generally useful for all viruses and spyware. Follow all the steps, using ComboFix instead of RootRepeal. This will take several hours to complete the steps recommended.

If spyware and viruses are a problem, seriously consider changing from Internet Explorer to Firefox or some other browser. These browsers, by their very nature and design, are less susceptible to picking up viruses (they do not run ActiveX programs).


Other Software Issues

If an idled machine's CPU utilization is low (2 - 7%), but the computer is still sluggish, consider these thoughts:

* Symantec (Norton) AntiVirus:

If you have Norton/Symantec AntiVirus, versions 2009 or older, do these steps:

a. Un-install the software using the Control Panel's "Add Remove Programs" (Vista: "Programs and Features"). Uninstall all Symantec products, including the Symantec Updater.

b. Reboot.

c. See if the machine behaves and "feels" faster.

Note: I have seen while this software is installed, CPU utilization still only shows about 3% -- but the machine still behaves poorly, as if it were at 90%. I have worked on dozens of otherwise healthy computers and uninstalling all Symantec software has been the #1 solution for slow computers (I kid not).

This means you will need to find another anti-virus vendor and yes, you may have wasted your money. The number of times this has fixed a slow computer has been remarkable. This assumes the scanner is not downloading updates or is running a background full-system scan.

I am not on friendly terms with most commercial virus scanners -- especially the consumer-grade "suites." They seem to do too much, consume too many resources, and are overbearing when the subscriptions expire. I no longer recommend Norton/Symantec and am leery of McAfee.

Reportedly, Norton 360 behaves better, but I have not tested it or seen this with my clients. In this article you can find reviews of various anti-virus vendors:
Article: Cleaning a Virus

* AVG 8.5:

If you have AVG's virus scanner, and are seeing CPU utilizations of 25% or more, see this article on how to correct the problem. Other free virus programs are also recommended in this article:
Article: AVG CPU.


* Printer Drivers:

I have seen several machines with multiple printer drivers installed. For example one laptop had 9 separate printers installed -- but they only owned two printers. Over the years they had retired numerous printers, leaving all of the old drivers and software installed. I only noticed the problem because all of the printer-driver icons were still in the control panel. If you have a history of buying a lot of printers, consider this possibility.

Even though the printers were from the same vendor (Canon, HP, etc.), each printer installed its own set of programs. The computer spent all of its time asking each of the 9 printers, "are you there... hey, where are you? How's the ink level? Yo!, why don't you answer me? I'd best check even more often...."

To solve: Delete the printers from the Printer Control Panel, then go into Add-Remove Programs and uninstall all of the monitoring software. It may be a challenge to find all of the programs that a printer may have installed. For example, an average HP printer seems to have a half-dozen programs. It may be easier to de-install *all* printers and printer-related software, then re-install the printer you own.

When I install printers, I always go to the vendor's support site and download the "Drivers Only" driver; I seldom want to install all of the junk that most printers come with. I have not had enough experience with multi-function printers to have a strong opinion about what needs to be installed; your comments on this are welcome.


Slow Browsing Speeds

If the computer is generally fast but browsing speeds are slow, then you are likely infected by spyware. To properly test this, turn off all other computers in your (home) network -- just to make sure they are not causing bandwidth issues. Then follow the Virus and Spyware steps listed above.


Hard Disk

If your hard-disk "thrashes" (lots of disk activity on seemingly minor tasks), then do the following:
  • Check total Free Disk Space
  • Consider Defragging the Hard Disk
A PC needs about 20% free disk space in order to operate properly. If you are consistently pushing against this, this will cause problems with surfing (insufficient cache space) and with overall system performance.

Follow these steps to recover space, including un-installing unneeded programs and flushing your email-cache. If this fails to gain enough space, it is time to buy a larger hard drive -- which half-jokingly means a new computer. If you have a laptop, be aware those hard drives are easily upgradable.
Article: Disk Cleanup Steps

Defragmenting has small performance benefits, but do not expect miracles. See Windows XP Help for steps on how to do this. I recommend defragmenting Windows XP about once per quarter. Vista will automatically defrag if the machine is left on during its normal defrag-schedule (see Help for more details).


Cluttered Start Menus:

If the start-menu is cluttered, it can be streamlined with these steps. This will not make the computer faster, but it does make it more pleasurable to use:
Article: Streamlining Start Menus


Old Computers:

It is easy to say that old computers should be replaced. But with many of my clients, all they do is surf the web, check email, play solitaire and run a word processor. Even a 5 to 7 year-old computer can handle these tasks -- and look at the new Netbooks; these are not the most powerful machines on the block and yet they are still adequate.

Admittedly, a new, low-end computer is only about $400 -- and it is leaps-and-bounds faster than some of these old dogs -- but it is still significant work to move software and data.

There is no doubt that a faster computer can help, but if the user has systemic problems with viruses and tons of installed and de-installed software, then a new computer will not fix these issues.

In some cases, it might be best to reformat the disk and re-install the operating system. Of course, this is a boat-load of work:
Article: Re-Installing Vista (XP) from Scratch

Your comments on this article, as well as other suggestions are welcome. Symantec lawyers need-not reply.

Related Articles:
"Slow Keyboard Response in Windows 7"
Cleaning a Virus
Removing Virus and Spyware
Cleaning up Startup Programs
AVG CPU Utilization
Disk Imaging and Cleanup Steps

Simplifying Startup menus

Optimizing Swap Files (very geeky)
Rebuilding Vista from Scratch
Vista Spiffs and General Improvements

2009-08-24

Desktop Wallpaper Crops

Howto: Cropping photographs for desktop wallpapers, with the correct aspect ratio. Plus, you are welcome to have a copy of this image for your own wallpaper; instructions below.

I just came back from a delightful 3-day backpacking trip in Idaho's Sawtooth wilderness and was able to carry my Pentax K10 digital camera. This photograph was one of my favorites and I wanted it as my wallpaper. It took a few minutes to figure out how to crop the image properly. This article shows those instructions.

Downloading this image now:
You are welcome to download a full-sized version of this image for your own wallpaper.
This image has been cropped at 1440 x 900 and will scale with all wide-screen monitors. See below for instructions.


The Need for Cropping:


Standard photographs, when saved as a desktop wallpaper, become distorted because the aspect ratio for a photograph is different than a computer's monitor.  This is especially noticeable with people pictures. 


If the image is cropped properly, you will get a better fit on the screen.  Notice that Cropping is not the same as Resizing (see comments at the end of this article).

Although all photo-editors can crop, they are almost always limited to standard print sizes (4x6, 8x10, etc). Computer wallpapers, especially on the newer, wide-screen monitors, requires a different size.  It took me a few minutes to figure this out. 

Steps to Crop
(using Corel's PaintShop Pro; your editor may be different but the steps should be similar)

1. Find your monitor's screen resolution (Windows 7:  Control Panel, Personalization.  With XP: Control Panel, Display Settings). Note the size of the screen, in pixels.  In my case, the monitor is 1440 x 900.

2. Divide the two numbers to get the aspect ratio:
1440 / 900 = 1.600.

More modern computers have a movie-screen aspect ration.  For example, my laptop has a screen resolution of 1024 x 576, which is a 1.77 ratio, also known as 16:9.

My friend, Dutch, complained this was too much math. Here is a handy chart.


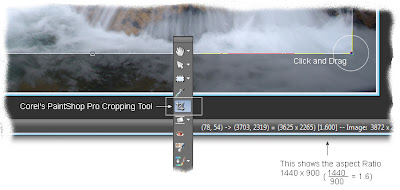
3. With Corel PaintShop Pro (or your photo editor), select the cropping tool. Click and drag.

In the lower-right corner, PaintShop Pro shows the highlighted size in pixels, but it is the next number that is of interest -- this shows the aspect ratio. With the cropping tool, click and drag across the image, dragging until the needed aspect is shown [in my case, 1.600]; this takes a steady hand.


It does not matter what size your original image was or how wide you drag the cropping tool; the only concern is the aspect ratio.

For example, the original image was 3872 x 2592 (or it could have been a postage stamp). Drag the cropping tool against the image until it is sized and positioned roughly where you would like it.  The only concern is the correct aspect ratio, which should match the monitor's ratio.Once the cropping window is sized, it can be moved and repositioned until it covers a composition that you like.

By definition, some parts of the picture will be cut (cropped). The final size could be at (1440 x 900) or (720 x 450), or any other fraction, as long as the aspect ratio is correct. Windows will re-size the image as needed when it is displayed.  With this said, better results (less pixelation, better colors) are found when sized the same or larger than the monitor's resolution, e.g., 1440 x 900.

4. Save the cropped image as a JPG file to your favorite photo directory. With Corel's product, click the "Crop as a new image button" on the cropping toolbar so you do not overwrite the original photograph.

Set the WallPaper:

5. Using Windows Explorer, locate the saved/cropped photo.
"Other-mouse-click" the photo and choose "Save as Desktop Background".

The image will now be on your wallpaper.


Download Instructions:

If you would like a copy of the example image for your own wallpaper, you are welcome to download it in one of two ways: 

1. Download from Keyliner's GDrive (recommended -- better image quality)
2. Download illustration from this page

To download from Keyliner's Public Gdrive:
GDrive Wallpaper link

or follow these steps:

A. Begin by clicking the photo to get to a larger size.
B. On the larger picture, "other-mouse-click" and select "Save Image As"
C. Choose a location/folder.
D. Use Windows Explorer to locate the file; 'other-mouse-click' and choose "Set as Desktop Wallpaper"

The photo stored by blogger is compressed.  Download from the GDrive site for a better quality picture.  .


Technical Details about the photograph:
Falls are approximately 3 miles north of Toxaway Lake, Sawtooth Wilderness, Idaho, USA

18mm APC lens; 10.2mpx Pentax K10
Polarized
1/8 second, f/5.6 @ iso 100 with +.7 exposure compensation, adjusting for the white.
Handheld on a wet rock.
This is a straight, non-retouched photograph 
August 23, 2009, by Tim Wolf, Boise Idaho
 
An Aside:

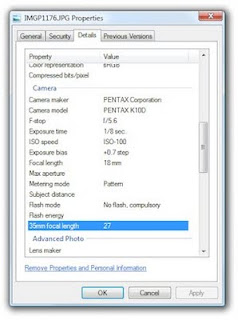
Digital Cameras record a remarkable amount of information on each photograph. From Windows Explorer, Other-mouse-click the filename, choose Properties, then [Details].


Related articles:
Commentary: Cameras and FotoSizer
Howto: Using FotoSizer
See also imageliner.blogspot.com


2009-08-18

Access 2007 Compact and Repair

HowTo: Access 2007 Compact and Repair Menu. Compacting removes deleted records, removes all prior (development) version of forms and reports and rebalances index files. Access databases will be more stable with periodic maintenance. If a database is active, I recommend running these steps monthly or quarterly. If you a actively developing VBA and Forms, do it more frequently.

Are you looking for the Microsoft Access 2007's Compact and Repair Menu?
Follow these steps:

Pre-Requisites:
A. No other users should be using the database; it is unsafe to compact while it is in use.
B. Recommend making a backup of the MDB (database) file prior to this step.

Steps:
1. Open the Access Database
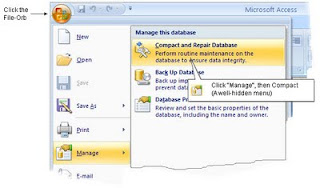
2. Click the File (Orb) menu
3. Choose Manage
4. Click "Compact and Repair Database"

In older versions, this was found in the Database Utilities Menu.
Especially if you are doing a lot of Form and VBA work, compact and repair the database frequently. Using Windows Explorer, compare the original file-size with the compacted size (press F5 to refresh the Explorer window); the amount of compacting is often surprising.

If you have a split database, where development happens in one MDB and the data is stored in another (which is highly recommended), Compact and Repair both, starting with the data first.


Related Content:
Excel Alternating Rows
Excel User Defined Functions