2025-09-05

Book: Real World Excel

Book: Real World Excel


keyliner has published a new book on Amazon called "Real World Excel."  This is the book that shows how to solve day-to-day business problems.  570 mostly amazing pages.  Version 2025.09

Search Amazon for "Real World Excel"  (use quotes)

For Student Files, see bottom of this article


About this book:

The book is intended for beginning to intermediate Excel users. 

Sure, YouTube and AI can do the same thing, but I suspect this book is faster, and it is definitely more guided and better curated.  Written by an honest-to-god real human, I show how to solve real problems.  Learn the tips and tricks you need to get real work done.

How do I know this stuff?  I've spent decades beating data into submission and people are constantly asking me how to do this-and-that.  This book distills my experience into one place.   Keep-in-mind, this is not a reference guide; instead, it is a training book. 

Topics include:
Basic Excel formulas and navigation, 

along with:
Parsing Names and Addresses
TaxTable lookups
Importing csv and txt files without screwing things up
Pivot Tables
xLookups to solve the most interesting problems
Picture clauses
Custom functions - write your own Excel verbs
and useful formulas galore

There are about 700 illustrations, each cropped and annotated, and they show exactly what is needed for the topic being discussed.  There are no paper-wasting full-screenshots here.

Sample illustration, snipped directly from the book

When a formula or concept is described, I show exactly what you need to know, and I show the errors and bugs you might encounter.  Things like leading zeroes being accidentally stripped, date-conversions gone awry, parsing names from badly-formed lists, and numbers masquerading as text; all are shown with clear examples.  

Another fabulous sample illustration

Sample Student Files:

There are dozens of Student files that accompany the book (see link, below).  The files are downloadable any time, without registration, and they save you from building your own test data.  Many of the files contain actual data.  For example, the ASCII text import chapters use a 30,000-row sheet containing U.S. Census data.  The Pivot Table chapter has 6,000 rows in its example file.  

Why such hefty Student files?  How else will you learn the keystrokes to navigate such monstrosities?  These are things you see in your day-to-day work and the chapters reflect that.

Yet another Excel book?

There must be a thousand books on Excel, but I think I approach teaching differently than most and I believe my book is better.  A conversational style that does not spend much time on theory.  After Chapter 1, this book gets into the details you need to be productive.  Steps are clearly marked as 1, 2, 3.

$ For roughly the price of a nice lunch, this will save endless hours watching videos.  

Publishing as a Kindle paperback allows me the space to be detailed and it keeps the price low.  At nearly 600 pages, this is clearly a labor of love.  Kindle takes a large chunk of the book sales, so this is not a money-making adventure.  And it is neat you can order this book, have it custom-printed, and be on your doorstep in about 4 days.  Remarkable.

At this time, I am only publishing a paper-edition.  Reason:  It is easier to read, follow, and bounce around than on an eReader.  Because this is a print-replica textbook, it does not fit well on a smaller screen.  Your thoughts welcome.

This is not magic.  In order to do this right, you have to devote energy and work through the examples.  Once you are done, your coworkers will come to you for dating advice and for your spreadsheet-wisdom.  This is my goal.

Student File Downloads

Open this Public GDrive link and download the student workbook files.  
The files are in a standard .zip folder, with expansion steps in Chapter 1.

* For the download, there is no logon, no registration, no nags, no advertisements.  I cannot tell or track who downloads.

GDrive Link:
https://drive.google.com/drive/folders/1WO0dGEG6lnlkbkDi1ETQN8DahN4irkA9?usp=drive_link

Folder:  "RealWorldExcel"  File: RealWorldExcel-StudentFiles-Ver1.02.zip

.ZIP MD5 Checksum:  3a-86-f2-34-02-20-a4-10-ba-5b-f3-e0-d7-fd-44-b4

SHA256:     c8e012362868da744856db657fcaf32507f156c8e346db64dba4fcccf0d612ec


- Leaving a review helps everyone, including me.  I want to hear about your progress, and I use your comments to make improvements.  If something is not clear, or you find a section cumbersome, drop me a note.  Visit keyliner.com "about".


Other books by keyliner 
Search Amazon for: 

"War and Peace Programming in C#"  
(Six volumes, 2,200 pages, 1,100 illustrations.  A porker-of-a-book that scares everyone when they first see it, but it is amazing in what it covers.  Yes, you can learn to program!  Start with the Student Guide.)

"Adventures with WordPerfect"  
(Writing books with WordPerfect)
 -- this very book was written with these techniques.  Very professional looking, eh?)

keyliner book: "Term Papers with WordPerfect"  
https://www.amazon.com/dp/B0FSYTWSW5

(For college students.  A smaller, tighter version than Adventures.)

Thank you for your consideration.
I wish you the best in your studies.

Search Amazon "Real World Excel"  with quote-marks,  by Tim Wolf


2025-09-04

Book: Term Papers with WordPerfect

Book: Term Papers with WordPerfect

keyliner has published a new book, "Term Papers with WordPerfect" -- a sister book to the previously published "Adventures with WordPerfect".

Amazon Link:  "Term Papers with WordPerfect"
https://www.amazon.com/dp/B0FSYTWSW5


This book is a subset of the larger, more complicated book and is targeted specifically to students and other manuscript writers.  This book shows how to use your word processor to write professional Term Papers, manuscripts, thesis papers, and other long documents.

If you need to write Term Papers or a thesis, glance at this older keyliner article:  Using WordPerfect for Term Papers.  

But for the past year, this has bothered me.  That article is too short to do justice and my other book, "Adventures with WordPerfect", although great, is overkill for a college term paper or thesis.  I fixed the problem by writing a shorter, more distilled book, "Term Papers with WordPerfect".


This book shows how you can do this
  • Edit large documents with complete control over formatting
  • No-nonsense footers -- easy to write in WordPerfect; damn-near impossible in Word
  • Automatic Table-of-Contents
  • Easy Page-Referencing (as in, "See Page xx")
  • Block Protect section headers with their text; no more unsightly page breaks; no more managing page-breaks by hand
  • First-of-Section - Force Page Odd, and other handy controls
  • Learn all of the best keystrokes, saving you time
  • Learn how to do graphics the right way -- both creating them and importing them into your document.
  • and more

WordPerfect?  Seriously?

I tell people it takes five minutes to learn the basics of WordPerfect, and another 20 minutes to be proficient.  With this book and another few hours, you will be a master.

I know there is already some friction, with some of you saying, "I already own MSWord (or GoogleDocs), why would I want to spend the time and money on a new word processor?"

My answer is simple:  Your sanity is worth something.  Not yelling at your word processor is worth something.  And time is valuable.  WordPerfect is not without faults, but you will find it simply behaves better.  It is worth the trouble.

I also own MS Word but I seldom use it.  Even for my day-to-day word processing needs, I stick with WordPerfect.  I suspect you will be a convert too. 

WordPerfect does things that Word cannot.  For example, WordPerfect has a unique way of handling its formatting.  Formatting, such as a Bold, Font, or Tab changes, are all tracked in a feature called "Reveal Codes".  Every code, every character, every change-of-heart, is tracked by these codes and the codes are all visible.  Nothing is hidden.  

Click for a larger view


This means when some word or sentence mis-behaves, it is easy to see why, and more importantly, easy-to-fix without re-typing.  


My Recommendation

If you have a big project, buy this book (naturally, I'd say that).  Then download Corel's WordPerfect Home and Student Edition for a free 30-day trial.  For about the price of a nice lunch, you can kick the tires and try this out.  You can easily go through the most important parts of this book in just a few evenings.

When you do this, pay close attention to the setup in Chapter 1, as well as the keystroke chapter.

"Term Papers with WordPerfect" does not have the chapter or style-complexities needed by a full-fledged book.  Nor does it spend time on how to publish.  I carefully cut and tightened the TermPaper book to be more succinct, with many new graphics.


Links:
Amazon link:  Book:  Adventures with WordPerfect
https://www.amazon.com/Adventures-WordPerfect-Writing-Books/dp/B0CRZD2QPR

Amazon link:  Book:  Term Papers with WordPerfect
https://www.amazon.com/dp/B0FSYTWSW5

Amazon link:  Books:  War and Peace Programming in C#
https://www.blogger.com/blog/post/edit/1585105787473796476/4797889075679590116#

Amazon link:  Book:  Real World Excel
https://www.amazon.com/Real-World-Excel-Tim-Wolf/dp/B0FRSJP1JV

Articles (somewhat dated now)
keyliner:  Using WordPerfect for Term Papers
keyliner:   WordPerfect -- why this instead of MSWord
  

T.


2025-09-01

Book: Adventures with WordPerfect

 Book: Adventures with WordPerfect

keyliner has written a book, Adventures with WordPerfect  -- a book about how to write books using WordPerfect.

Amazon link:
https://www.amazon.com/Adventures-WordPerfect-Writing-Books/dp/B0CRZD2QPR

This book shows how to write books with WordPerfect.

In here, learn how to make a multi-chapter book, with a table-of-contents, indexing, footnotes, and end-notes.  The document can be as large as you could imagine, and everything will work. 

As you will learn, to do this right, it is not just one long continuous document.  As can be imagined, a 300 page book (or even 700 pages) becomes unmanageable.  WordPerfect has a unique way to tame and organize your writings.

This book shows how you can do this

  • Edit multi-chapter books
  • Only the chapter you are currently working on needs to be exposed
  • Set "Styles" -- controlling the look-and-feel of chapter headers, section headings, indentations, margin releases, and the like
  • Change the style one time and all chapters absorb the change -- this means consistency throughout your document
  • Automatic Table-of-Contents
  • Back-of-book Indexing
  • Easy Page-Referencing (as in, "See Page xx")
  • Block Protect section headers with their text; no more unsightly page breaks; no more managing page-breaks by hand
  • First-of-Chapter - Force Page Odd, and other handy controls
  • Learn all of the best keystrokes, saving you time
  • Learn graphics the right way -- both creating them and importing them into your document.
  • Complete steps for publishing to Kindle (just like this book)

Seriously, WordPerfect?

I tell people it takes five minutes to learn the basics of WordPerfect, and another 20 minutes to be proficient.  With this book and another few hours, you will be a master.

I know there is some friction, with some of you saying, "I already own MSWord (or GoogleDocs), why would I want to spend the time and money on a new word processor?"

My answer is simple:  Your sanity is worth something.  Not yelling at your word processor is worth something.  And time is valuable.  WordPerfect is not without faults, but you will find it simply behaves better.  It is worth the trouble.

I also own MS Word but I seldom use it.  Even for my day-to-day word processing needs, I stick with WordPerfect.  I suspect you will be a convert too. 

 
WordPerfect does things that Word cannot and it does it in a way that is less confusing.  You will be pleasantly surprised.

WordPerfect has a unique way of handling its formatting.  Formatting, such as a Bold, Font, or Tab-setting change, are all tracked in a feature called "Reveal Codes".  Every code, every character, every change-of-heart, is tracked by these codes, and the codes are all visible.  Nothing is hidden.  

Click for a larger view

This means when some word or sentence mis-behaves, it is easy to see why, and more importantly, easy-to-fix without deleting and re-typing.  


Fundamentally, WP behaves differently than Word.  Word anchors most formatting changes to a paragraph and those changes stay with that paragraph -- even if it is copied and moved-about.  

On the other hand, WordPerfect drops a code at the cursor position and that change flows down through the document until told to change.  (Sure, it can also highlight a paragraph and make its change there, but by default, it is a "set one time and it sticks" mentality) 

For example, my book, Real World Excel is nearly 600 pages long, 18 chapters, 700 illustrations.  One day I decided to change the font from Arial, 11 points to Century School, 10 points.  One change at the top of the main document and it cascaded through all chapters.  All chapter heading (with a larger font), all subheadings, all italics, all bolds --- all changed to the new font and the font change was proportional.

More importantly, even though every page was wildly-reformatted, all graphics stayed where they were supposed to, and all page-breaks behaved.  In other words, with only a five minute review, the entire book re-formatted and all was well.


My Recommendation

If you have a big project, buy this book (naturally, I'd say that).  Then download Corel WordPerfect's Home and Student Edition for a free 30-day trial.  For about the price of a nice lunch, you can kick the tires and try this out.  You can easily go through the most important parts of this book in a few evenings.

When you do this, pay close attention to the setup in Chapter 1, as well as the keystroke chapter.

Shorter Projects - Term Papers

If you need to write Term Papers or a thesis, glance at this keyliner article:  Using WordPerfect for Term Papers.  The trouble is that article is too short to do justice and this book, "Adventures with WordPerfect", although great, is overkill for a college term paper or thesis.  I fixed the problem by writing a shorter, more distilled book, "Term Papers with WordPerfect".


"Term Papers with WordPerfect" does not have the chapter or style-complexities needed by a full-fledged book.  Nor does it spend time on how to publish.  I carefully cut and tightened the TermPaper book to be more succinct, with many new graphics.


Links:
Amazon link:  Book:  Adventures with WordPerfect
https://www.amazon.com/Adventures-WordPerfect-Writing-Books/dp/B0CRZD2QPR

Amazon link:  Book:  Term Papers with WordPerfect
https://www.amazon.com/dp/B0FSYTWSW5

Amazon link:  Books:  War and Peace Programming in C#
https://www.blogger.com/blog/post/edit/1585105787473796476/4797889075679590116#

Amazon link:  Book:  Real World Excel
https://www.amazon.com/Real-World-Excel-Tim-Wolf/dp/B0FRSJP1JV

Articles (somewhat dated now)
keyliner:  Using WordPerfect for Term Papers
keyliner:   WordPerfect -- why this instead of MSWord


2025-04-09

Windows File Share - Cannot access shared folder

Windows File Share - Cannot access shared folder
Windows File Share - Can't access shared folder
Windows File Share - Making a reliable file share


Issue

Trying to map a drive to another computer in the home network fails with a "Cannot access shared folder", or you are prompted for a user-id/password that should work, but doesn't. 

Likely solution:
Assuming all other settings are correct, the remote computer's account is a non-administrative user (and should stay that way).  Instead, on that remote computer, login with that machine's admin account.  This seems like a design flaw in Windows.

Details:

For years, I've had troubles making a reliable Windows share connection with the computers in my local network.  It sometimes worked, sometimes not.  More typically, it would start to work after an initial failure.  These steps make for a more reliable network.

For this discussion, assume two computers:  A desktop and a laptop (any two computers)

Prerequisites:

  • Both computers must have password-enabled Windows accounts (logins)
  • The remote computer must be powered-on, but does not have to be logged in to a user-account.  The remote computer can be on a screen saver (but not asleep).  The remote computer can have all users "logged-out."
  • Both computers must be on the same physical network (home network)
  • Both computers (should be) in the same Windows Workgroup (untested for this article; assumed they are in the same Workgroup), and it is helpful if both have a friendly name.
Windows Workgroup:

Recommended change: On each workstation, confirm the workgroup name: 
 
A.  Open Windows Settings (the Gear icon), [System] tab

B.  In "Domain or Workgroup"

Consider renaming each PC to a friendly name. 
Some PC's come from the factory with a name like "W3b29411a" -- feel free to change.  The name should be relatively short, no spaces.

In the same panel, make the two machine's Workgroup name the same. 
In this example, "WOLFHOUSE"

Click for larger view


Network and Internet

Microsoft is confused in this area.  The settings which need changed are scattered in various control panels, and where these settings are is incoherent.

I am unhappy with some of the steps in this section because some of the settings can only be run while logged in as an administrator -- and there does not seem to be a way to promote a non-administrative account with enough rights to do this.  This means temporarily making that user an administrator, make the change, and return them to normal rights.

 If you are running your day-to-day login as an administrative user, you are doing this wrong, and most people are wrong.  See:  https://keyliner.blogspot.com/2020/02/windows-10-administrative-accounts.html

1.  In Windows Settings (the Gear icon) 

In [Network & Internet] (left-nav)
In center list, choose "Ethernet" or "Wifi" (depending on your current connection)
Poke around the center menus, for example, clicking "Wolfhouse Wifi"
Confirm both computers are marked (*) Private Network


2.  On each computer:

In Settings (the gear icon)
Select left-nav "Network and Internet"
Scroll down and select "Advanced Network Settings" from the center list
Select "Advanced Sharing Settings"

In Private Networks:
[x] Turn on "Network Discovery"
[x] Turn on "Set up network connected devices automatically"
[x] Turn on "File and Printer Sharing"

Leave Public Networks turned off

In "All Networks", many articles recommend turning off 'Password Protected Sharing'.  This is risky and not recommended, no matter what other people say.  

2a.  Start, Run, "CMD" (run-as Administrator)
From the DOS command Prompt, type these commands, all on one line:

netsh advfirewall firewall set rule group="Network Discovery" new enable=Yes
- Look for "updated 62 rule(s)"

netsha advfirewall firewall set rule group="File and Printer Sharing" new enable=Yes
- Look for "updated 46 rule(s)"


Services:

3.  On each workstation in the network (regardless of the user logged into that workstation):

- Click the Start Button and immediately begin typing the work "Services"
- When offered, select "Services" (Services.msc) - choose "Run as Administrator"

3a.  In the list of services, locate these six services:

"Function Discovery Provider Host"  (illustrated)
"Function Discovery Resource Publication" (illustrated)
Network Connected Devices Auto-Setup
Network List Service
"SSDP Discovery"
"UPnP Device Host"


3b.  For each service, change the Startup Type from (Manual) to "Automatic (Delayed Start)"


Why are these services not set to auto-start when Sharing is turned on?  No clue.  Some of these auto-start *after* a first network share attempt; some do not.  By having these services always running at machine-boot, network sharing is more reliable and consistent. 


Building the Share:

Microsoft calls common folders a "Share" -- where one computer can open a folder on another and can write and update files.  

In this example, the desktop computer is named "Oscar" and the laptop is named "MaryLeno".   The desktop is trying to reach the laptop's drive.  Assume a folder on a laptop's C: drive, named "C:\Data" 

The goal:  Make this folder 'openable' from the desktop with these steps.

On the Laptop (the remote computer)

A.  Using File Explorer, locate the "C:\Data" folder (any folder).  

Highlight the folder on the "detail side"


It is helpful if this folder is 'higher-up' in the directory tree, saving from having to build lots of shares for lower folders.  Permissions are set at this level and flow down, through all subfolders.  Grant "Everyone" (full-control) rights; rights can be restricted in a later step. 

If a sub-folder needs to be "ReadOnly", with different rights than another Share, it needs to have its own Share Name and cannot live within an upper-share.  This may force building a whole series of little sub-shares, or it may force you to move the ReadOnly Share to another location on the hard disk.

Be leery about sharing the entire "C:\Users\<you>\Documents" (myDocuments) folder.  You might consider making a sub-folder, such as "...\Documents\Public".  "Documents" is more sensitive, with more secret stuff, than would be found in a normal data folder.


B. On the highlighted folder, right-click, 

Choose "Properties"
Click "Share"


C.  In the text box, type "Everyone" (Add)

When prompted, choose "ReadWrite"

"Everyone" does not mean everyone in the world. This is limited to your network.  Full Control (see illustration below) seems to be a requirement to update files.  Peer-to-Peer network sharing in Windows has always been a little wonky.

D.  On OK, you are prompted:  "Your folder is shared"

Click "Done" (you are not really done...)

Although the Share is built, Windows picked the sharename, based on the folder name and if the folder name had spaces, it causes troubles later. 

There can be as many "named shares" on a computer as desired.  You can share USB drives, D: drives, CD drives, or individual folders.  I typically name my shares "data".  It could be called "myData", "theSharedDrive", "TaxFiles",  etc..

Continue with the next step.


E.  Review and Change the Share name:

In Explorer, from that top-level folder,
Select the Properties panel (near the Share button)
Click "Advanced Sharing"

- Note the [x] checkbox:  "Share this folder"

- Review the Share name; if necessary, change to a shorter name; a name with no spaces

- For example, if the folder name was "Some Random Folder" -- the sharename would be the same.  Consider renaming the share to "mySharedFolder"

Click "Permissions"
Select "Everyone" -- confirm "Full Control"
Close all dialogs


Using the Share:

Windows Sharing is screwy.  If the destination Share's user-account is a local administrator's account, the share, from the desktop to the laptop, will work as shown next.  

If the remote computer's account is a non-admin account (a "loser account" -- highly recommended), or the account was formerly an administrator, but is now demoted to a standard account, the share will not work with that user-ID, even if that user built the share!

*In other words, the remote computer can only be mapped with the Administrator's login-credentials!

On the plus side, the remote computer does not need to be logged in with either the Administrator or the original share.  The only thing needed is the machine be turned on -- and not asleep.  Just login with the admin's credentials.

The remote computer's Share's name is the computer's name + the share name:  
\\MaryLeno\Data

where "\\" indicates a server name.  Here, the laptop's name is "\\MaryLeno"
(or from other thoughts:  \\MaryLeno\Public)

If a similar share was built on the desktop computer, it could have been called:
\\Oscar\Data    or
\\Oscar\myRandomFolder

In this example, the share was made on the laptop. 
From the Desktop, access that drive (that Share) by:

a.  From the desktop, launch File Explorer

b.  On File Explorer's top address line (the path area), type

"\\MaryLeno\Data"
(no quotes, where "data" is the Laptop's Share name, as defined above)

c.  You may be prompted for credentials.

Use the login name from the remote computer's point-of-view -- the user's name on the remote computer.  Use the same password that user would type when unlocking the PC when it first boots

To find which user name to use:  On the Laptop, Start, Run, "CMD" (a DOS prompt).  Note the path name.  (There are other ways of finding this name, such as typing "whoami")


To find the computer's name:
From File Explorer's left-nav, "This PC", Right click, "Properties"
or at the CMD / DOS Prompt, type "Whoami", seeing the computer name:  Oscar\trayw


Possible Problems:

The (remote) computer does not appear in File Explorer's "Network"

Possible solutions: 
- A share was not built
- The "Network Discovery" settings were not set (step 2, above)


Possible Problem:

The login credentials do not work -- but they should.  You know the user-id and password is right and you know that UserID has an actual login (and profile) on that workstation.

Solution 1:  It appears you must use an Administrator's credentials to login to the Share.

Possible Problem:

I don't want to give away my admin credentials.
Does not seem much hope here.  You could create a new account, such as "ShareUser" -- but it would have to be admin in order to present the share.

2025-03-09

Password Generator

Password Generator - program for building lists of random passwords.  Length and complexity are controlled by options.  Final results are written to an ASCII file.

This is a free Keyliner download that is a stand-alone executable.  No installation or configuration is required.  This program does not require registration, nor are there ads or nagware. Free to use for personal and commercial use.  Tested on Windows 7 through 11. 


For a company's public wireless access, we needed a way to generate passwords with a one-week life-span, starting Monday morning through the next Sunday night.  


This program generates several year's worth of weekly passwords, writing results to a tab-delimited file. 


When run, it writes a simple tab-delimited text file, editable with Notepad or Excel.  In the three columns are that week's password, the starting date and an ending date.  If you only need passwords, check the option [x] Passwords Only, or simply ignore the dates.

Installation:

There is none.  Download, expand the ZIP, and run.
No spying, no adware, no registration, no logins, no kidding.

This is self-contained .exe that does not need installation, registry changes, or configuration files.  Place the .exe, and its related files, in any directory.  Double-click to run.

Since keyliner cannot afford a signing certificate, you will be prompted the file is not safe (being downloaded from the internet).  Click "more information" and allow the program to run or see below for better instructions.


Follow these steps for a more professional installation:

This program should be copied to ProgramFiles so it gains the protection of other Windows security features. Total time: about a minute.

A.  Download the .ZIP to a Download or Temp folder:

From Keyliner's public GDrive, click this link and download to a local temp or download directory.  Do not download directly into ProgramFiles

Download ZIP link
Public GDrive Download Link:  PasswordGenerator.zip

Direct link: https://drive.google.com/file/d/1P7vx-Zy8cgBeBMH2fOBhVn-OcrCH5BME/view?usp=drive_link

MD5:  c7-47-fc-51-ac-6b-65-c5-31-2f-e1-db-cf-95-af-0e
SHA256: 324fdede08e6b645e09f58d84e2185ee79fc33184d859ce665596dbcaf13cabe

When downloading, different browsers behave differently.
You may be prompted the file cannot be scanned.  Click "Download anyway"

B.  Mark the ZIP as safe-to-run:

(This step may not be needed if downloaded by Edge and you clicked "More / Download Anyway")

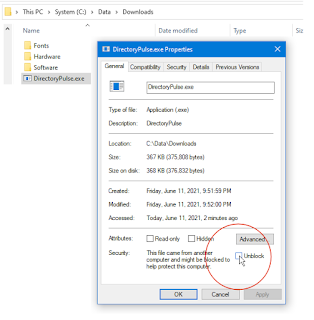
Using File Explorer, right-mouse-click the downloaded .zip
Select "Properties"
Check [x] Unblock.  This removes the "mark of the web." 

                 Click for larger view

* Only do this if you trust keyliner *and* only if downloaded from keyliner's public GDrive.  When unblocking the .zip, it also unblocks each file within the zip -- an important thought.

If "Unblock" is not visible, it has already been unlocked (by Microsoft Edge).
Once [x] Unblocked is clicked, this security menu disappears.


C.  Create a Program folder to hold the program:

Using File Explorer, open folder C:\Program Files,
Create a folder  C:\Program Files\Util


D.  Separately, Copy the .exe and two other support files to ProgramFiles\Util:

Using File Explorer,
Double-click to open the downloaded .ZIP

Copy and paste these three files from the download folder 
to C:\Program Files\Util

PasswordGenerator.exe 
PasswordGenerator.dll 
PasswordGenerator.runtimeconfig.json 
 
 
Do this copy as a two-step, copying from the download folder into Program Files.  Windows security will not let you download directly into Program Files (technically, you will not be able to remove the "mark of the web" if downloaded directly into Program Files).


E.  Create a Start Menu icon:

Using File Explorer, in C:\Program Files\Util
Right-mouse-click "PasswordGenerator.exe" and "Pin to Start"
 
The program is ready to run.  See icon on Start Menu.


Use:

1.  Launch the program.


2.  Choose a password strength.

     Default = "High" 
     (12-character passphrase, Caps, digits, likely multi-word, depending on length)

     For documentation:
  Lowest  = 8 Char,  Capitals, No numbers
  Low     = 8 Char,  Capitals, Numbers
  Med     = 10 Char, Capitals, Numbers 
  High    = 12 Char, Capitals, Numbers, likely multi-word
  Higher  = 14 Char, Capitals, Numbers, multi-word
  Highest = 16 Char, Capitals, Numbers, multi-word

     Optionally select "[x] Require special characters"      

3.  Set the Count for how many passwords to generate.
     100 is two year's worth of weekly passwords.

4.  Type an output file path and filename or accept the default:
     "C:\Temp\VisitorPassword.csv"

5.  Pick a Start Date (any Date) or ignore if not important.
     Set the Cycle Date; which defaults to a 7-day password rotation.

6.  Click Generate.

7.  Click the Notepad icon to view the resulting file.  Example results:


The generated list has passwords and dates.
To generate the file without the dates, choose [x] Password Only, no dates


Randomization Notes:

The intent is to generate multiple, random passwords (passphrases), but over the course of several hundred runs, it may assemble the same phrase.  This is okay.  Theoretically, you are assigning the phrase to different users or across wide time spans.

To help block dictionary attacks, at strengths "Higher" and above, the program generates multi-word phrases. 

Password lengths are guaranteed to be the minimum length indicated, but are often longer, with variations in lengths.  For example, a "High" password will be a minimum of 12 characters, but will randomly generate longer, 12 to (16) characters.  This makes passwords less predictable.

When generating single passwords, press ctrl-C to copy the password to the clipboard.


Drop me a note on how you used the program.  I welcome suggestions.

Humor:  Earlier versions of this program generated these passwords:  "FriskyHamster27".  Management called.  Program modified.  I am still fond of FriskyHamster.

2025.03 Updates:
Recompiled using .dotNet 8.0 libraries
Added several hundred-word randomizations
Added "password only" option
Added clipboard capabilities
Added Set Sunday/Monday start dates

-----------------------
For an interesting discussion on passwords and for the reasons for this program's design, see this keyliner article:  Link:  "Better Safer and Stronger Passwords"


Download link
Public GDrive Download Link:  PasswordGenerator.zip

Related articles:
keyliner link:  Better Safer and Stronger Passwords
keyliner link:  Calculate MD5 Checksums


2025-02-02

PaintShop Pro - Using a masking layer to change colors

 PaintShop Pro - Using a masking layer to change colors.  For this example, change a person's eye color.


Goal:
Change an eye-color using PSP's Mask feature.
In the photograph, anything's color can be changed with this technique.  For example, a bridge or a river
.

This can be better than PSP's "Color Changing Tool".  Instead of "repainting", this adjusts the hue and saturation, without losing details in the object

I found an AI-generated instructional video on YouTube documenting these steps but the video was unusable.  Here are the steps in a more digestible format.  AI-generated person's Eye-model pilfered from that video.

Using PaintShop Pro 2023
These steps should work with any version and these rough steps will probably work in any photo editor.

Steps:

1.  In the layers pallet, duplicate the background layer
 
Right-mouse-click the layer, select "Duplicate"
Right-click the new layer's name, changing its name to something like "myMaskedLayer"

2.  Highlight the new (duplicated) layer

In the Layers pallet, along the bottom row of icons, click the Mask icon
Choose "Show All"

A new group forms
Note the new White Mask sublayer

3. Add an "HSL" Adjustment Layer

In the new Mask Group, select the inner full-color photograph (illustrated below, in Blue)
(For now, ignore the white Mask layer)

On the bottom, click the Layer's "Adjustment Layer" icon (bottom of pallet)
Select menu "Hue/Saturation/Lightness" (HSL)

4.  An HSL popup appears

A new gray-scale image displays
Check [x] Colorize

Note:  All sliders move to zero
Click OK

5.  Select the White Mask Layer


In the Color Pallet's menu:
- Set the Fore-Color to Black (click the black/white diagonal button)
- Set the Back-Color to White

6.  Paint the eyes

While still on the "White" layer

Select the PaintBrush tool
Set Hardness = 0
Opacity = 100
Size = (Any comfortable, but smaller brush size)

7.  On the gray-scale "white" layer, paint the eyes with a relatively small brush. 

- Use the mouse's roller-wheel to zoom
- Zoom in 1000% is common

You are essentially painting the eyes with a black brush, but since this is on the colorized masked layer; the background color bleeds through


When done, note the white-layer's eyes, showing as two dark eyes on a snowy-white background:

8.  Invert the layer

While still highlighting the "white" layer
Select top-menu:  Layers, "Invert/Mask Adjustment"

The photo returns to normal colors
(The "white" layer, with its two little eyes is now a "black" layer with two white eyes (not illustrated))

9.  Select the HSL layer

Right-click, "Properties"
Adjust the slider-bars until happy with new eye colors

At the group's level, toggle the layer's "Visibility" icon off/and on to see the effect:

10.  Optional: Adjust the effect's lightness

While highlighting the HSL Layer
Select the Pallet's bottom button "New Adjustment Layer"
Choose "Curves" from the sub-menu (not illustrated)

Slide ("scootch") the two sliders inland a "smidge"

Final results:

-end

2025-01-31

Powershell - ParseExact with 3 argument(s): String was not recognized as a valid DateTime

Powershell Code - ParseExact Date Conversion - String not recognized as valid DateTime


Windows Powershell

Goal:  Read and validate a string-date (with a known and expected format). 
Guarding against February 31st and stuff like that

Technique:
Cast the string into a [datetime].
Use ParseExact to convert the date
Use try-catch to detect detect failures.

Code:

[DateTime]$dtconvertedDate           #Declare DateTime Variable
[string]$strmyDate = "01/01/2025"    #Variable to test

try
{
   # Cast the ParseExact as [dateTime]

   # Unsafe
   $dtconvertedDate = [datetime]::ParseExact($strmyDate, "MM/dd/yyyy", $null)

   # Safer
   $dtconvertedDate = [datetime]::ParseExact($strmyDate.Trim(), "M/d/yyyy", $null)
}
catch
{
   # not illustrated -- not a date
}

Possible errors:
Exception calling "ParseExact" with "3" argument(s): "String was not recognized as a valid DateTime."

Possible answers:
-  $strmyDate  is from an Excel-exported CSV or tab file.   Be sure to .Trim().  Unsafe otherwise.

-  Mask  "MM/dd/yyyy" is case-sensitive!

-  Mask "MM/dd/yyyy"  can be, but is not always safe. 
    Date strings with leading zeros vs not:  "1/17/2025" -- MM/dd will fail.
    Use "M/d/yyyy"

-  Mask in wrong format:  MM-dd-yyyy  vs MM/dd/yyyy
    hyphens vs slash.  ParseExact with a mask cares.