
How to: Setup and install a NetGear Nighthawk AXE8700 Router (RAXE300)

The setup can happen manually, without installing NetGear's cell-phone app, and without using wizards ("Genie"). If all goes well, existing wireless devices won't even notice the rug was pulled out from under them.
This article assumes you are using a cable modem with a separate wireless router, illustrated as the NetGear AXE8700. All wireless routers, all brands, behave similarly.

Prerequisites:
A. A laptop or desktop with a wired RJ45 network cable/port (these steps can also be done wirelessly, not described here).
B. A short network patch cable
C. Able to login to your existing Wireless network router's admin panel. The password may be printed on a label on the router, or if changed, refer to your own documentation. If you do not have this password, and have no hope of finding it, continue with the article, with the understanding you will have to forget-and-reconnect all wireless devices. This is not horrible.
Discover Existing Network
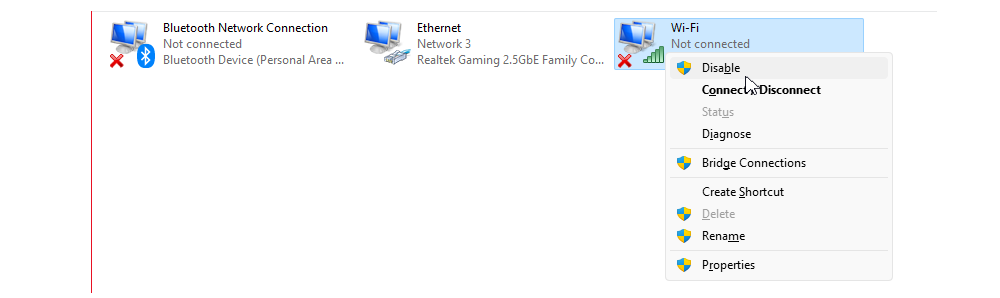
1. Click once on the Windows 11 Start Menu and begin immediately typing "View Network Connections" (control panel)
2. On either your network card or your wireless card, right-mouse-click and select "Status", then "Details"
3. Write down the IPV4 address
This is the router's IP Address and it is almost always (always!) dot-one. For example, mine is 192.168.200.1 (Yours might be 192.168.100.1, etc.)

4. From any browser URL, type the IPV4 address, literally typing the dot-one address (for example: 192.168.200.1).
A login screen appears.
Type userID "admin" followed by your router's configuration/login password.
(If you cannot login to your existing wireless router, skip this step. Consider opening your cell-phone's Settings screen, and look for "Network" -- note the broadcast Network names (SSID's) for your home network -- for example, mine are always called "Wolfhouse-".
Once logged in, select the "Advanced" section (varies by router, by manufacturer), and browse-around looking for the Wireless sections.
Note the Wireless SSID Names (case-sensitive)
Note the passwords (some router brands do not show passwords)
Typically default names are the unimaginative NetGear-5G, NetGear-24G, NetGear-24-G-Guest, etc. At my house, they are named "Wolfhouse-5G", "Wolfhouse-24G-Guest", etc.
Initial Hardware Setup
A. Optionally connect the router to the Cable modem.
The new router can be initially-configured as a stand-alone box (off the Internet / not connected) and then dropped into place at the last minute. Better if the router is near the cable-modem: If so, connect from the cable-modem's yellow-out-port to the new router's second yellow-port, marked "Multi-Gig 2.5G/1G" -- use this even if your cable modem does not support the higher speed. (To set-up the router without impacting the current wireless, leave this cable disconnected.)

B. Connect your PC to the wireless router, LAN Port 1 (black port)
Assuming you have a wired Ethernet Cat-5 network port on your desktop/laptop, connect the network cable to LAN Port 1.
On your desktop or laptop, temporarily disable any wireless cards (see the network control panel):
(If you do not have a hard-wired network port, I believe (but did not test) these configuration steps over the default wireless.)
C. Power on the new router.
Wait about 90 seconds or so (this router is slow to boot), then power-on your computer.
(As an aside, your PC will acquire a new DHCP IP Address, similar to 192.168.1.3)
D. Login to the router's administration screens
From your Windows computer, open Microsoft Edge or Chrome, type this dot-one URL:
192.168.1.1
(Literally typing the router's default IP Address. Later this address changes to 200.1)
Other brands may present as [192.168.1.1], or [192.168.100.1]. Use Edge or Chrome. Firefox and other browsers seem to misbehave in some of the configuration screens.
Initial "Genie" (Wizard) login panel
1. You will arrive at a Netgear setup page where it offers to install using a phone-app.
Ignore the offer and scroll down the page.
At the bottom, see the link "If you don't have a compatible mobile phone or tablet, click here". Click the link and accept the lawyer-induced license agreement. Sorry, no screen shot.
2. At the "Wan Preference"
-- select "Multigig Port 2.5G/1G" -- selecting this port, regardless of the speed of your cable-modem.
3. You may be prompted, "You are not yet connected to the Internet. Do you want the NetGear Genie to help?" Select "No, I'll do this myself"
4. Invent a new admin password
Admin account: admin (case-sensitive)
Admin Password: __________________
I recommend 12 or more characters - using a password phrase. Write it down.
Complete the 2 security questions.
Important: Write down both the security question and the security answers*
*Reason: As of 2024.07, NetGear has a bug. If you forget the admin password and it prompts for the security questions -- it does not show which security question you chose! It says, "what is the answer to question 1" -- not helpful; a bug!
5. If the router is wired to the Cable Modem, [X] Check "Smart Connect". Otherwise, leave unchecked.
6. Wireless SSID names and passwords
When prompted, set the 2.4G, 5G, and 6G SSID name's and passwords, following the on-screen prompts.
Ideally use the same SSID names from your old router (e.g. Wolfhouse24G, etc.). Within each type of wireless network, I typically set the 5G and 6G passwords the same, and I set the slower 24G password differently -- this is what I tell the kids -- tee hee.
The 6G connection may be new to your network.
Note: Once complete, the next page shows a report and that report may show the wrong SSID names (showing the default "NetGear-24G" names and passwords); safe to ignore. Be aware the "Guest" networks are not yet defined.
7. Allow the Firmware check -- which may or may not find an update and depends if the cable-modem is connected. Safe to temporarily ignore.
"Setup Genie is complete" (even though you didn't use the Genie steps).
After the Firmware check, you arrive at the normal setup panels.
Advanced Settings - Recommended
Click the "Advanced" Tab

1. Change the Router's main IP Address to match the old router's setup.
For example, my old router was at 192.168.200.1. Yours may have been 192.168.100.1. (Out of personal preference, I set my main network at a different default address than the out-of-box addresses.)
In the left-Nav's "Setup" section, "LAN Setup"
Edit the IP Address, changing from 192.168.1.1 to 192.168.200.1

Your desktop/laptop will lose its connection to the network and the Setup panels will (close).
- Restart your desktop/laptop to acquire a new IP Address
- At a browser, type this new IP Address (192.168.200.1) to re-open the Setup panels:
192.168.200.1
Again, login as "admin"
2. Change the default DNS servers
In the left-Nav's "Setup" Section, "Internet Setup", make this recommended change: Change from your ISP's DNS server to a safer default, choosing a new Primary DNS: Google's: 8.8.8.8. Scroll-down to find this setting.
Optionally set the secondary DNS to your ISP's value, here illustrated as CableOne's 96.dot address. For my own networks, I set both the Primary and Secondary address the same, bypassing the ISP's DNS.
You must click "Apply" to save the changes.

The router can auto-assign floating IP addresses to other devices on your network, using a feature called "DHCP". Reserve IP addresses below 10, and above 150 (or as illustrated, 100) for hard-coded devices such as an in-house web-server, a Pi-Hole, printers, and TV's.
Change the Starting IP Address to .10
Set the Ending Address to .100 (better to use 150)
"Apply"

On the Advanced tab, "Wireless" section,
NetGear-24G (Wolfhouse24G)
NetGear-5G (Wolfhouse5G)
NetGear-6G (Wolfhouse6G)
Again, if the default SSID is "NetGear-this-or-that", change the name to something like "Wolfhouse24G", "BatHouse", "FBISurveillance", etc.
5. Confirm "Guest Network"
Similarly, review each "Guest" network. In the left-Nav, select "Guest Network". Make the passwords different than production networks. I recommend only exposing the slower 24G network.
WolfhouseGuest24G (Enable and broadcast SSID)
WolfhouseGuest5G (Disable and do not broadcast SSID)
WolfhouseGuest6G (Disable and do not broadcast SSID)
* You do not need to contact your Cable Provider to tell them about the new router *
Power down your original/old wireless router
Install the new router, as illustrated at the top of this article
Return your workstation to the normal network (the Switch), LAN-Port 2, Wireless, etc. (If you previously disabled the workstation's Wireless card, re-enable it.)
Power-up in this order:
a) Confirm the Cable Modem is powered up (you do not need to turn it off during this upgrade).
If rebooting, wait 1 minute before next steps.
b) Power the NetGear Wireless Router
Wait 1 to 2 minutes for the router's status lights to turn white
c) From your normal workstation, use a browser to test Internet connectivity, browsing Google or some other external site. If it can't find the network, reboot the workstation to get a new DHCP address.
d) Test your network printers. Reboot the printers if necessary.
Possible Problems:

Final Cleanup
Consider and test these other devices that might be on the wireless network.
Laptops
Cell Phones
Tablets
TV
SAN drives
Thermostats (NEST, etc.)
Security Systems
Water Detectors
Light Switches
Garage Door openers
Sprinkler Systems
Can Openers (joke)
If the device does not find the network, a reboot should fix the problem (provided your SSID names and passwords are the same as before. If not,
have each failing device "Forget" their network and re-login.)
Rare Items:
Consider these esoteric items that I have on my network:
Rare: If you have a Raspberry-Pi Pi-hole DNS Sink Hole, re-login to the NetGear Wireless router setup screen (192.168.200.1). Change the DNS from your ISP's address (or from 8.8.8.8) to your Pi-Hole's address, removing the previously-set addresses. See article, below.
Primary DNS: 192.168.200.151 (my Raspberry-Pi's hard-coded IP Address)
Secondary: 192.168.200.151 (repeated, or 8.8.8.8)
Rare: If you have a local https webserver running inside your network, it needs holes punched through the firewall for ports 80 and 443. See article, below.
Rare: If you have a local webserver, check your external-facing IP Address. It likely changed. At your Domain Provider (Godaddy, etc., likely different than your ISP), review your "A-Record's" IP-address.
Final, Final Cleanup:
Use a Brother Label Printer and print a snazzy label, showing the Router's IP Address (dot-one) and its new administrative password. It might be helpful to also print the 24G Guest password. Stick these on the new router. (Then, remove the factory password label). Better yet, document these settings in a notepad document.
After a few days, once you know all is well, wipe-out the old router's memory: With the old router disconnected from the network, power-up the device. Find the micro-reset button, found on the back of the device. With a pencil-tip, press and hold for about 10 seconds, then power-off.
Other Related keyliner links:
Install your own Webserver
Stop Advertisements using a Raspberry-Pi Pi-Hole