
Programming Problem: Visual Studio C# Linked DLL - Unhandled System.IO.FileNotFoundException. Could not load file or assembly 'System.Runtime, Version=6.0.0.0.... File Not Found Exception
When attempting to link a DLL into a Visual Studio (2022) .Net program, I ran into this ~ problem and it took days to figure this out. The Internet suggested all kinds of crazy solutions.
Error:
When linking a DLL into a Visual Studio C# Solution.
Application.Run(new Form1()) fails
 |
| The Crash (Click for larger view) |
In the Windows Event logs, this shows as a CLR20R3 error
Problem:
The .DotNet version of the application is different than in the linked DLL's .DotNet version.
In Visual Studio, separately open both the current solution and the DLL.
In each, select "Project, Properties"
I'd bet the DLL's code points to .DotNet 6.0 (.Net60)
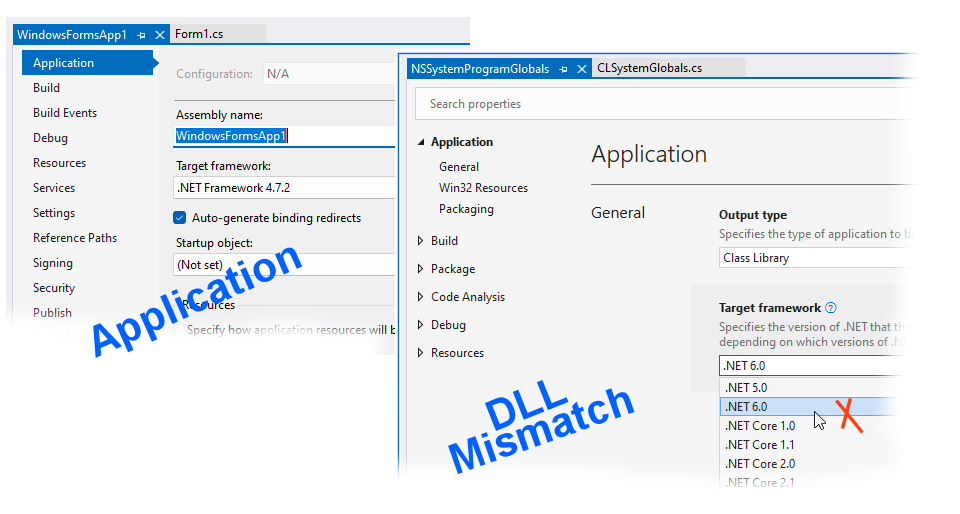 |
| (Click for larger view) |
Rebuild the DLL solution from scratch.
Pick "Class Library (.Net Framework)" - Do not pick "Class Library"

Recompile (build) the solution and copy the DLL into your project as a new reference.
This technique, along with more verbose descriptions, can be found in my C# programming book, "War and Peace Programming in C#", Volume 2, Chapter 9.

Full steps for Building a DLL
This example builds a class called "CLSystemGlobal", in a NameSpace "NSSystemGlobal" and this example is meant to store System variables that can be used by all projects in a shop. The DLL is intended to be linked into most of your shop's programs.
I'm a big fan of naming things properly. Many steps are rename/confirm steps. Doing this right makes later steps easier to understand.
1. Start a new Visual Studio C# project.
Select /filter-by C#, Windows, Library ("Class Library (.Net Framework").
Do not select "Class Library"
2. Configure your new project:
Project Name: "NSSystemGlobal"
Location: (a dedicated folder of your choosing)
For example, "C:\data\source\NSSystemGlobal"
Framework: (".Net Framework 4.72") -- matching your other program(s)
3. Rename default Class
Results: A new Visual Studio project, with code-view.
In Solution Explorer (right-nav), rename the solution, application, and class names. Right-clicking each for the rename menu. ".cs" extensions required, as shown in the rename menus.
-Rename the Solution from "ClassLibrary" to "NSSystemGlobal"
-Rename the Application Name to "NSSystemGlobal"
-Rename the Class.cs to "CLSystemGlobal"

4. In Code View, confirm or rename the NameSpace and the ClassName, illustrated.
Highlight the namespace name, re-type/rename. Then click the "screwdriver" icon on the left margin and select "rename". Similarly, rename the "public class." These may already be named.

5. From top-menu, select "Project, Project Properties" (NSSystemGlobal Properties)
Confirm the AssemblyName and
Default NameSpace
are both "NSSystemGlobal"
 |
| (Click for larger image) |
In button "Assembly Information", name versions, company, etc. (not illustrated)
6. Create the methods and variables needed in this class.
This example demonstrates a simple variable, holding a favorite default server name. Build other functions and methods as needed.
Returning to CLSystemGlobal.cs code view,
Directly below the class's opening brace, create a variable for the main database server's name. Notice there is a private and a public version of the name. This follows best practices:
(example variable or methods, method not illustrated here)

7. Compile the DLL with these steps:
a. From the top-ribbon, change from Debug to "Release"
b. From top-menu, Build, "Build Solution"

8. Save all changes in the solution and close Visual Studio
The DLL is compiled and ready to be copied into other projects.
How to see the results are described next.
Application Steps:
A. Create a "lib" folder
Using Windows Explorer, location the project/solution folder, where your application is stored.
Create a new folder at the same level as the .sln file. For example, C:\Data\Proj\myWindowsApp1
Create FolderName: "lib" (any name, this is a common convention)
B. Still in File Explorer, copy the compiled DLL
- Tunnel to (C:\data\source\NSSystemGlobal) -- the location of the Class project
- Tunnel to the \bin folder
- File-Copy: NSSystemGlobal.dll
- Paste into (WindowsFormsApp1\lib) / the newly-created "lib" folder
C. Launch Visual Studio,
open your application, "WindowsFormsApp1"
D. In Solution Explorer, add a reference for the new DLL:
Right-mouse-click, "References",
Select "Add Reference"
Browse to "\bin\NSSystemGlobal.dll" (the copy in your project's solution)

E. Form1: Code
(assuming this class is needed in multiple locations throughout the program)
Three steps are needed:
1) Add statement, "using NSSystemGlobal;"
2) Where class-level variables are defined, declare the class, giving a cosmetic name:
"CLSystemGlobal SystemGlobal"
3) In the form's constructor, instantiate the class:
"SystemGlobal = new CLSystemGlobal();"
illustrated:
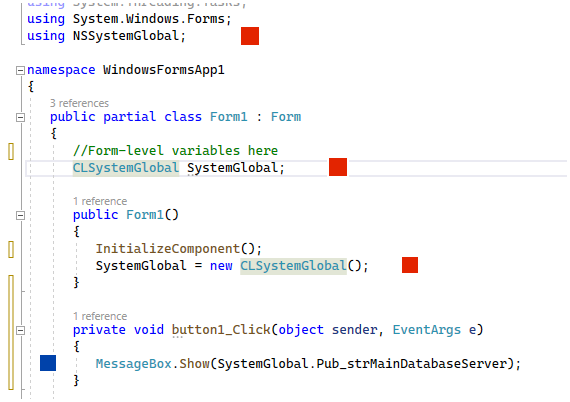
F. Using the Variable
To retrieve a SystemGlobal variable, retrieve using this (button1_Click) syntax:
MessageBox.Show(SystemGlobal.Pub_strMainDatabaseServer);
To use a method (not illustrated in this class):
SystemGlobal.myMethod();
-end
References:
Search Amazon for "War and Peace Programming" - Visual Studio C#. This is a six-volume, 2100 pages, 1100 illustrations, that covers everything a beginning programmer needs to know about writing C# programs. Oh, my gosh, this was a fun book to write!
See the right-nav for other computer-oriented articles. www.keyliner.blogspot.com