
How to add the Bit Rate column to Windows Explorer Detail View (for music files), and making it "stick". This article was tested with Windows 7, 8, and Windows 10, 11.
Issue:
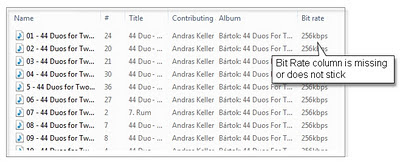
Opening an MP3 music folder with Windows Explorer shows the Name, Track, Title, Contributing Artist, and Album name -- but not the Bit Rate. Manually adding the bit rate for one folder may work for that folder but not for others; you want the bit-rate in all subfolders (albums).
Solution:
1. Launch Windows File Explorer.
2. Open your top-level music album folder (mp3 folder).
3. Windows 7 users: Expose the File Menu with these steps:
4. View the Details:
5. Locate the Field/Name headers (the columns):
Issue:
Opening an MP3 music folder with Windows Explorer shows the Name, Track, Title, Contributing Artist, and Album name -- but not the Bit Rate. Manually adding the bit rate for one folder may work for that folder but not for others; you want the bit-rate in all subfolders (albums).

Solution:
1. Launch Windows File Explorer.
2. Open your top-level music album folder (mp3 folder).
* Only do this step (this article) for your music library
* This only works for local disks (C: drive)
* This only works for local disks (C: drive)
In my case, C:\Data\Music
You may find yours in C:\Users\(your name)\Music
3. Windows 7 users: Expose the File Menu with these steps:
On the top menu bar, click "Organize," Layout, and check "Menu Bar".
This exposes the File, Edit, View menus.
This exposes the File, Edit, View menus.
 |
| Click for larger view |
4. View the Details:
For Windows 7: On the newly-exposed menu, choose "View, Details"
For Windows 10/11, click the View tab in the ribbon bar, choose "Details"
5. Locate the Field/Name headers (the columns):
In any Music/MP3 folder, locate the file/directory name's column-heading (the line with the Name, Date Modified, contributing artists, album, etc.).
Find a blank space on that column-heading section and "other-mouse-click" (right-mouse).
A list of fields will appear. It may help to maximize the screen and look to the right.
Windows 10 users may have to click "More"
A list of fields will appear. It may help to maximize the screen and look to the right.
Windows 10 users may have to click "More"
Check [x] Bit Rate.
Note: This only effects the current folder. Additional steps needed for other folders.

6. Make the change for all folders and sub-folders of (C:\Data\Music) with this one last step:
With Windows Explorer, highlight the top-level music folder; in my case C:\Data\Music
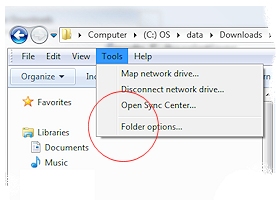
Windows 7 Users (illustrated below):
Return to Windows Explorer's top menu, choose Tools, "Folder Options."
Windows 10 Users:
From the Ribbon, Choose "Options", then "Change Folder and Search Options", (not illustrated, but similar steps)
7. All versions of Windows, continue with these steps...
(in Tools, "Folder Options" / Options)
Click the View tab
Click "Apply to Folders", then OK, closing the dialog.

Results:
The Bit-Rate should appear on all music folders and subfolders.
Related Articles:
Installing MusicBee - keyliner's favorite music player
Thanks for posting this. Got tired of adding bit rate all the time.
ReplyDeleteMany thanks - it still works!!
ReplyDeleteI didn't realise that if you set the folder type to 'music', that when you choose to save it windows will only change the 'music' type folders.
My 'something new' learnt for today.
excellent, just what the doctor ordered. Works great on Windows 8 pro...thanks
ReplyDeleteYes, thank you, this was just what i was after. Many thanks
ReplyDeleteThanks, tried a few different guides but couldn't get it to work either due to my incompetence or due to the guide being too vague. This one did the trick for me. Thanks!
ReplyDeleteVery Good (y)
ReplyDeleteThis shows bitrate in single music file. But is there any way to show avg bitrate in folder view? You can select bitrate to show in folder columns, but nothing is shown...
ReplyDeleteNo. The Bit rate information is stored at the file level. Folders have no provisions for averaging the contents.
DeleteDoesn't work. Bit rate is still only displayed in the "Music" folder". All sub folders as well as Music are set to type "music" Bit rate appears in the parent folder but NEVER in the children folders.
ReplyDeleteDid you follow step6 (Sorry late response: Too much spam on this blog and I no longer review frequently).
DeleteExactly the info I needed. Worked like a charm. Many thanks!
ReplyDeleteStill relevant. Just what I needed. Thanks!
ReplyDeleteThank you. I thought I had to install a 3rd party program. Nice tip!
ReplyDelete