I just came back from a delightful 3-day backpacking trip in Idaho's Sawtooth wilderness and was able to carry my Pentax K10 digital camera. This photograph was one of my favorites and I wanted it as my wallpaper. It took a few minutes to figure out how to crop the image properly. This article shows those instructions.
Downloading this image now:
You are welcome to download a full-sized version of this image for your own wallpaper. This image has been cropped at 1440 x 900 and will scale with all wide-screen monitors. See below for instructions.

The Need for Cropping:
Standard photographs, when saved as a desktop wallpaper, become distorted because the aspect ratio for a photograph is different than a computer's monitor. This is especially noticeable with people pictures.

If the image is cropped properly, you will get a better fit on the screen. Notice that Cropping is not the same as Resizing (see comments at the end of this article).
Although all photo-editors can crop, they are almost always limited to standard print sizes (4x6, 8x10, etc). Computer wallpapers, especially on the newer, wide-screen monitors, requires a different size. It took me a few minutes to figure this out.
Steps to Crop
(using Corel's PaintShop Pro; your editor may be different but the steps should be similar)
1. Find your monitor's screen resolution (Windows 7: Control Panel, Personalization. With XP: Control Panel, Display Settings). Note the size of the screen, in pixels. In my case, the monitor is 1440 x 900.
2. Divide the two numbers to get the aspect ratio:
1440 / 900 = 1.600.
More modern computers have a movie-screen aspect ration. For example, my laptop has a screen resolution of 1024 x 576, which is a 1.77 ratio, also known as 16:9.
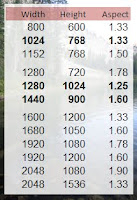
My friend, Dutch, complained this was too much math. Here is a handy chart.

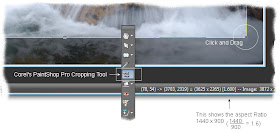
3. With Corel PaintShop Pro (or your photo editor), select the cropping tool. Click and drag.
In the lower-right corner, PaintShop Pro shows the highlighted size in pixels, but it is the next number that is of interest -- this shows the aspect ratio. With the cropping tool, click and drag across the image, dragging until the needed aspect is shown [in my case, 1.600]; this takes a steady hand.

It does not matter what size your original image was or how wide you drag the cropping tool; the only concern is the aspect ratio.
For example, the original image was 3872 x 2592 (or it could have been a postage stamp). Drag the cropping tool against the image until it is sized and positioned roughly where you would like it. The only concern is the correct aspect ratio, which should match the monitor's ratio.Once the cropping window is sized, it can be moved and repositioned until it covers a composition that you like.
By definition, some parts of the picture will be cut (cropped). The final size could be at (1440 x 900) or (720 x 450), or any other fraction, as long as the aspect ratio is correct. Windows will re-size the image as needed when it is displayed. With this said, better results (less pixelation, better colors) are found when sized the same or larger than the monitor's resolution, e.g., 1440 x 900.
4. Save the cropped image as a JPG file to your favorite photo directory. With Corel's product, click the "Crop as a new image button" on the cropping toolbar so you do not overwrite the original photograph.
Set the WallPaper:
5. Using Windows Explorer, locate the saved/cropped photo.
"Other-mouse-click" the photo and choose "Save as Desktop Background".
The image will now be on your wallpaper.
Download Instructions:
If you would like a copy of the example image for your own wallpaper, you are welcome to download it in one of two ways:
1. Download from Keyliner's GDrive (recommended -- better image quality)
2. Download illustration from this page
To download from Keyliner's Public Gdrive:
GDrive Wallpaper link
or follow these steps:
A. Begin by clicking the photo to get to a larger size.
B. On the larger picture, "other-mouse-click" and select "Save Image As"
C. Choose a location/folder.
D. Use Windows Explorer to locate the file; 'other-mouse-click' and choose "Set as Desktop Wallpaper"
The photo stored by blogger is compressed. Download from the GDrive site for a better quality picture. .
Technical Details about the photograph:
Falls are approximately 3 miles north of Toxaway Lake, Sawtooth Wilderness, Idaho, USA
18mm APC lens; 10.2mpx Pentax K10
Polarized
1/8 second, f/5.6 @ iso 100 with +.7 exposure compensation, adjusting for the white.
Handheld on a wet rock.This is a straight, non-retouched photograph
August 23, 2009, by Tim Wolf, Boise Idaho
An Aside:
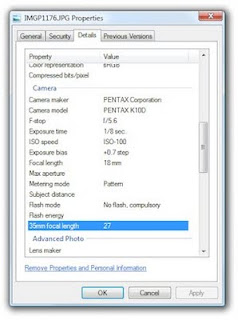
Digital Cameras record a remarkable amount of information on each photograph. From Windows Explorer, Other-mouse-click the filename, choose Properties, then [Details].

Related articles:
Commentary: Cameras and FotoSizer
Howto: Using FotoSizer
See also imageliner.blogspot.com

 In older versions, this was found in the Database Utilities Menu.